
A contact form is a must-have feature for any website. No matter how much money you invest or hard effort you put into designing your website, if you fail to offer a correct and relevant contact form to your users, you are likely to miss all your probable number of communications and leads.
Luckily with WordPress, you don’t have to put much effort to create your contact forms. To help you build a result-oriented contact form, we will show how to create a WordPress contact form today.
Elements of a Standard Contact Form
Offering a contact form makes the communication process effective for you and your website visitors. Keeping that in mind and considering a modern website design, generally, you need the following fields or elements on your contact form.
- Name
- Email and/or phone
- Message
- Security challenge
- Privacy notice
- Submit button
Ways to Create a Contact Form on WordPress
You will get a lot of free and paid options to create a contact form in WordPress. For example, you can use Jetpack to create a basic form on any WordPress site for free. There are lots of dedicated plugins to create a WordPress contact form. Since the WordPress industry is moving towards Gutenberg, today we’ll see how to create a contact form on Gutenberg. But then again, there is no default Gutenberg block to create a contact form right now.
Qubely is an easy and elegant solution to create a contact form on Gutenberg. Qubely has 2 dedicated blocks for this. One is “Contact Form” (basic, available in free & paid versions). Another is “Form Builder” available in the premium version that provides a lot of customization options. The process is nearly the same for both. However, since the Form Builder block offers more flexibility, we will be using that in this tutorial.
How to Create a Contact Form using Qubely on Gutenberg
Creating a contact form on Gutenberg is insanely easy when you use Qubely as your tool. Along with a ton of styling options for creating great websites, Qubely Pro comes with the “Form Builder” block. We’ll be using it to create the most versatile contact form on Gutenberg. So, let’s begin.
Step 1: Get the Form Builder Block on Board
To create a contact form using Gutenberg on your site, you need to install and activate Qubely Pro first. Qubely blocks are added to the Gutenberg editor as soon as you activate the plugin.
Then it’s time to start the process of creating the contact form. For this purpose, create or open the page where you want to place the contact form in the Gutenberg editing mode. Then click the Add Block option, search for Qubely’s Form Builder block and insert it into your desired place on the page. Now you are all set to shape it as your own!
Step 2: Choose a Predefined Form Layout
As soon as you add the Form Builder block, you’ll be presented with some predefined fields. And you’ll find, there are 3 layouts at the top of the right sidebar.
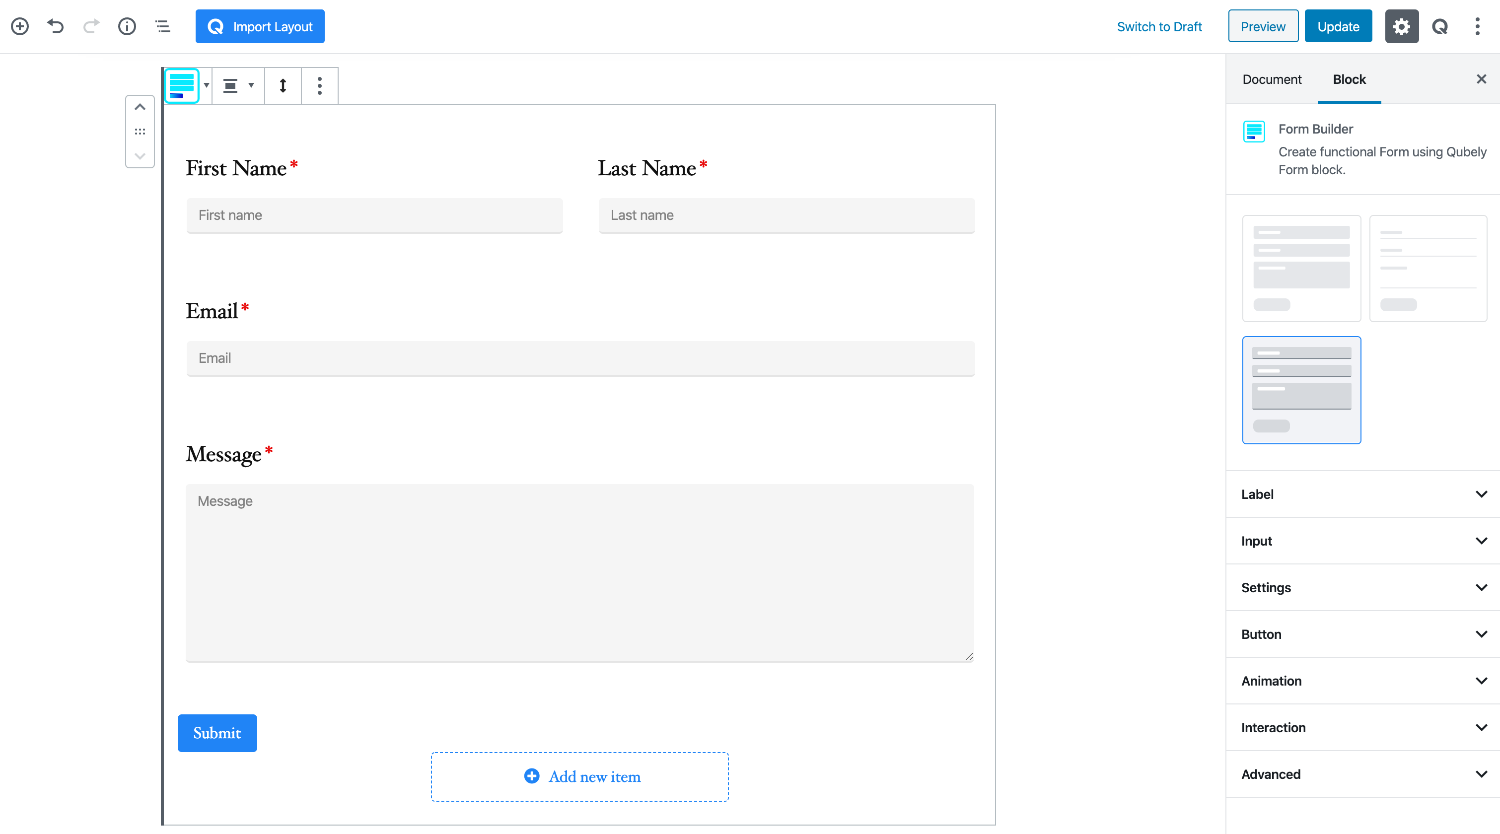
These layouts present you with preset styles, choose one from the list that blends with your design.
Step 3: Add the Desired Form Elements
The Form Builder block lets you build the form you need. You can start by creating a standard contact form to even create forms for conducting a high-level survey. In the Form Builder block, you’ll get 10 unique fields.
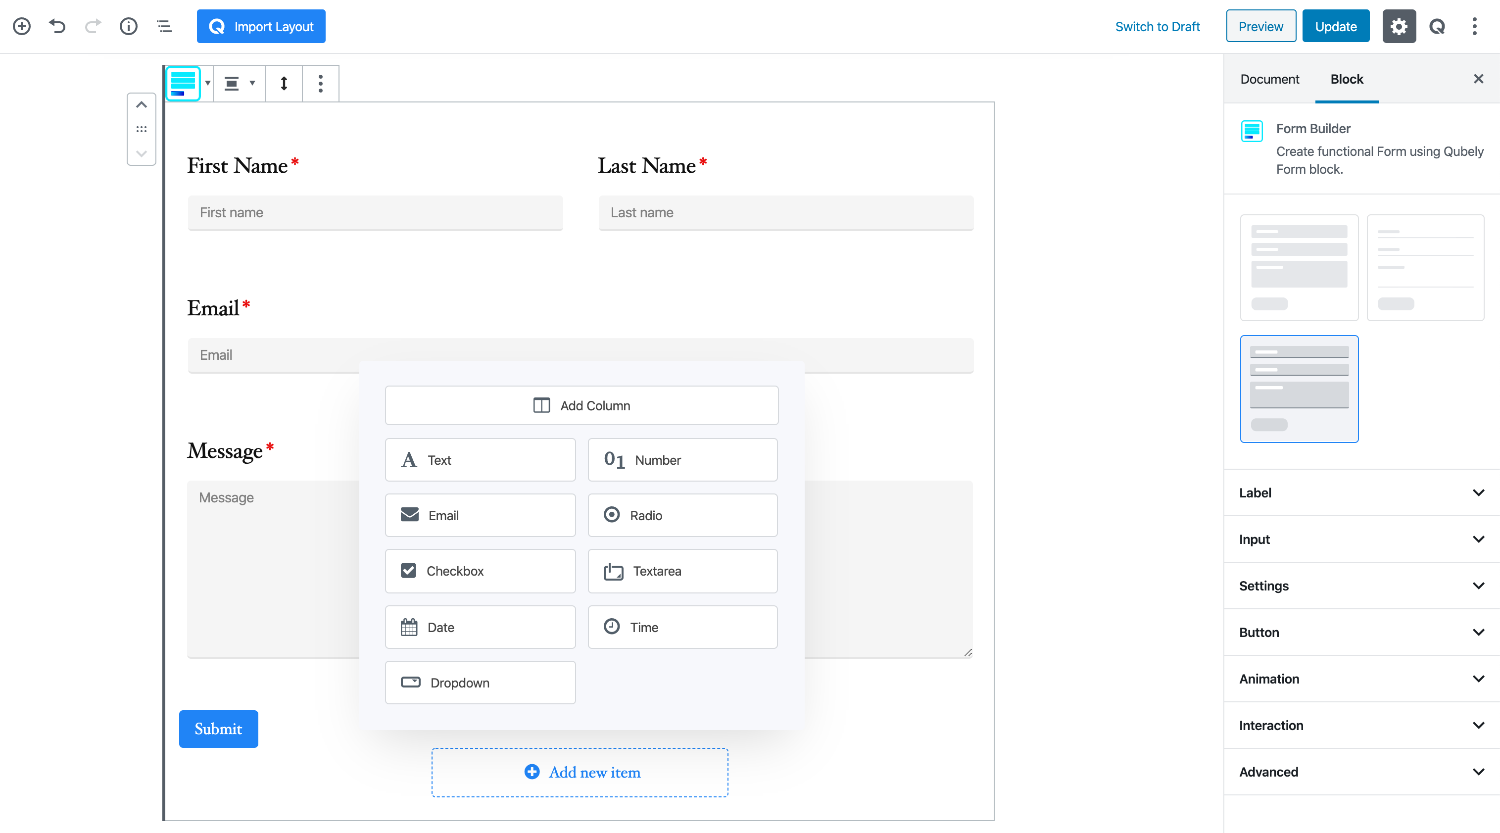
You can add new fields to the form by clicking the “Add new item” button. After you add a new field, you can configure the settings as you require. Clicking on each field will reveal their respective settings. You can then configure things like placeholders, instructions, and levels.
Step 4: Tweak the Contact Form UX
(This is an extended part of step 3)
When you create a form with Qubely, you don’t have to create traditional ones. You can introduce new things in the form. Adding reCAPTCHA to the form will provide an extra layer of security. It will prevent bots from filling up your forms automatically and will keep the spammers away.
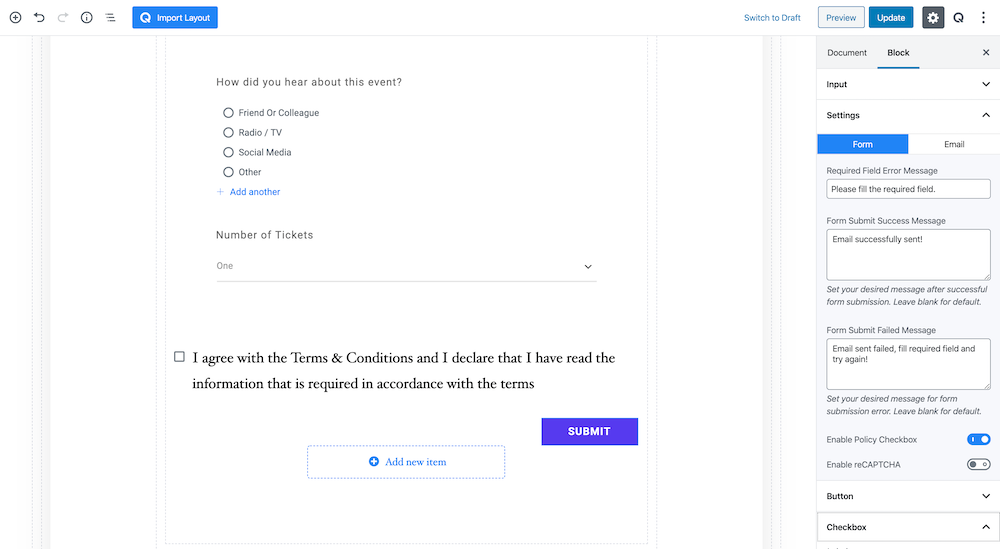
Adding the privacy policy notice to your form will give you the opportunity to take precautions against lawsuits. To enable it, open the Settings section and from the “Form” tab, turn on the “Enable Policy Checkbox” button. You can change the text and do other modifications (like inserting a URL or making it bold) by clicking on the text.
Step 5: Recipient and Email Template Setup
This is the most crucial part while setting up a form. The Form Builder block does not have a database of its own. So, in order to receive information that was sent from the form, you need to carefully set up a recipient email. That is the address where the collected information will be sent. To set up the form properly, you need to understand a few things. Firstly, every field has its own variable where it stores the data.
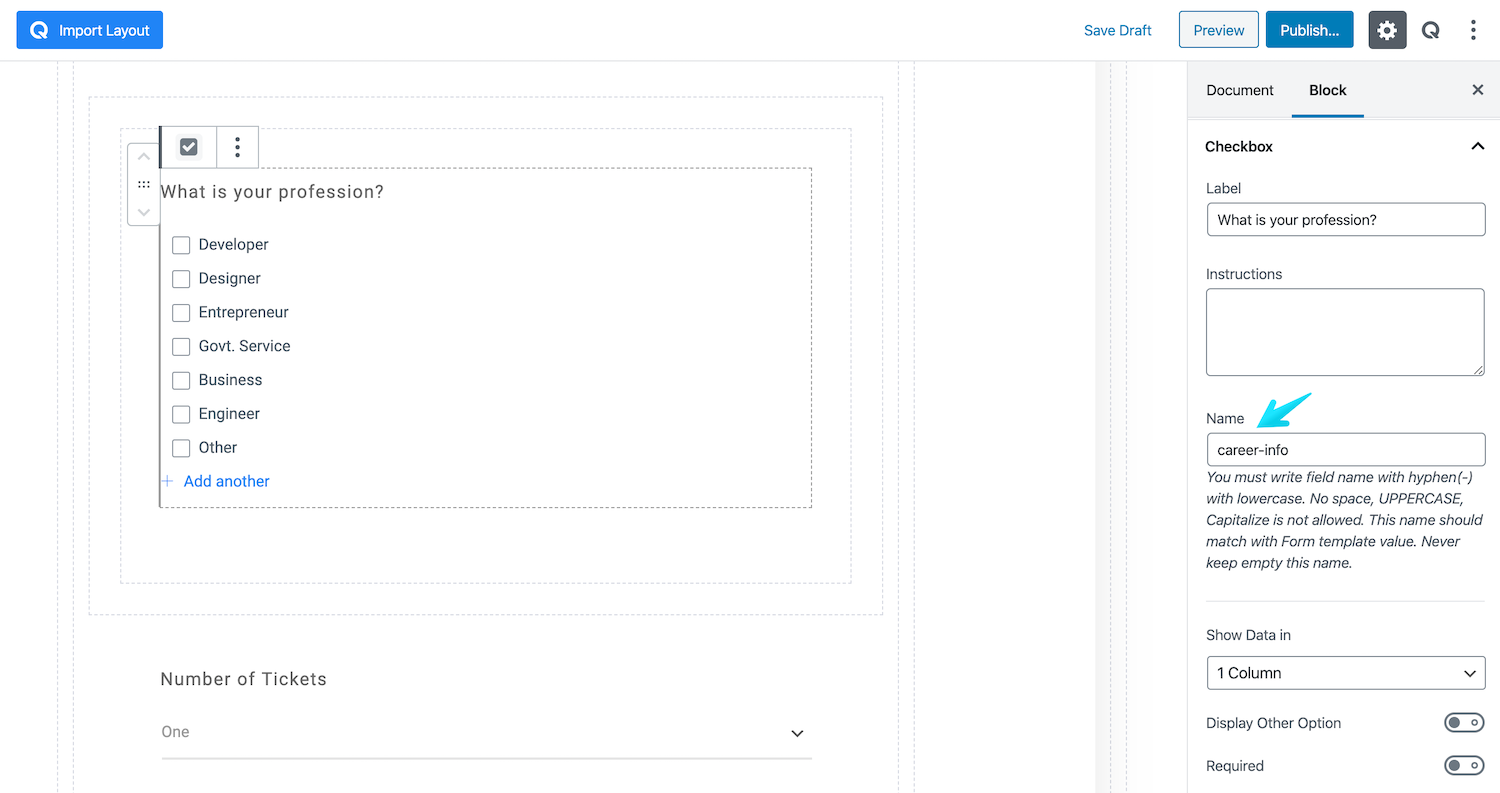
The variable names are defined by default. However, you can set your own. Click on the desired element (form field) and rename the “Name” field, like in the above image.
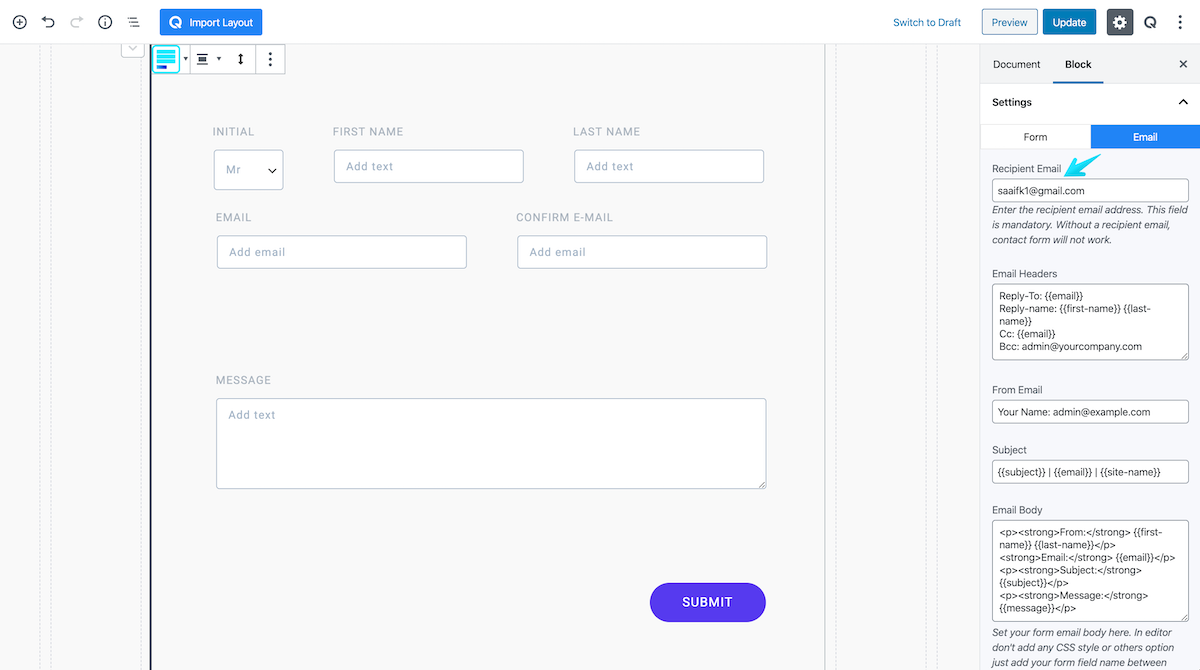
Then, we need to configure the recipient email. It is the most significant part of this process. Type in the email address in the “Recipient Email” field, found in the “Email” tab under settings.
You can configure the rest of the settings the way you want to. But remember to put the variable name (that you define earlier for each field) inside the double curly braces. Please note: the variable names you put in the Email Body field, are the information you will be receiving. So be careful to provide all the desired variable names in the Email Body field.
…And this was that! This is how you can create your desired contact form on Gutenberg. Using the Qubely Form Builder block you can create amazing forms with great functionalities. We offer a bunch of predesigned forms that you can import (or get inspired by) using Qubely’s Import Layout option so that you don’t have to build from the scratch.
Also, you can visit this demo page to see a few more. To understand all the functionalities of the Form Builder block better, you can head over to the documentation.
Best Practices to Enhance the Experience of Your Contact Form
A contact form is an invaluable part of a website. Perhaps, it can be considered as the most powerful tool to gather leads. While creating a contact form, you must pay attention to the design and relevancy as well to stay in focus. Here, we have shared some win-some ideas which can bring a favorable outcome to your website. So, let’s have a quick glimpse at how to make an effective contact form for your website.
Keep it Interesting
People tend to be more curious about unique and creative concepts. While forming a contact form, try to be equally innovative and superior in design as well.
Be Specific
No one prefers boring or complex stuff. To keep your users engaged, be simple yet interactive with the content of your contact form as well.
Embed it to the Right Place(s)
Placing a contact form only on the Contact Us page is an out-of-date concept. To bring the most out of your contact form try to include it on the most concentrated pages of your website as well. You can place it on the homepage, about us page, blog section or any other place even on the sidebar, or in the footer.
Pay Attention to the Overall Appearance
From font, size, style to features everything should be a brilliant one for a contact form. Also, try to include fields in a manner that will be convenient for your users to fill it up.
Wrapping Up
If you have reached this part of this article, we are confident that you have found it surprisingly simple to create a contact form using Qubely. As you have learned all the hacks of creating great contact forms, now it’s time to implement it! So, what are you waiting for? Get Qubely Pro today and start exploring all its amazing features right away. Also, do let us know your valuable feedback which will help us bring newer and more useful updates to you in the coming days.
Get Qubely Live Demo