

Designing courses is a crucial aspect of an eLearning site but many users feel unsatisfied with the process due to the complexity of LMS tools. They often find it to be a time-consuming experience.
Are you the same? Do you wish you could create courses easily using a hassle-free frontend interface? Well, now you can!
Tutor LMS is an LMS plugin for WordPress that’s taken designing eLearning platforms to new levels. It has fabulous features like the course builder, quiz builder, and more.
Course creation for your eLearning site has become easier than ever before using the said plugin. In this article, we’ll be giving you a detailed guide on how to effortlessly create courses using its Frontend Course Builder in just minutes.
Getting Started
Using the frontend course builder is easy as pie, and you only need to follow a few simple steps to get your courses published.
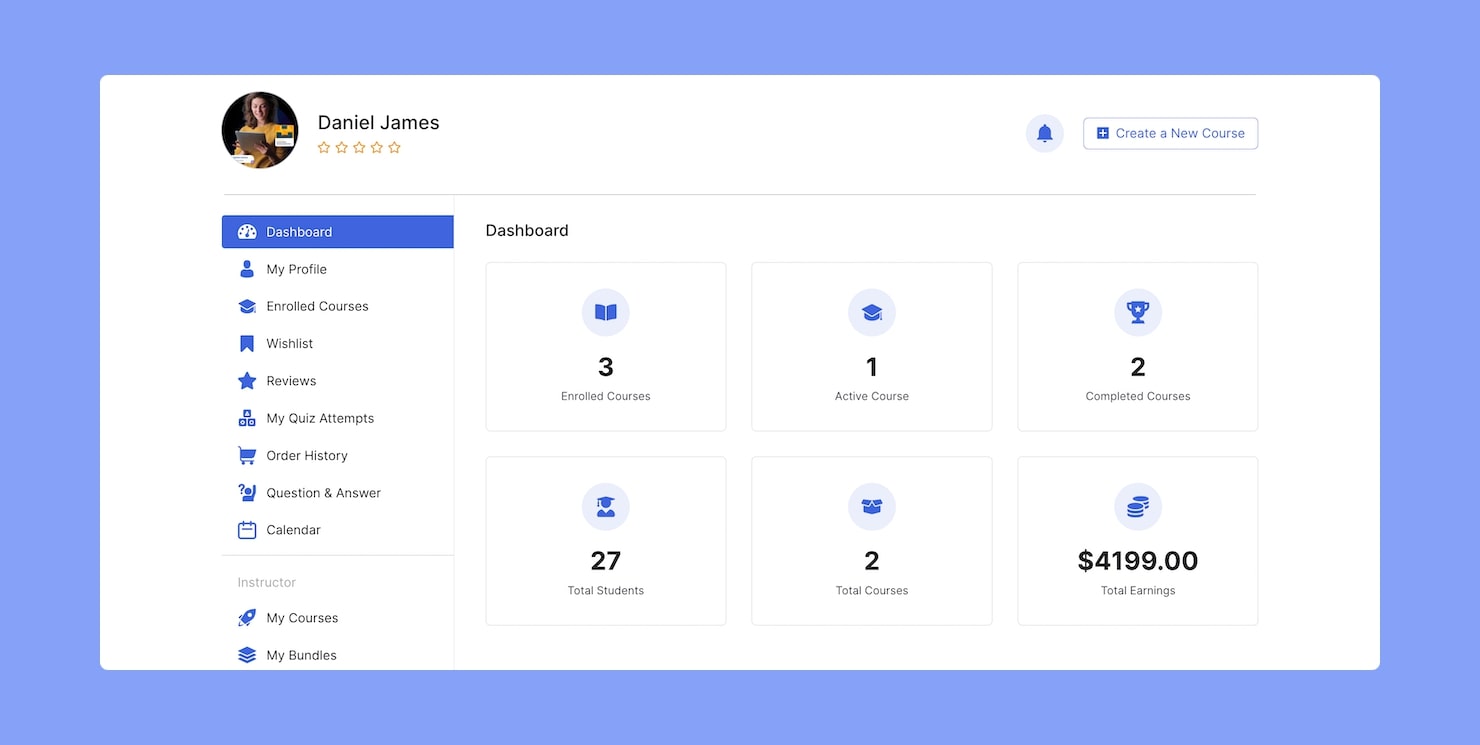
To create a course on the frontend, navigate to your frontend dashboard. Do this by hovering over your profile picture and choosing the dashboard option from the dropdown list.
You can also visit the dashboard by entering your website/dashboard in the address bar. Once on the dashboard, click on the Add a New Course button found on the top right-hand side.
Adding New Course Details
A lot goes into creating the perfect course, and Tutor LMS offers many handy features that you can use to achieve that. Let’s go over each one.
Course Info
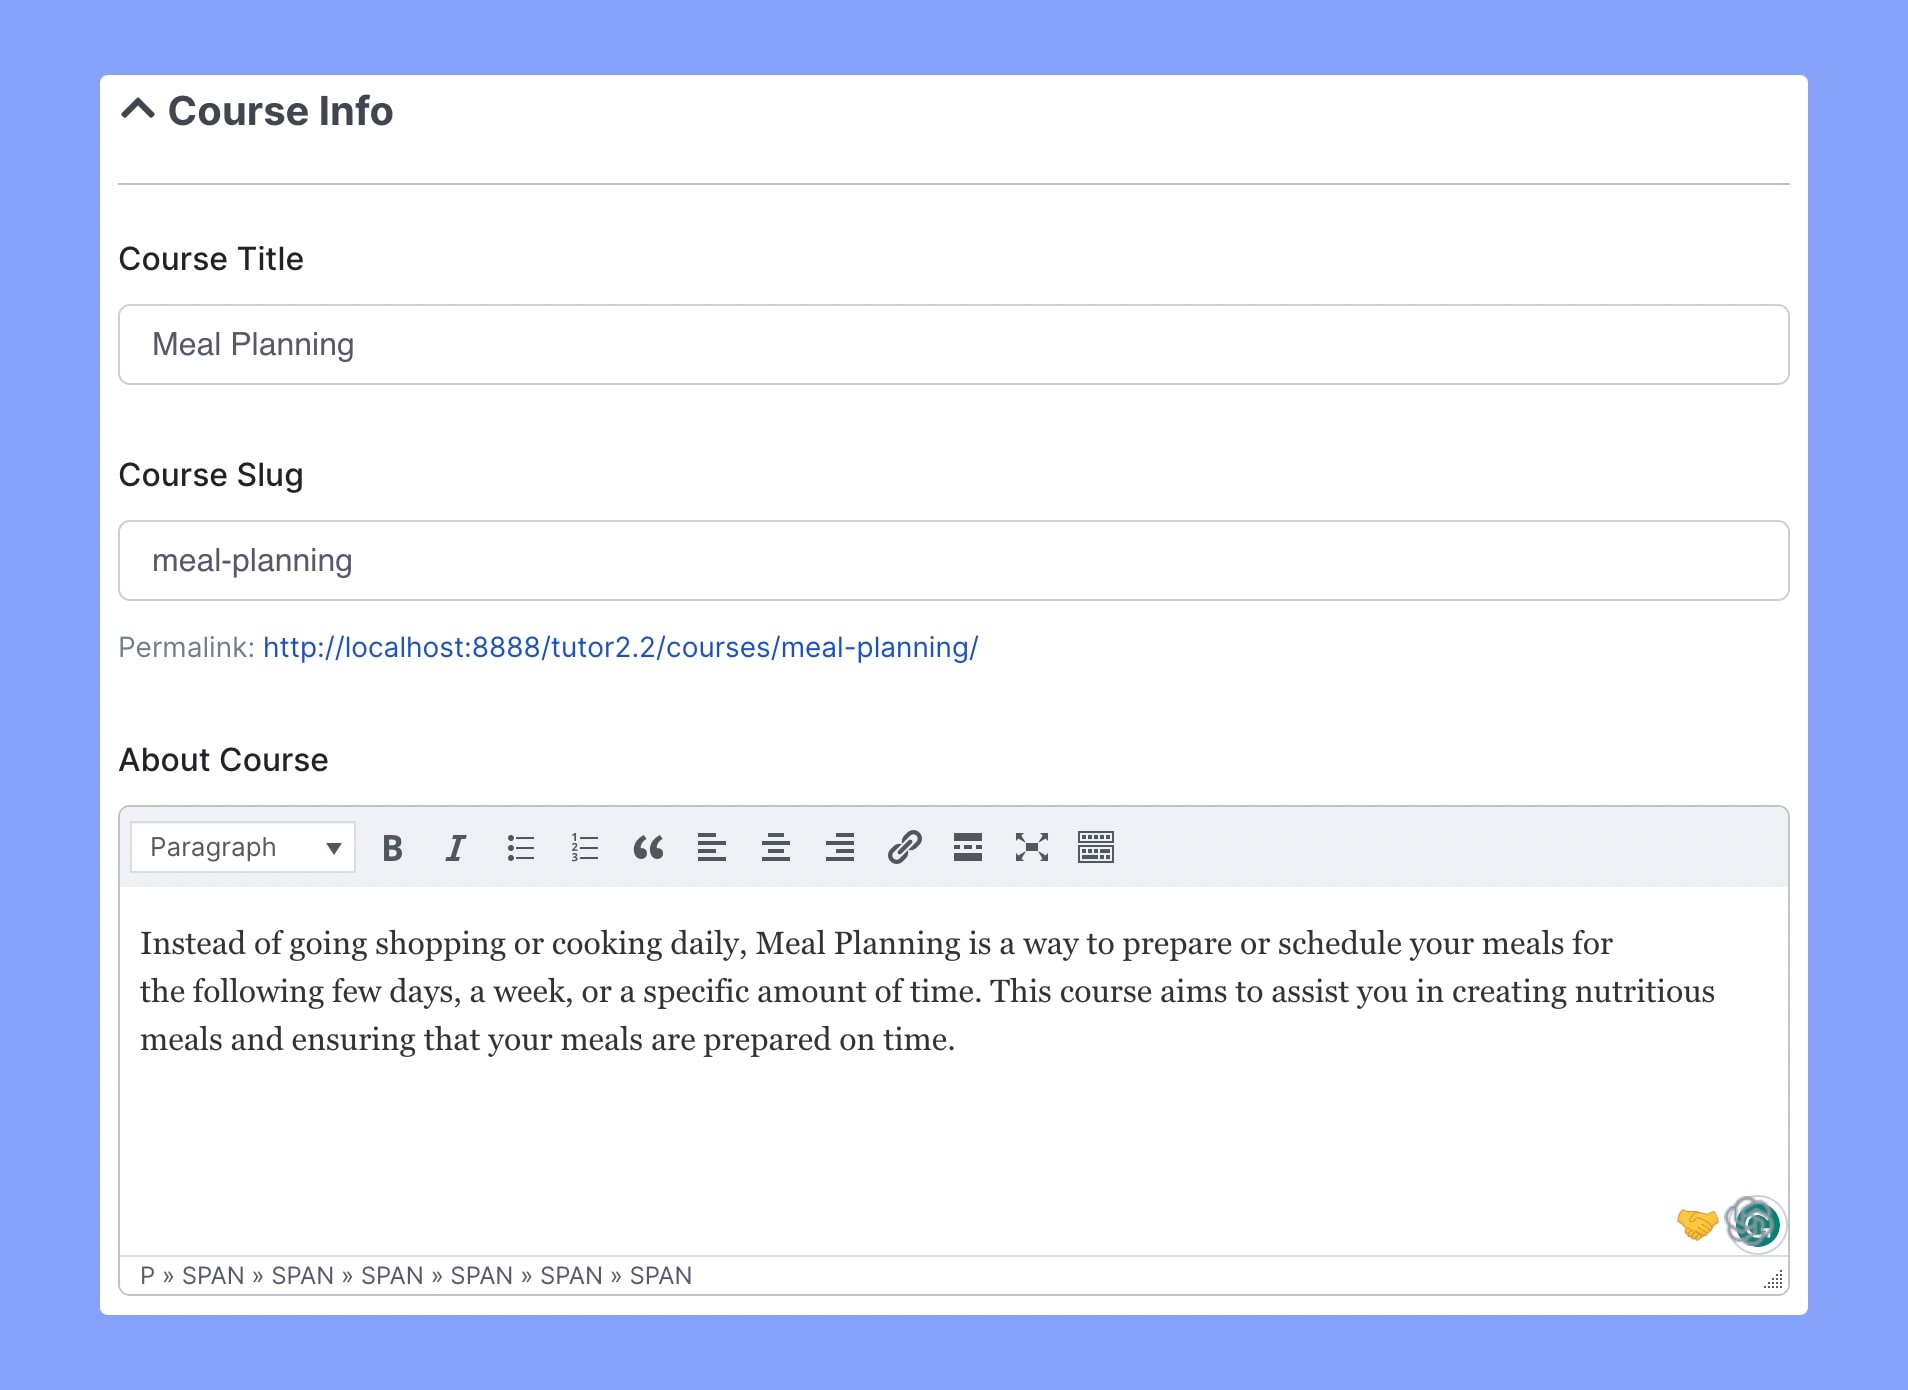
On the Frontend Course Builder, enter the Course Title and About Course. Here you’ll also be able to alter the Course Slug.
Course Settings
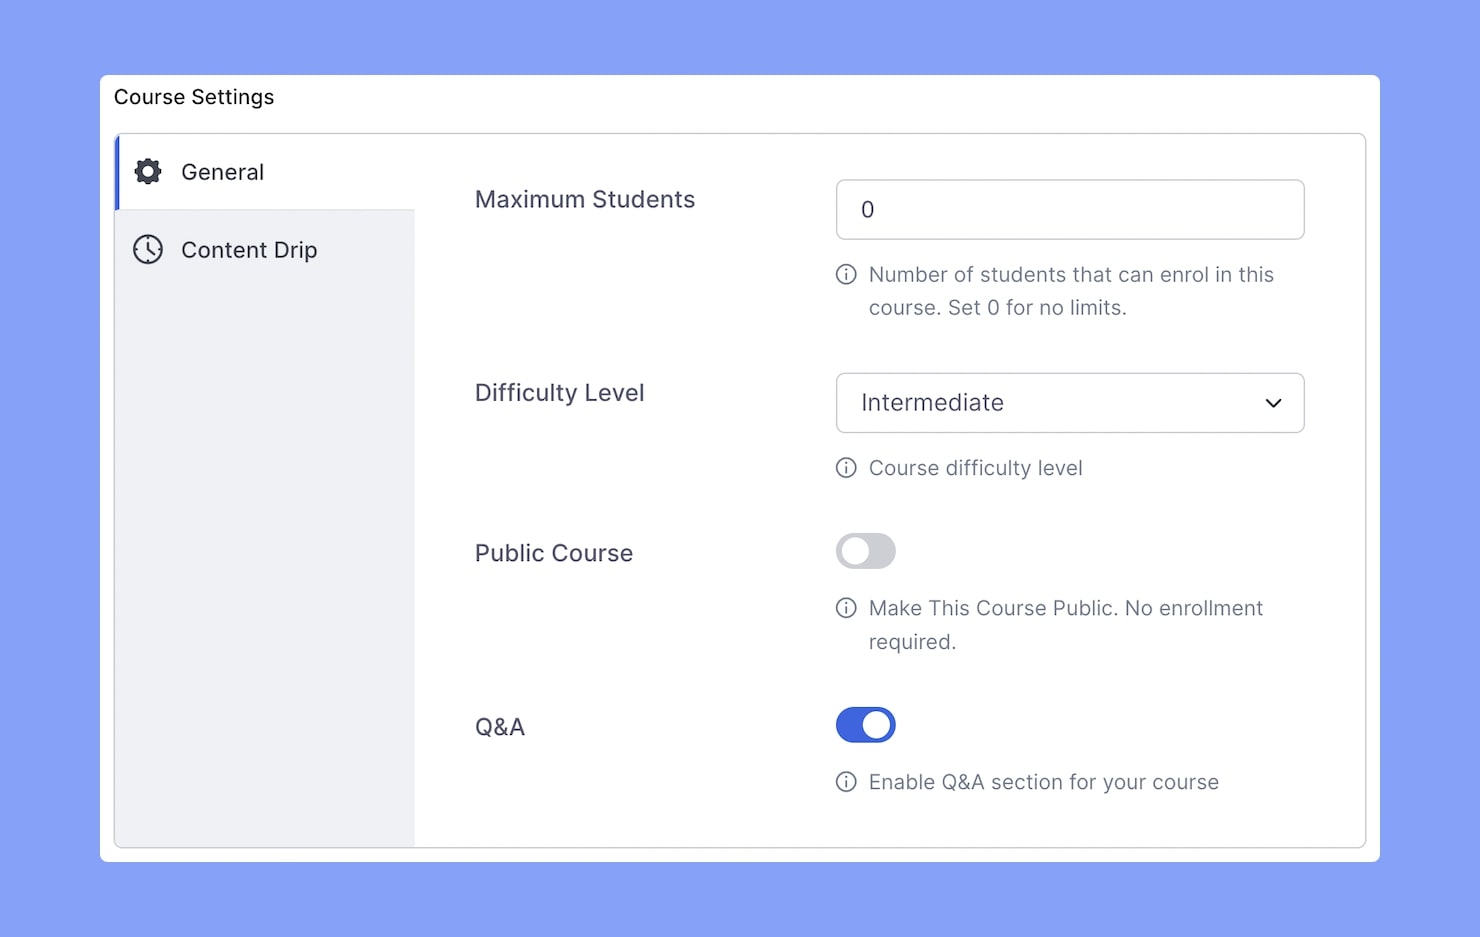
Next, in the Course Settings section, you can define the Maximum Students allowed to enroll and the Difficulty Level of your course. Specifying the difficulty level helps refine your audience.
You’ll then find the options to enable Public Course and Q&A. Enabling Public Course will allow users to take the course without enrollment and enabling Q&A will allow users to ask queries on the Course Details Page.
Content Drip
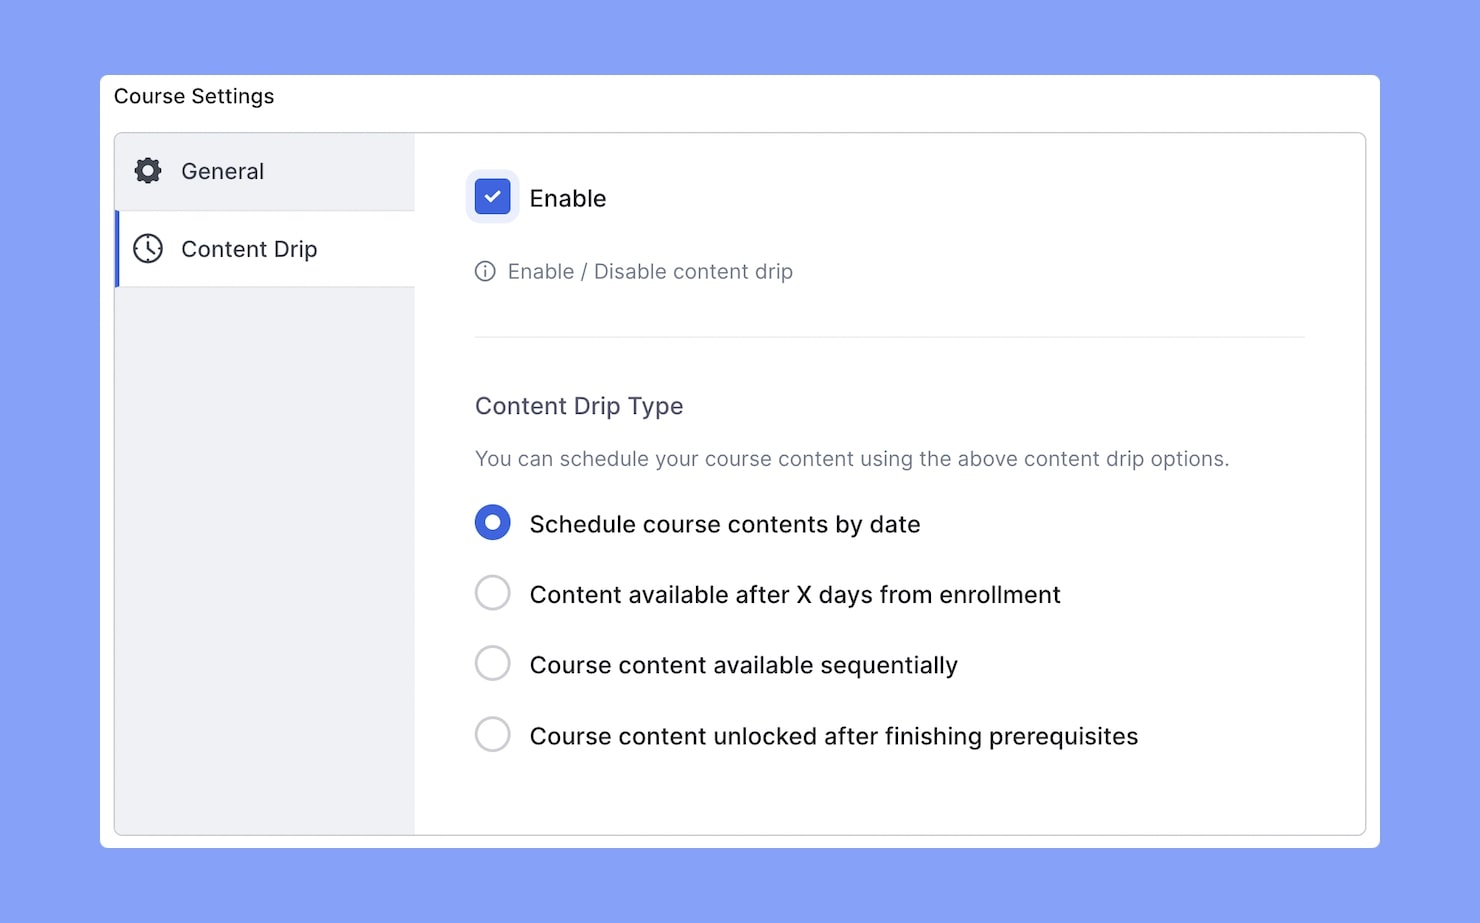
Next up is Content Drip, a nifty add-on of Tutor LMS and you’ll find this as a tab in the Course Settings section. Using this add-on, you can schedule content by date or release them based on a pre-condition.
To use this feature, start by enabling Content Drip from WP Admin > Tutor LMS > Add-ons. Then enable it for this course from here and set your preferred Content Drip type.
Now you’ll find the Content Drip settings within each content editor window like Lesson, Quiz, etc. For a full step-by-step guide, check out its documentation.
Category, Price & Thumbnail
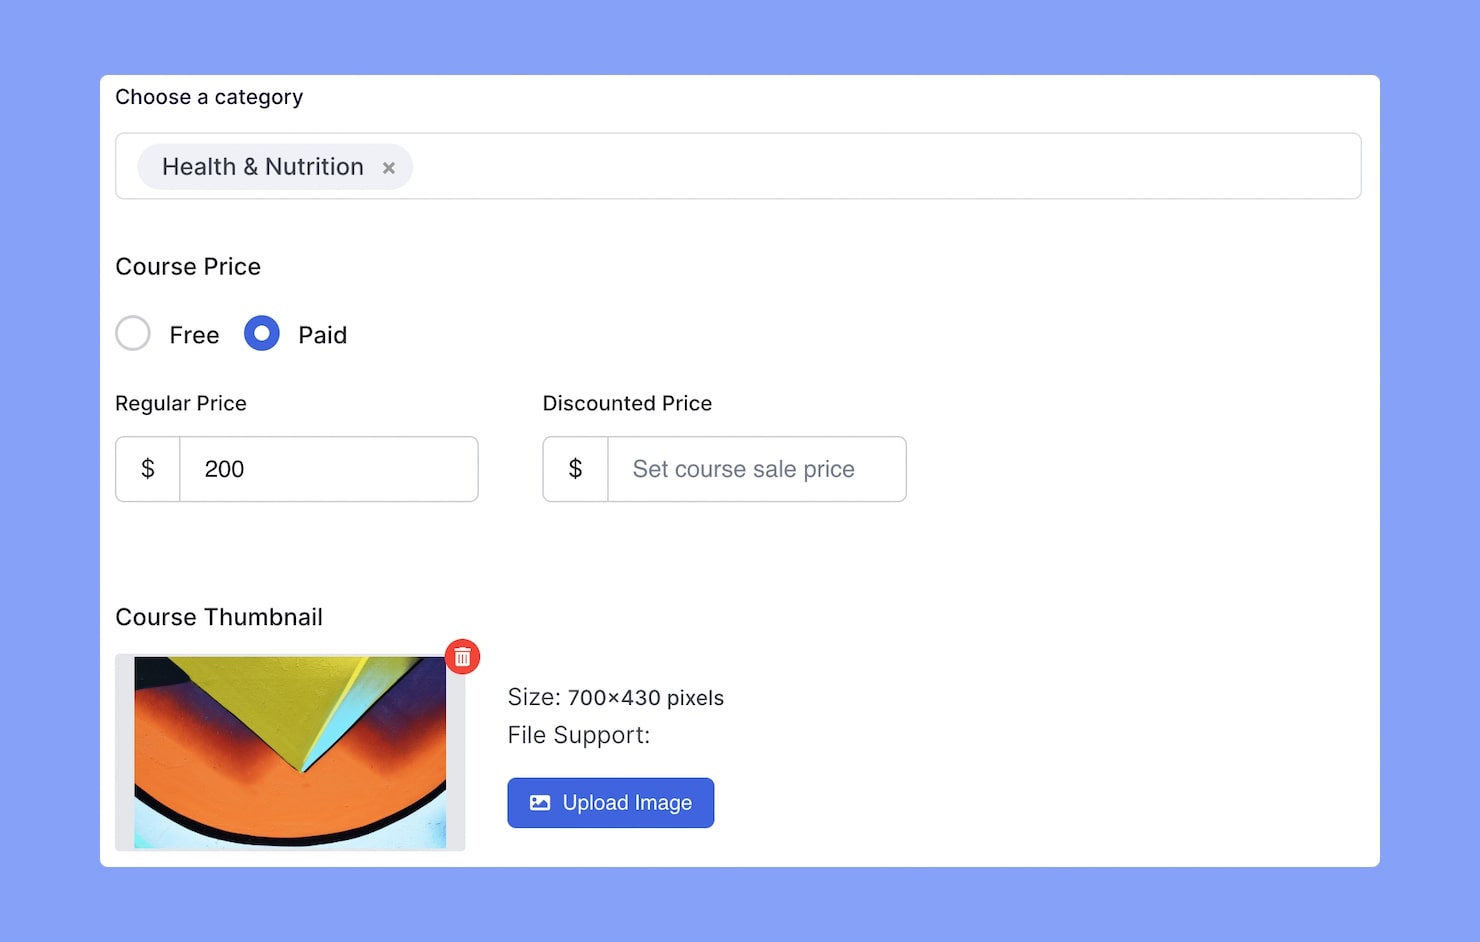
Next, you can set the Course Category, add the Tags, and define your Course Price.
You can even upload an image to be your Course Thumbnail. This image will appear wherever the course is listed or featured.
Course Intro Video
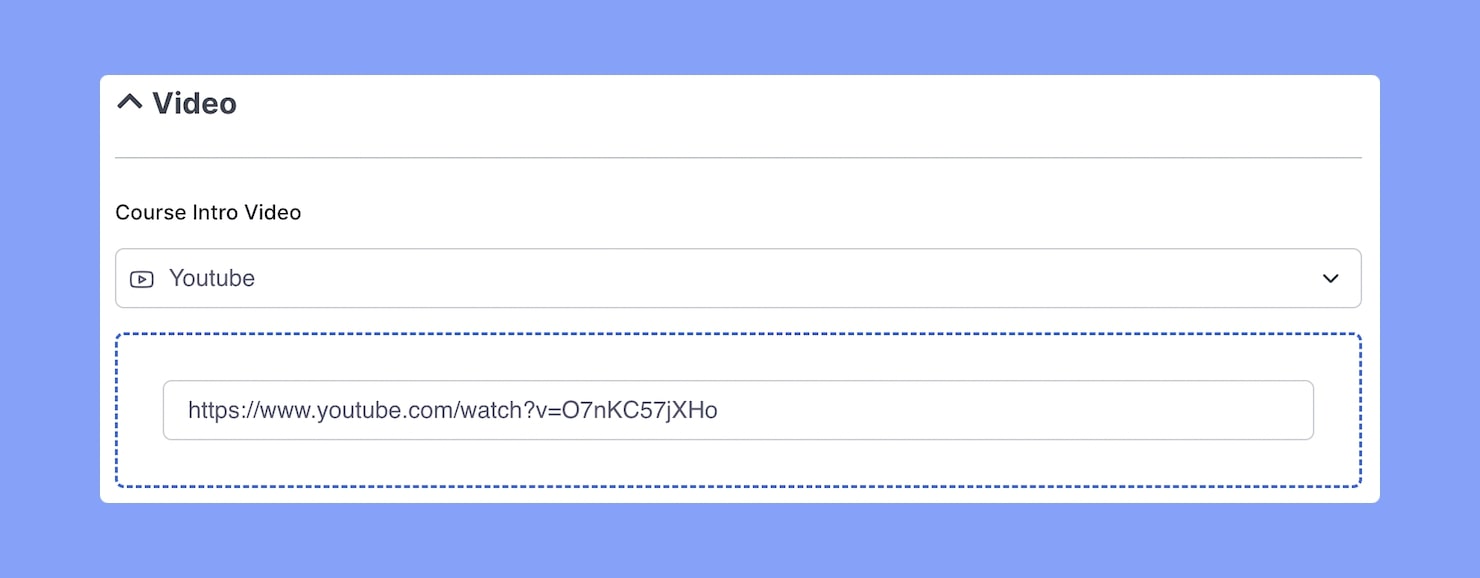
If you have a Video to introduce your course, then you can easily add it from this section. Tutor LMS offers various source types as options. Just select one of these options and link the appropriate video in the following text field.
If you want to learn more about what kind of videos you can host using Tutor LMS, check out this dedicated take.
Add a Topic
The Course Builder section is where you can add the content of your course. To begin, click on the Add New Topic option.
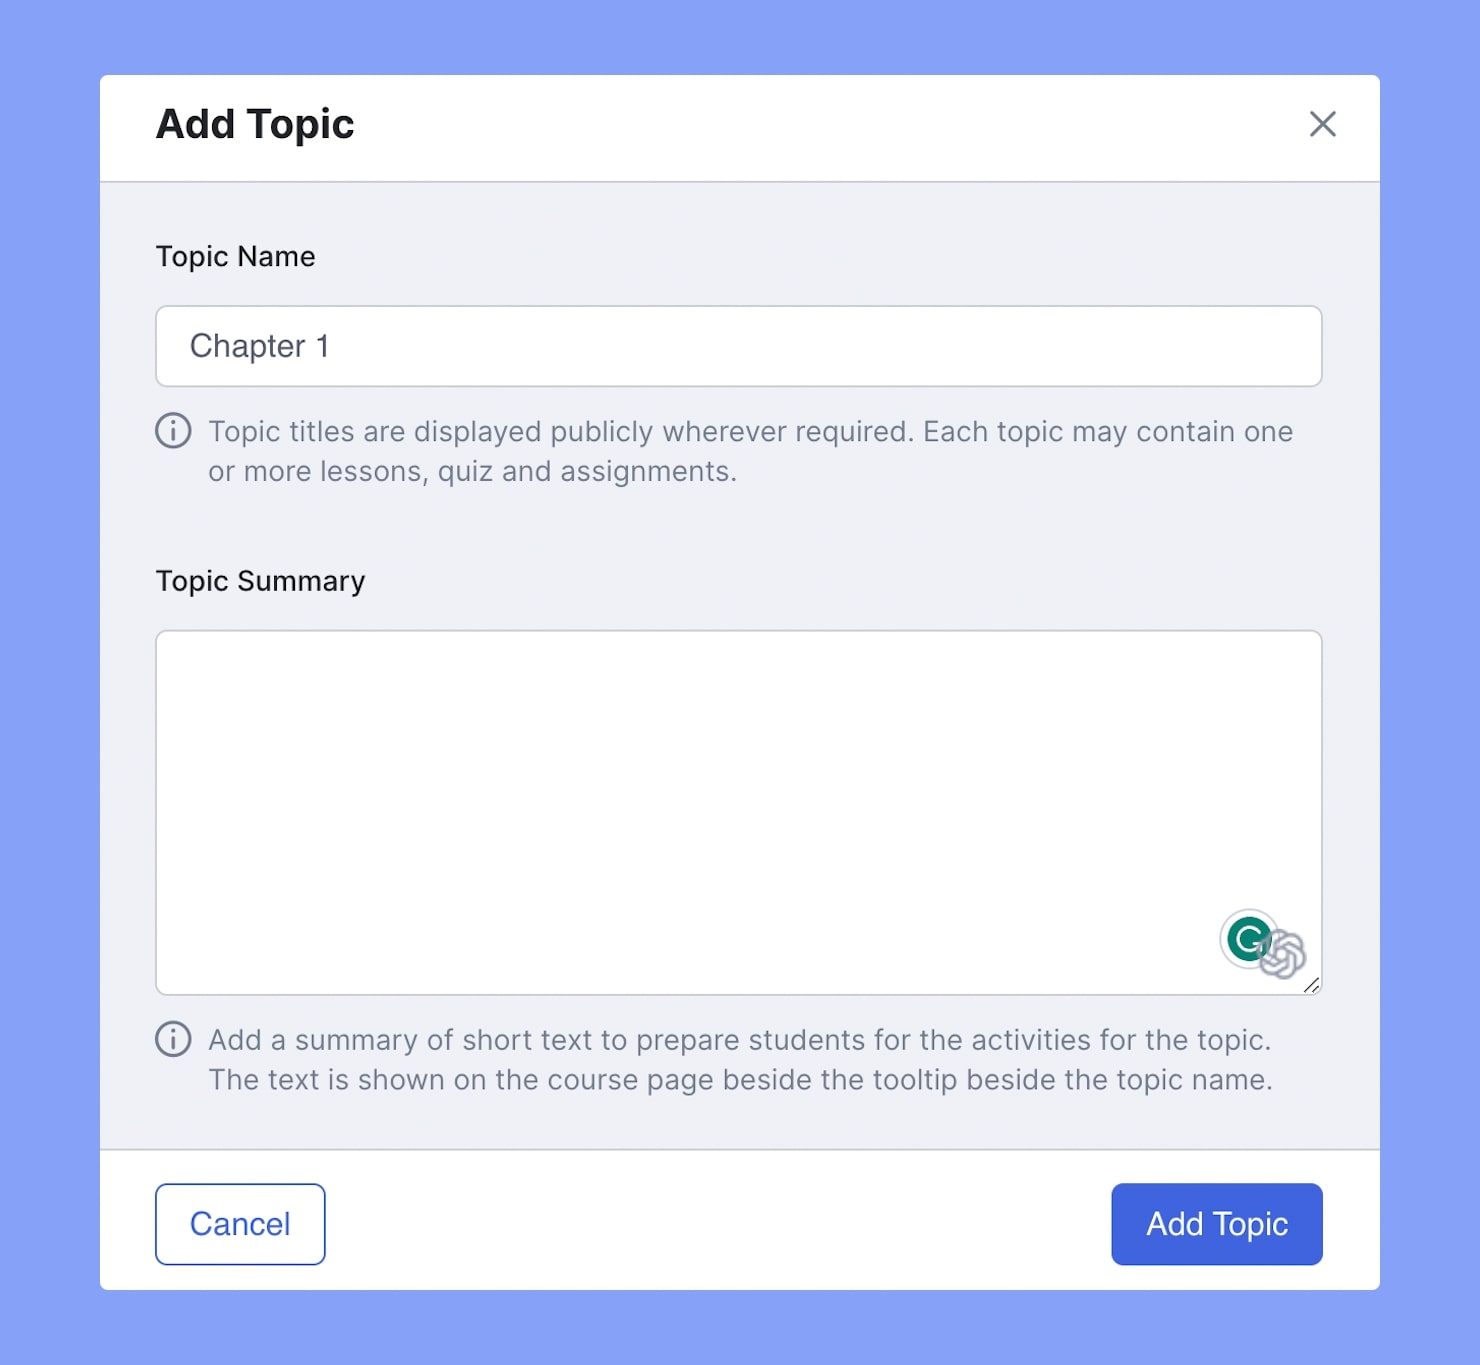
This section is pretty self-explanatory. Just enter the Topic Name and Summary and click on Add Topic.
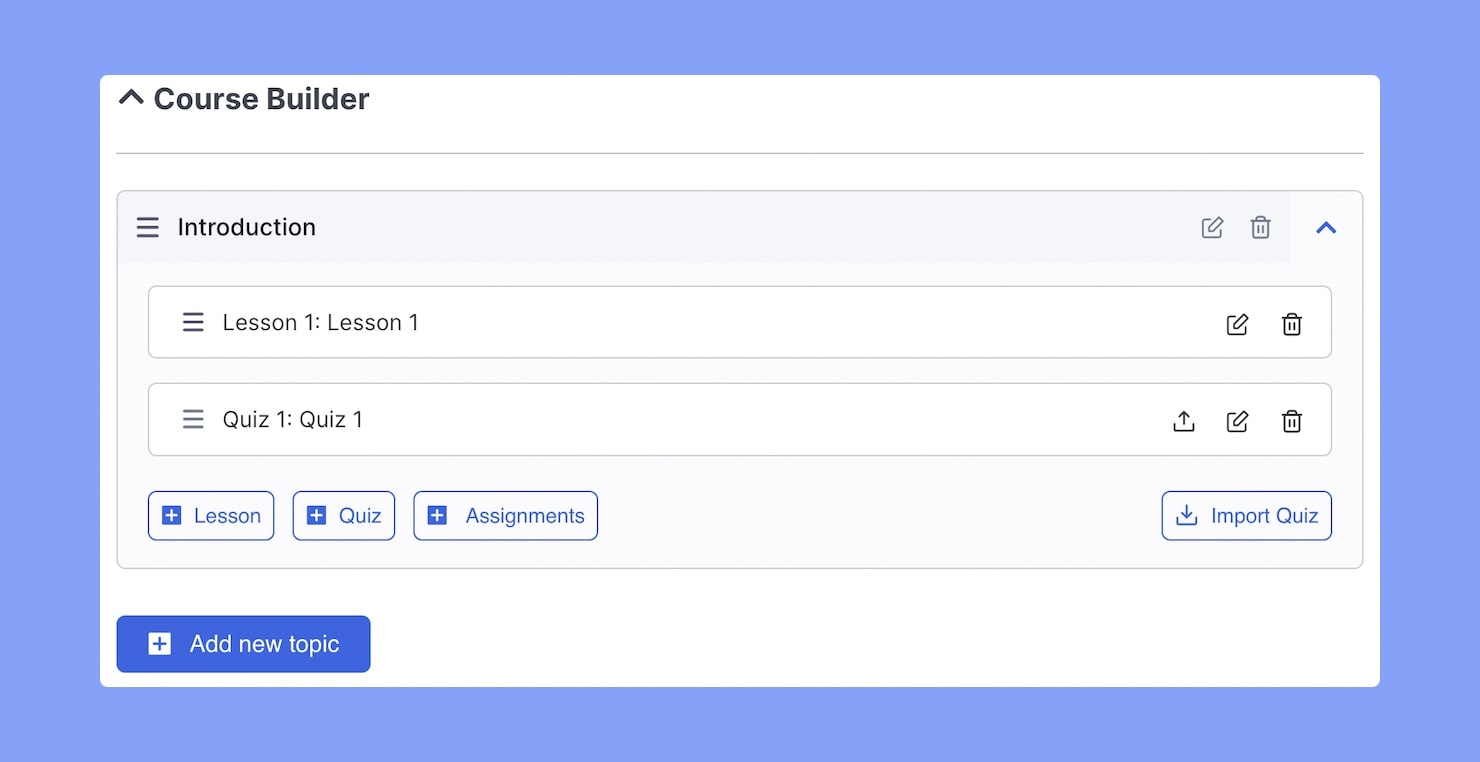
Following that, you will see this Topic added below which will be the options to add Lessons, Quizzes, and more.
Add Lesson
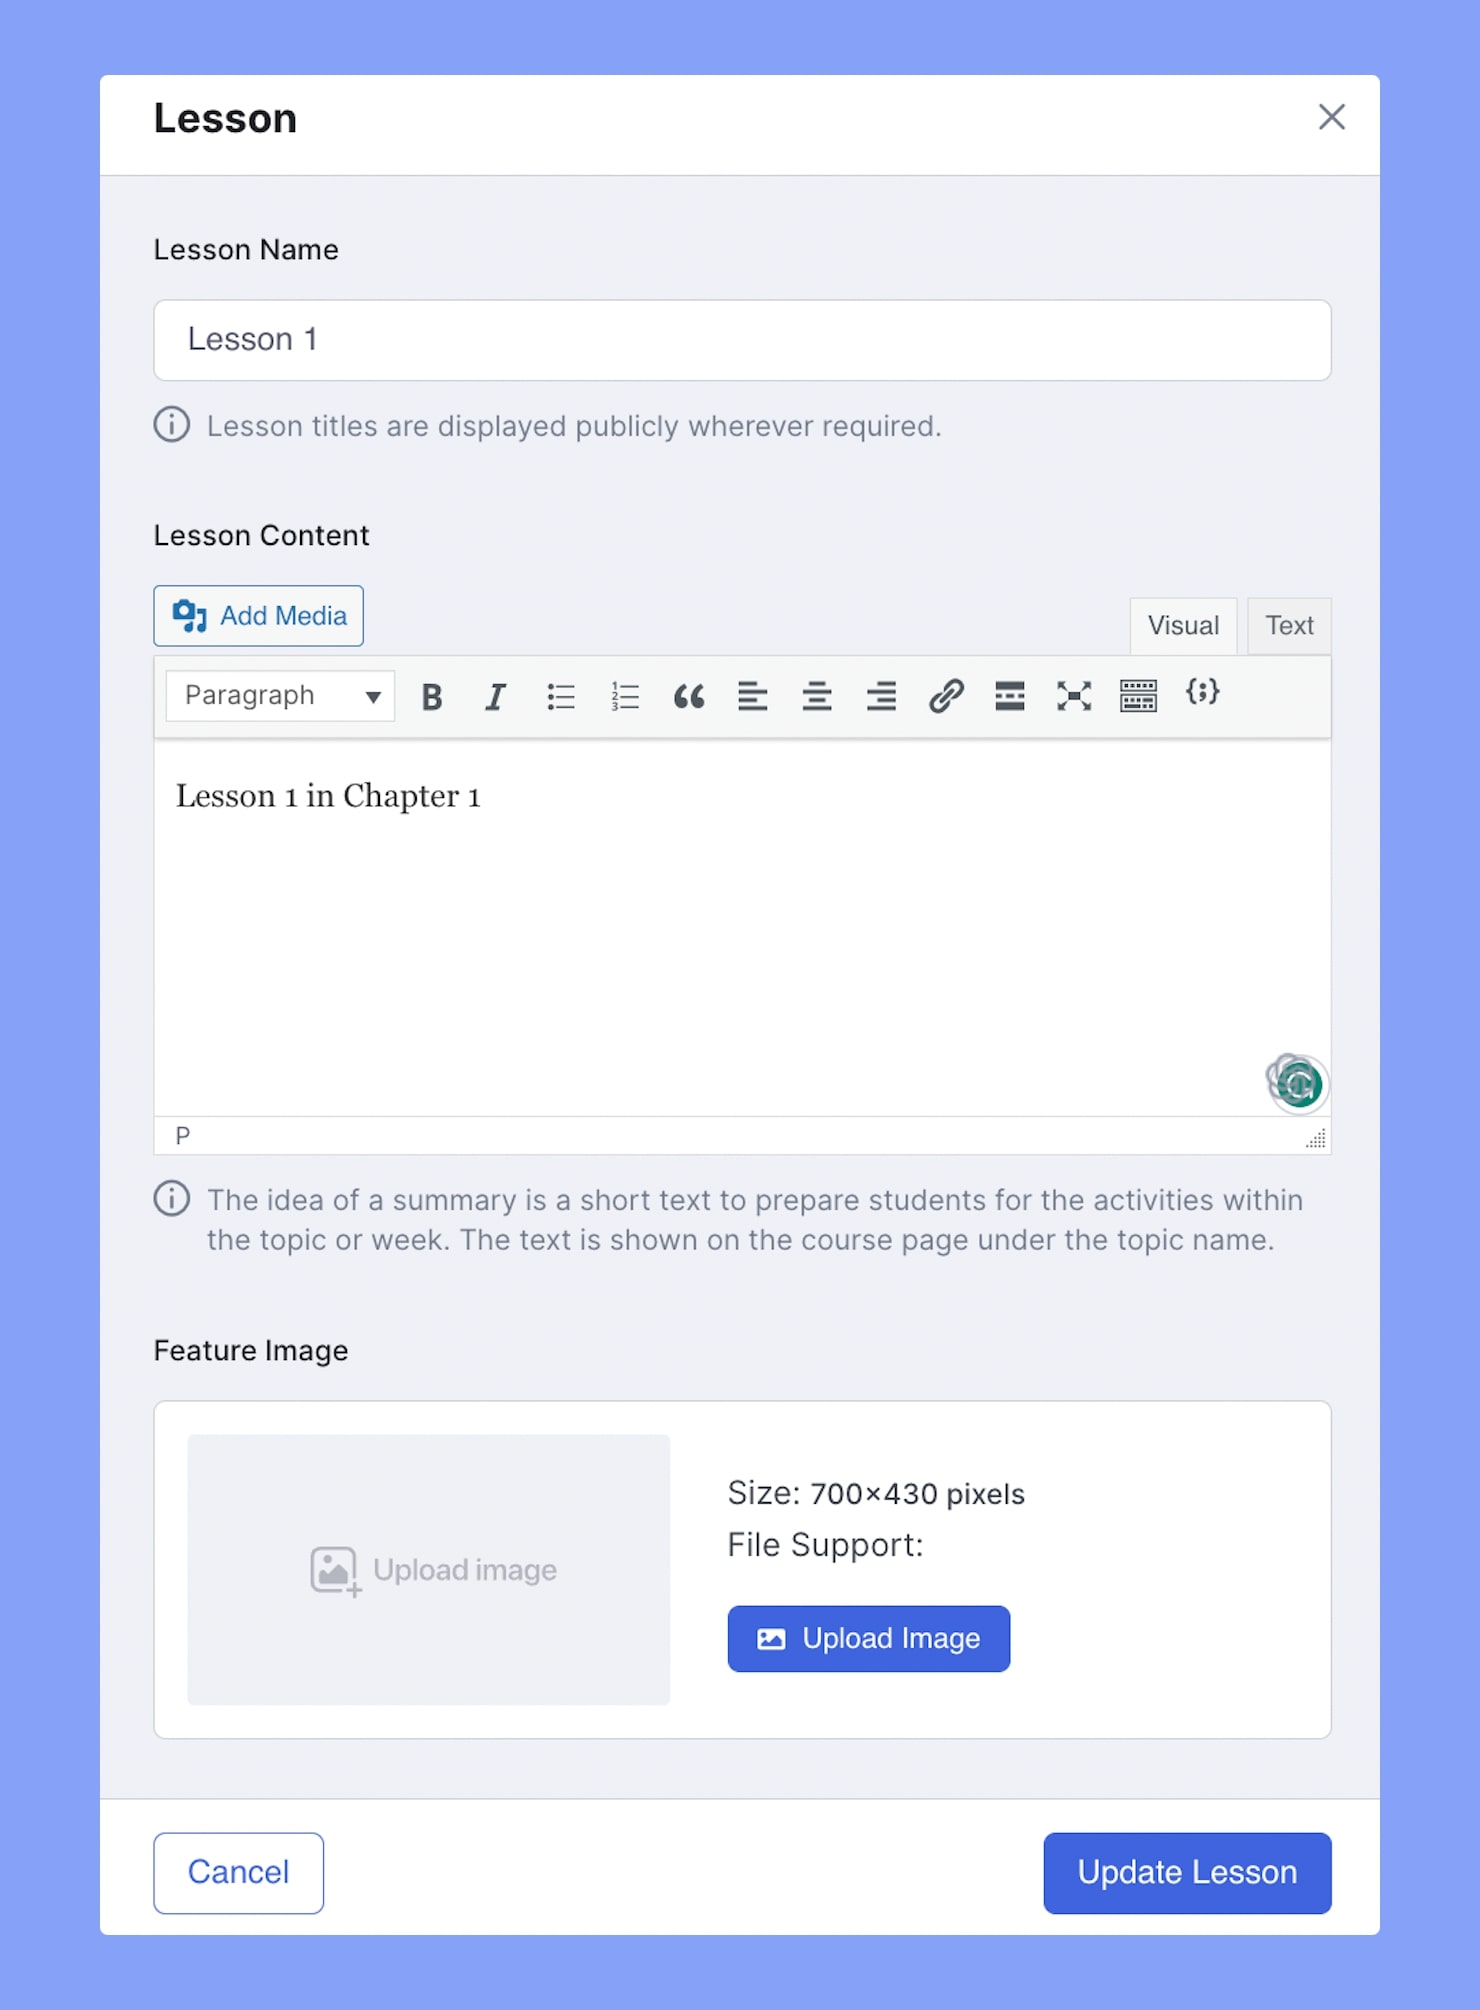
Click on the +Lesson option to add a new lesson. A popup section will appear where you can add the Lesson Title and Content.
You can upload the Feature Image for this lesson and add a Video if you have one.
You also get the option to upload any Attachments included in this lesson. Make sure to click on Update Lesson at the end.
Creating a Quiz
In the Frontend Course Builder, you can also create quizzes. The Quiz Builder is identical to its backend counterpart. It offers a selection of question types that allows instructors to build thought-provoking and challenging quizzes for the students.
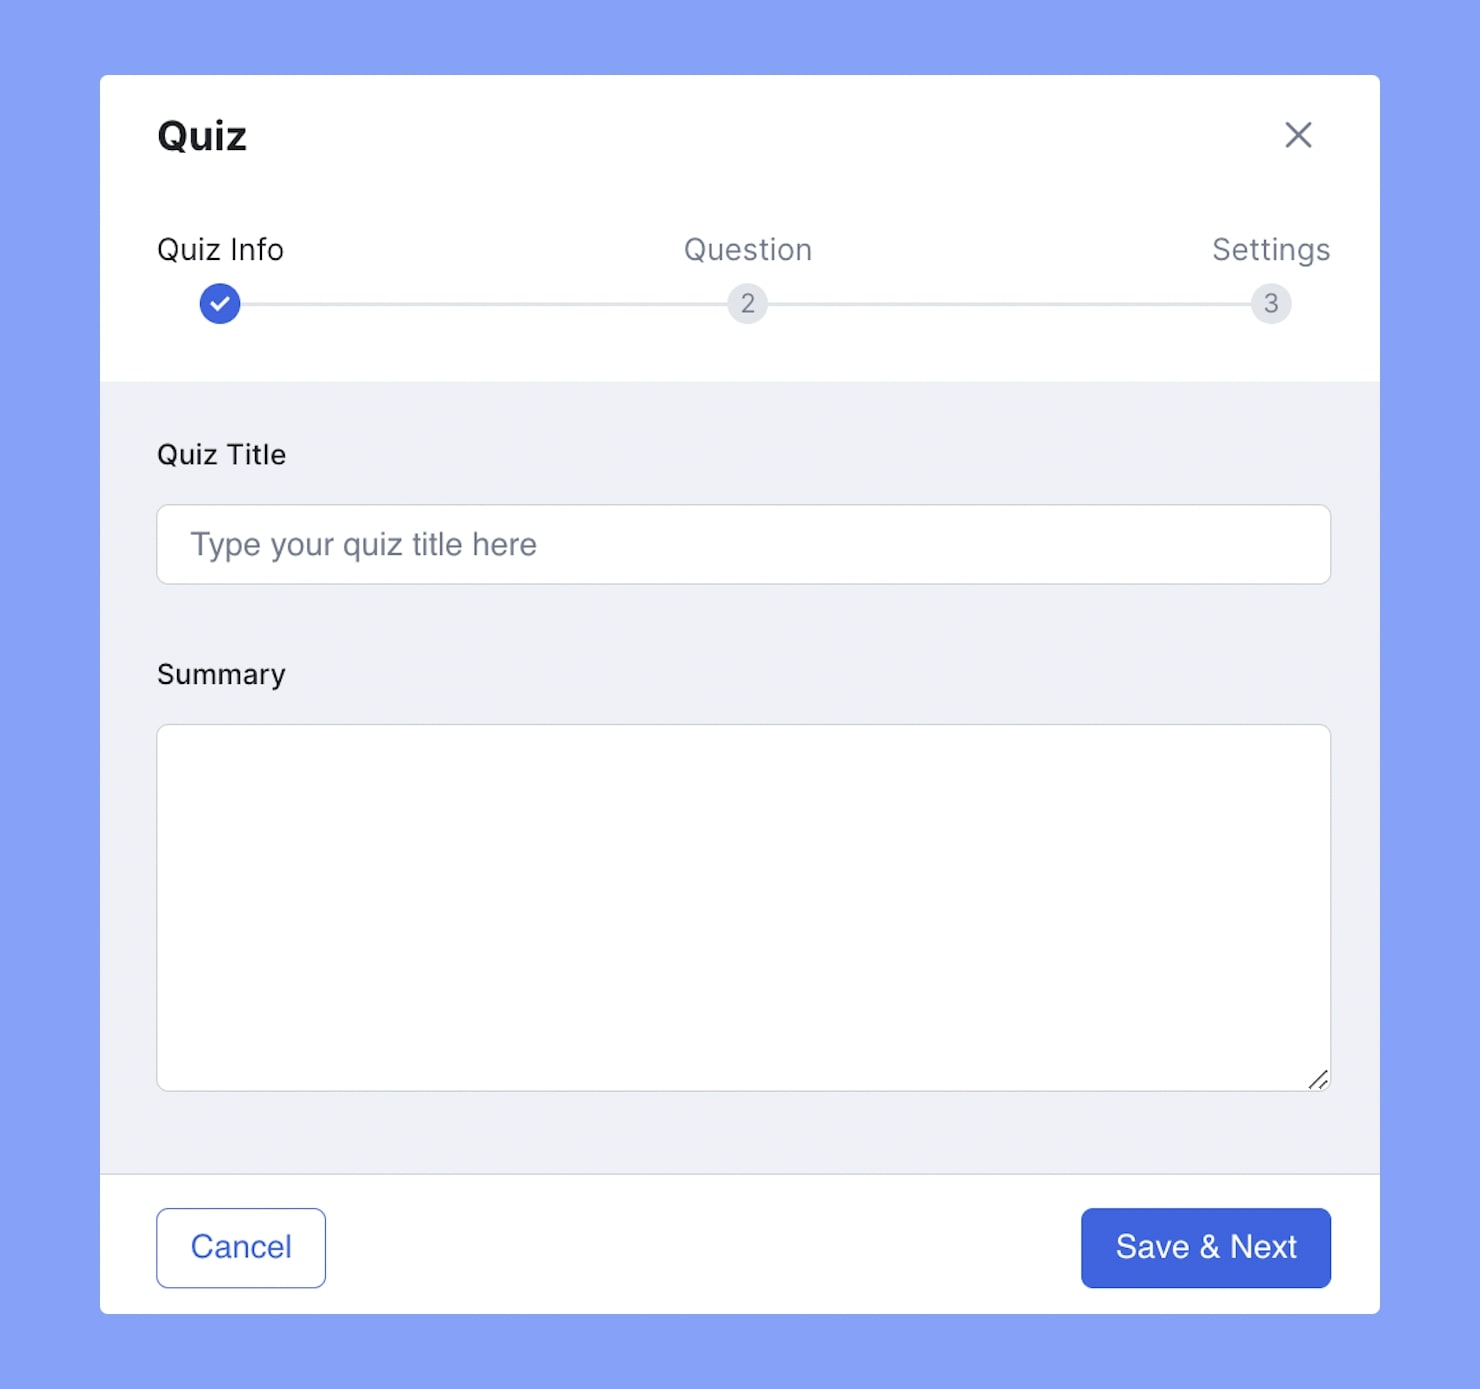
To create a quiz, click on the +Quiz option that appears below each Topic. Under the Quiz Info tab, enter its Title and Description. Click on Save and Next to go to the Questions tab. Here, click on +Add Question, fill in the Question text, and select its Type.
In Tutor LMS, we offer a range of Quiz Question Types for you to choose from. Suppose you choose Single Choice. Then you can enter the Answer Title, upload an Image, and set what to display. Click on Save Answer and repeat this for the other options and make sure to specify the correct answer. You can also add an Answer Explanation for your students to view once they’ve submitted the Quiz.
Click Save and Continue to move on. Add more questions to your quiz by following the previous steps. Once that’s done, click on Next to go to the Settings tab. Here you can adjust the quiz behavior. Click save right after. There are also some Advanced Options you can configure. If you made any changes to these, hit save again.
You also have the option to import existing quizzes from other courses using the Quiz Export/Import add-on. Once enabled, there should be an import quiz option just below each topic. First, visit an existing quiz in course edit mode and click on the Export icon. Next, return to the current course edit page, click on import quiz, and upload the downloaded CSV file.
Creating Assignments
Often instructors want to hand over Assignments instead of Quizzes or as an additional evaluation component. To create Assignments, enable the feature from the add-ons page of Tutor LMS.
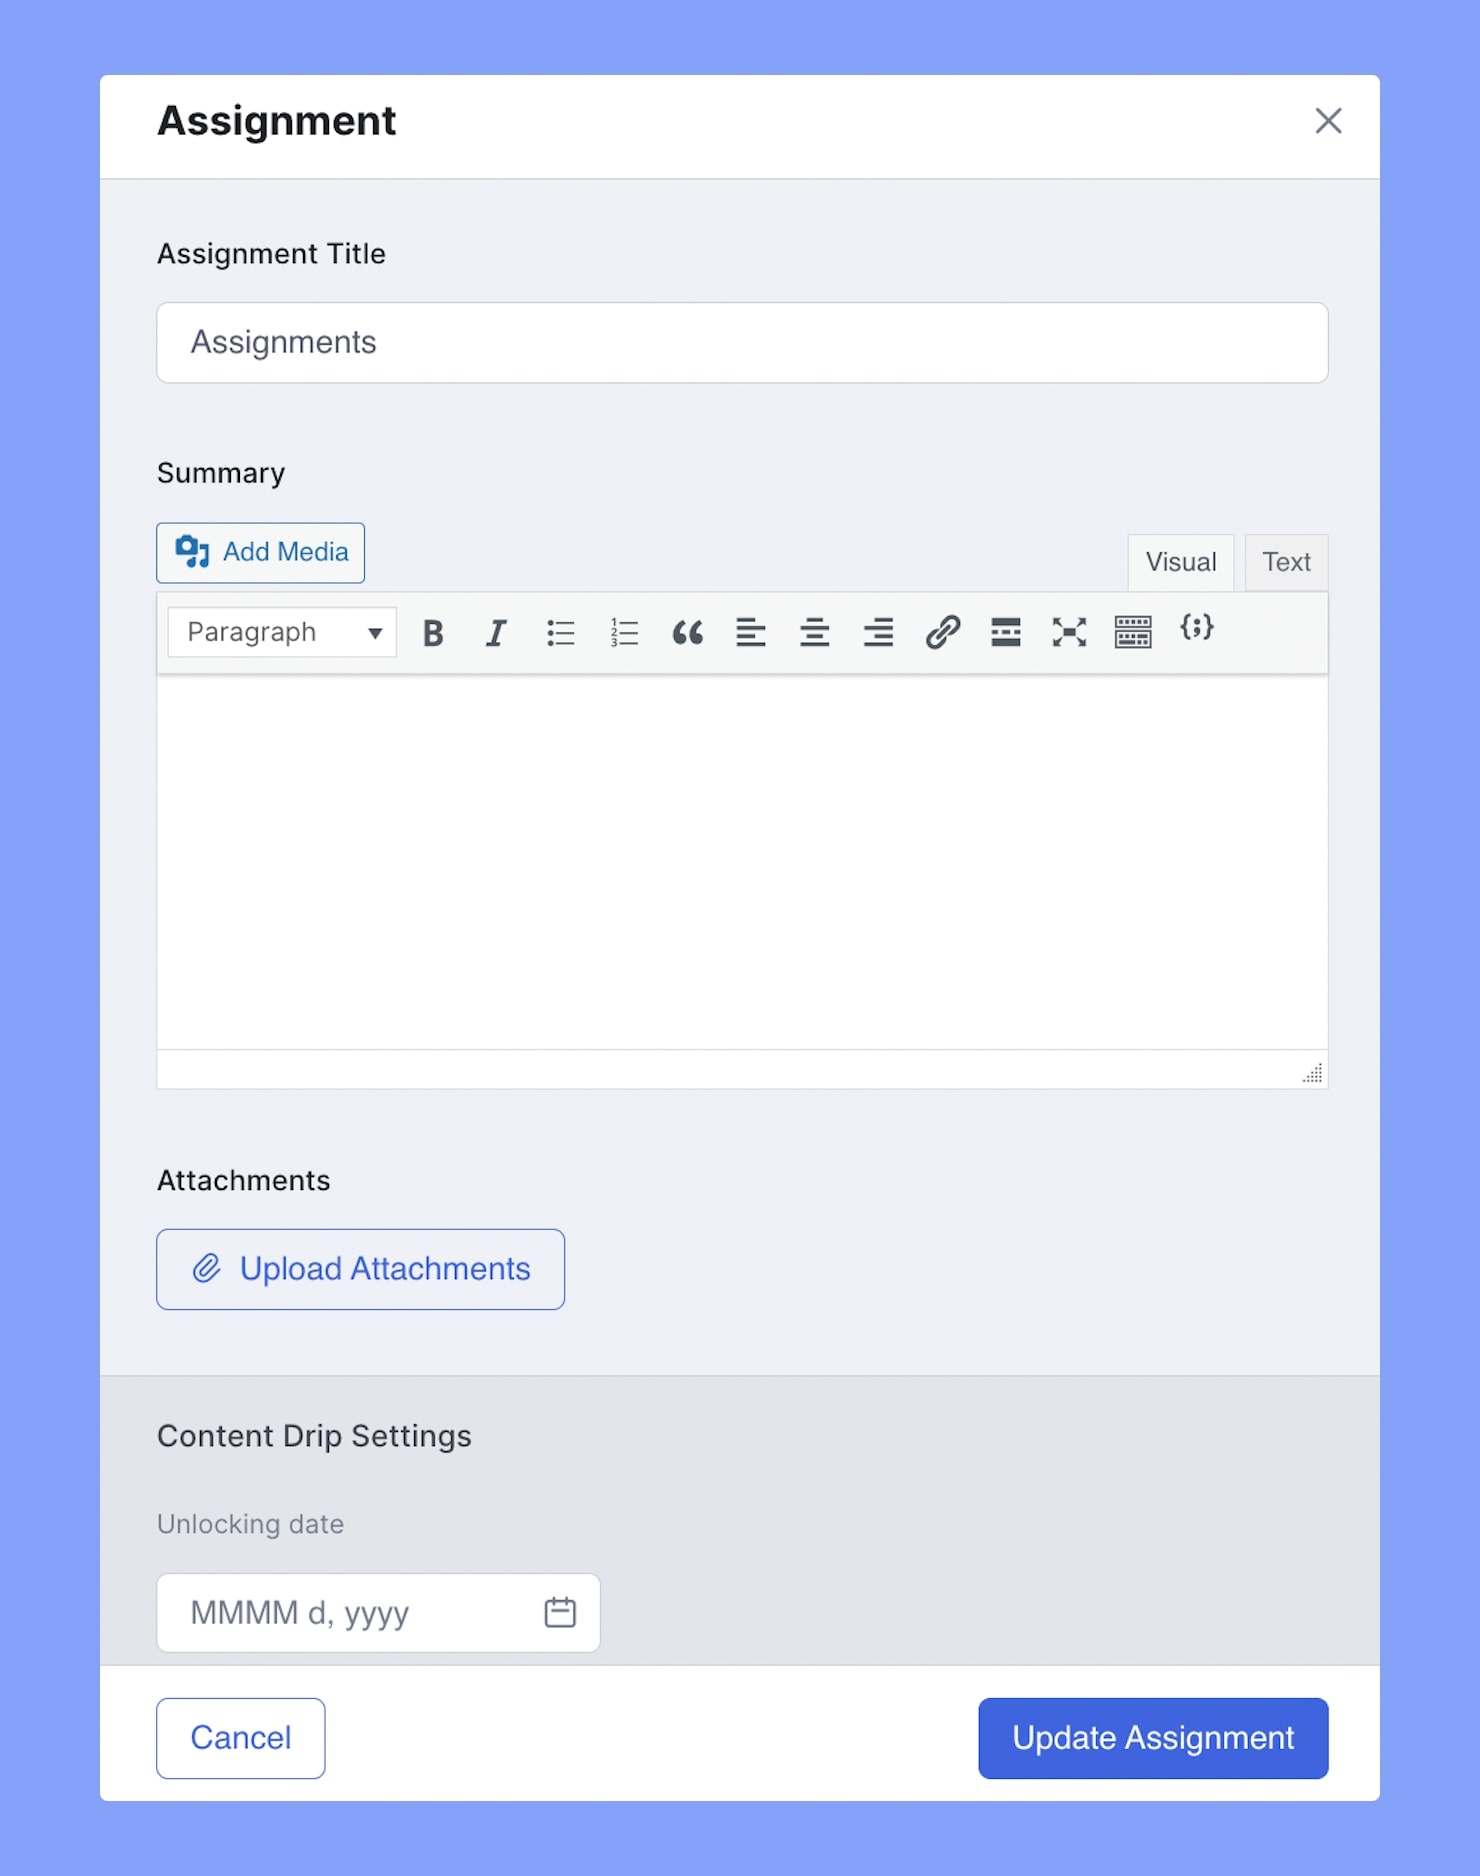
Click on the +Assignments option that should appear below each topic. Add assignment title and description. Upload any attachments and specify the following:
- Time Limit
- Total Points
- Minimum Pass Points
- Upload File Limit
- Maximum File Size Limit
Don’t forget to click on Update Assignment to finish off.
Live Class Integration
While pre-recorded tutorials do their job, nothing beats interactive Live Classes. And that’s exactly why Tutor LMS boasts integration with two major platforms including Zoom and Google Meet.
Zoom & Google Meet are two platforms that are all the rage for meetings like these and courses that offer live sessions are always in high demand. If you want to create the best eLearning environment for your students, then these are great add-ons to consider.
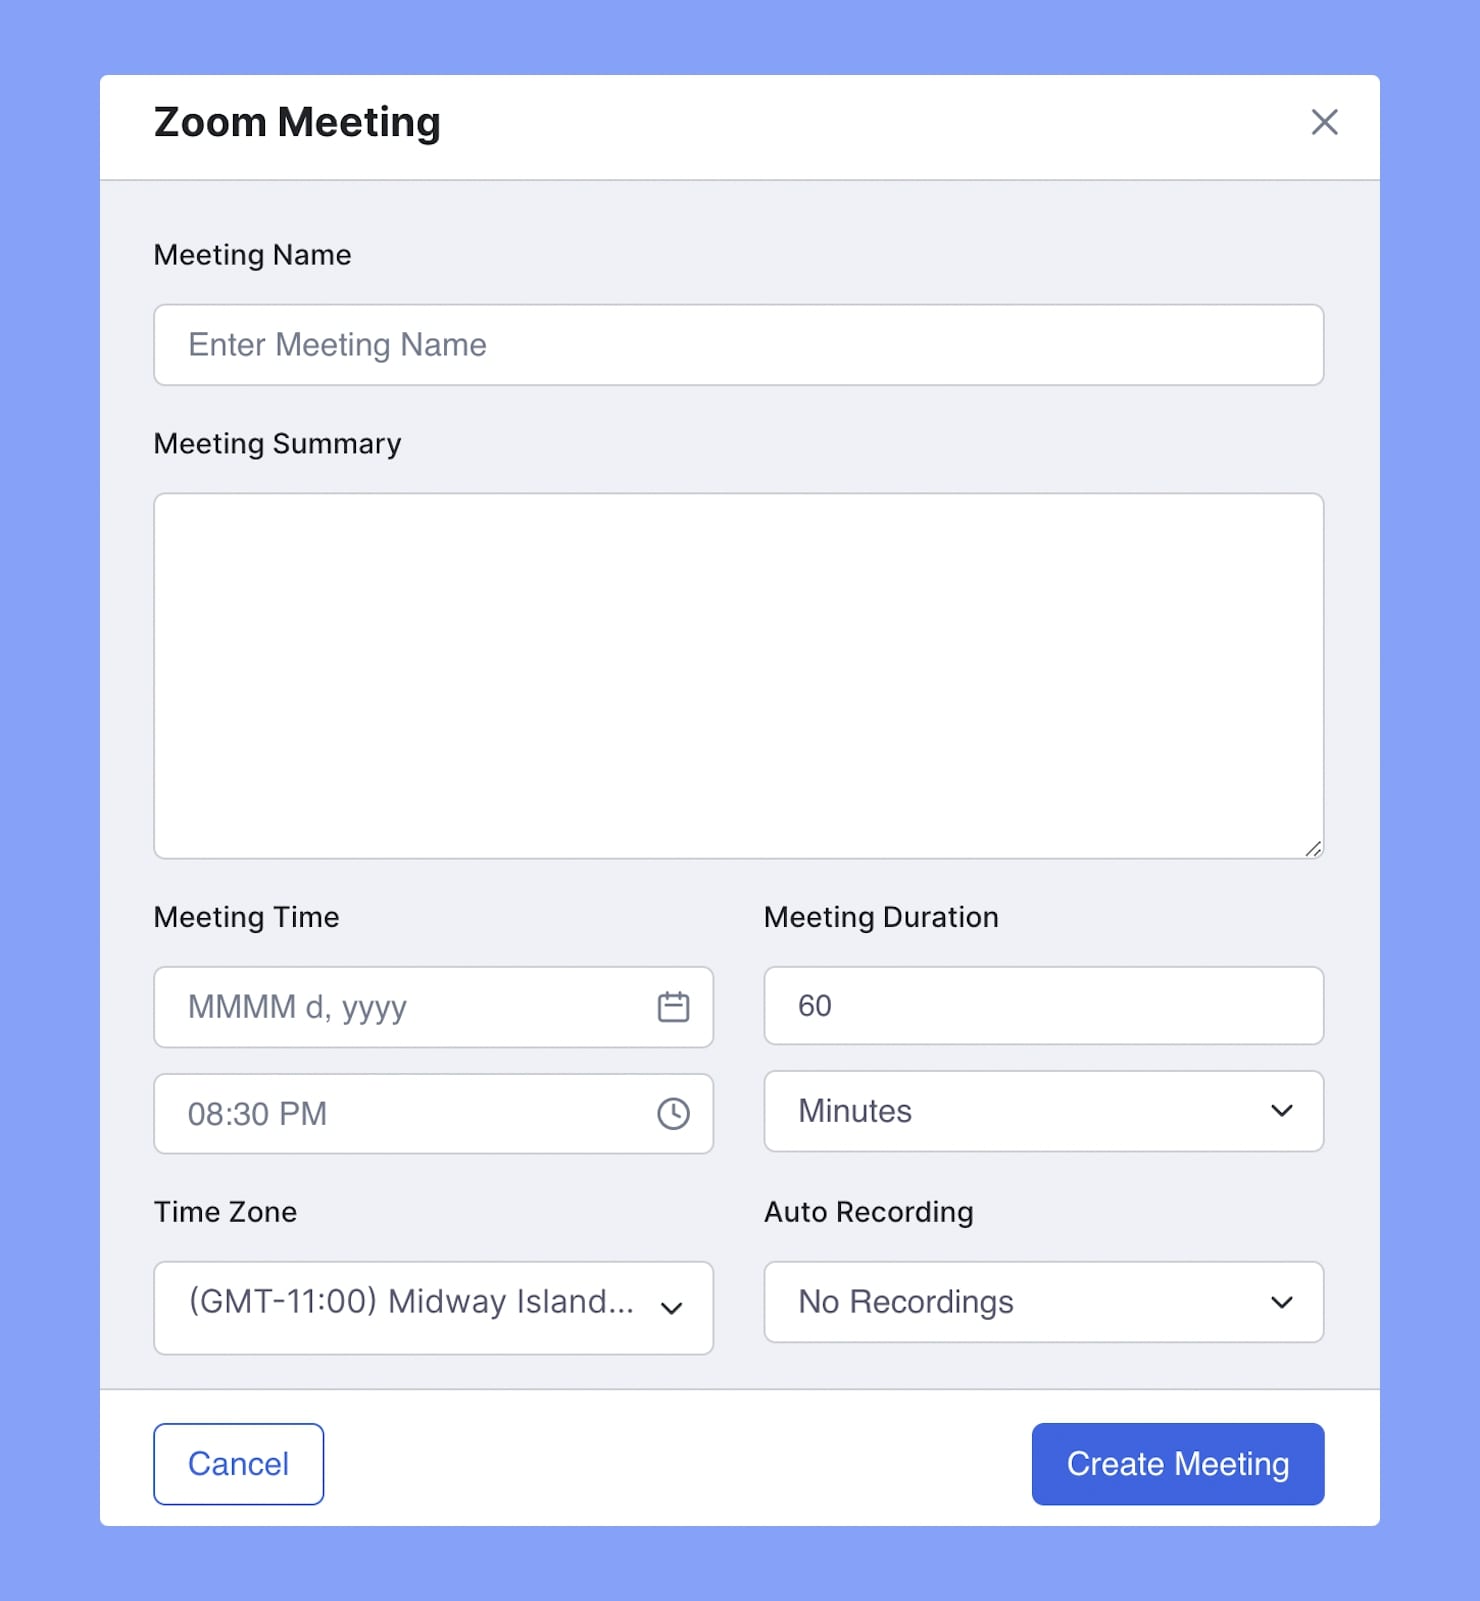
Suppose you’ve enabled and set up the Zoom Integration add-on. All you have to do next is click on the +Create a Zoom Meeting from this section and on the Zoom Meeting window, add the necessary details required and click on Create Meeting.
You can add a Google Meeting in the same way. And you can manage either of these meetings from the Frontend Dashboard and even save their recordings.
Instructors
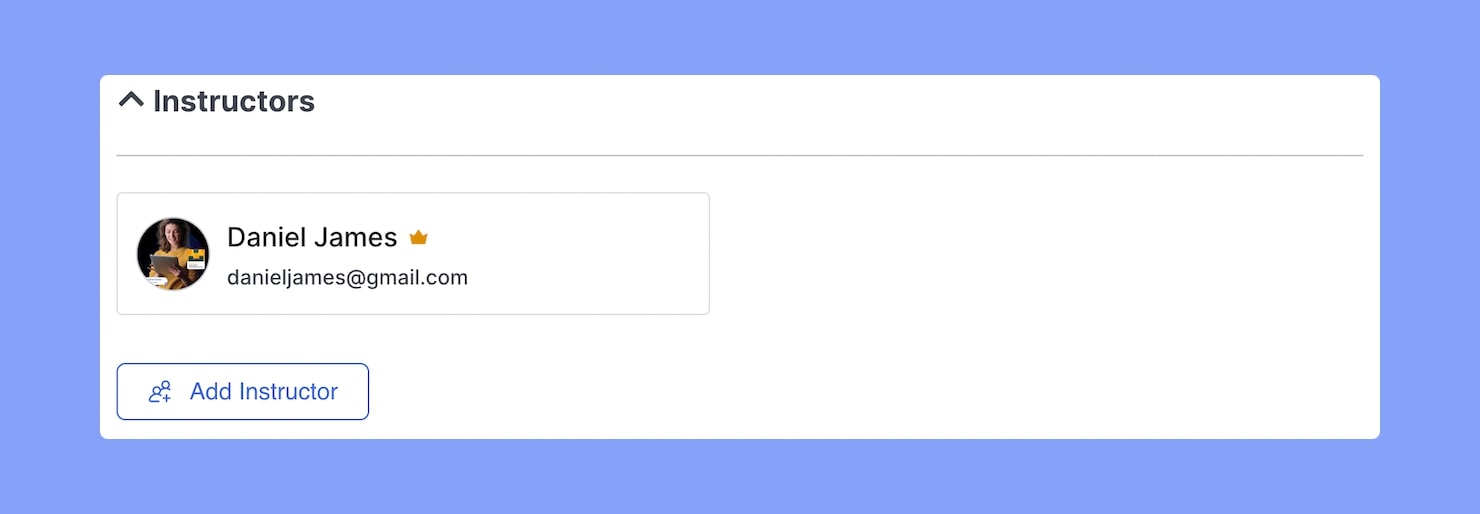
You also have the option to add more instructors to your course if you have enabled the Multi-Instructors add-on. Just click on Add Instructors and select one from the list. If you don’t see any instructors listed, then that means there aren’t any other instructors registered on your site.
Course Attachments
Upload any Course Attachments that you want to add from here. These will be general resources, unlike the lesson-specific ones that you can upload from the Lesson view.
Additional Data
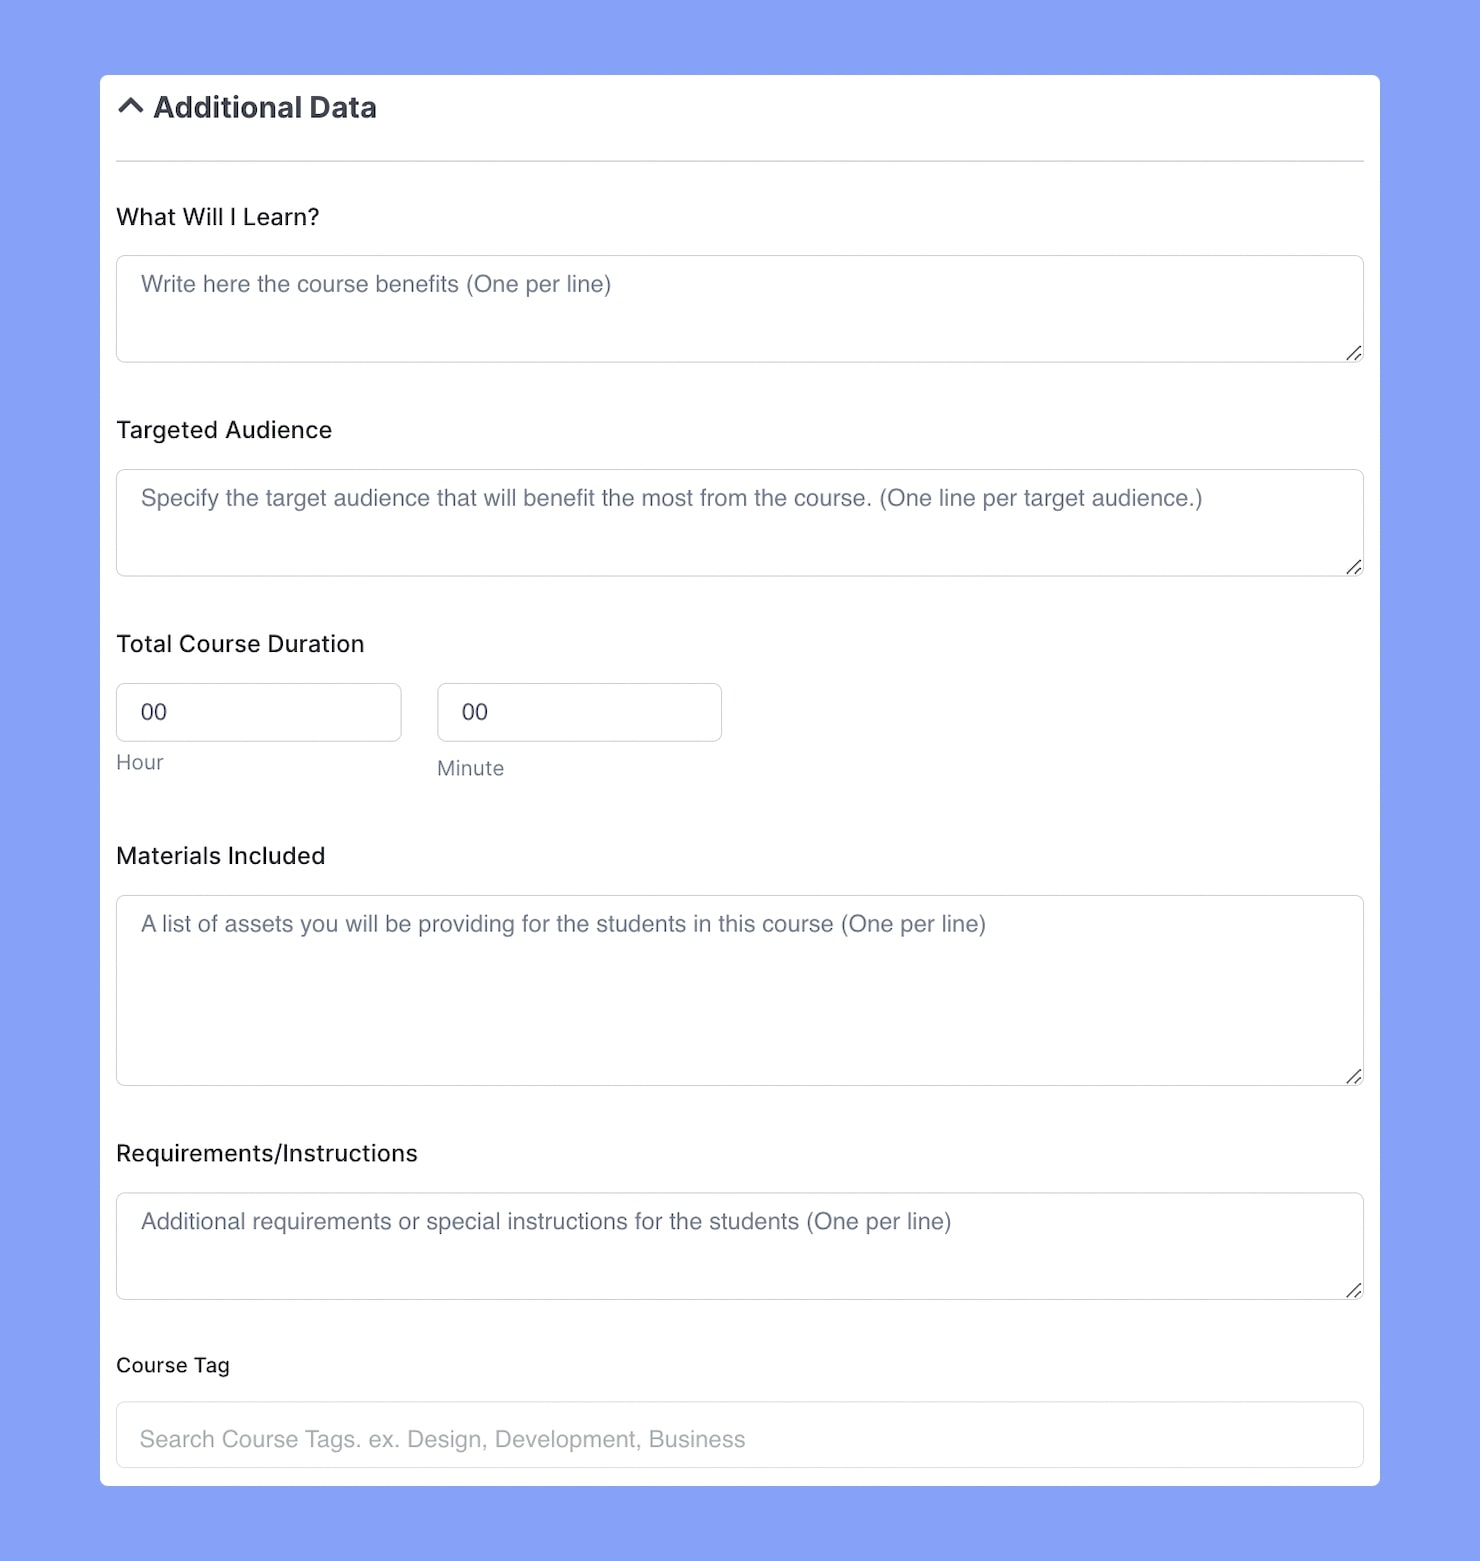
From this next section, you can define some simple information like:
- What Will I Learn?
- Targeted Audience
- Total Course Duration
- Materials Included
- Requirements/Instructions
- Course Tags
Course Pre-requisites
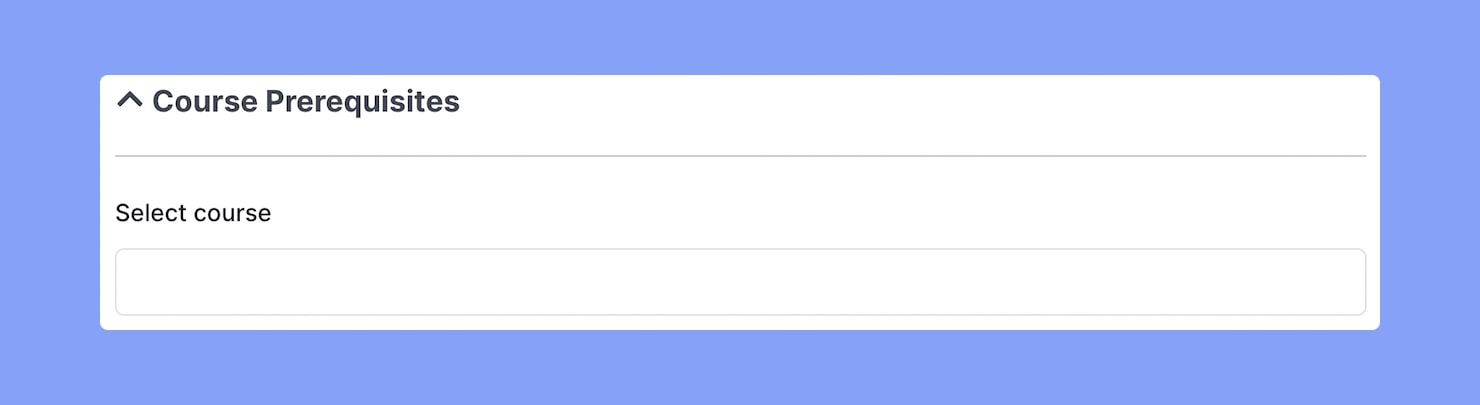
This section appears if you have the Prerequisites add-on enabled. Here you can define courses that a student has to complete before being eligible for this course.
Certificate Template
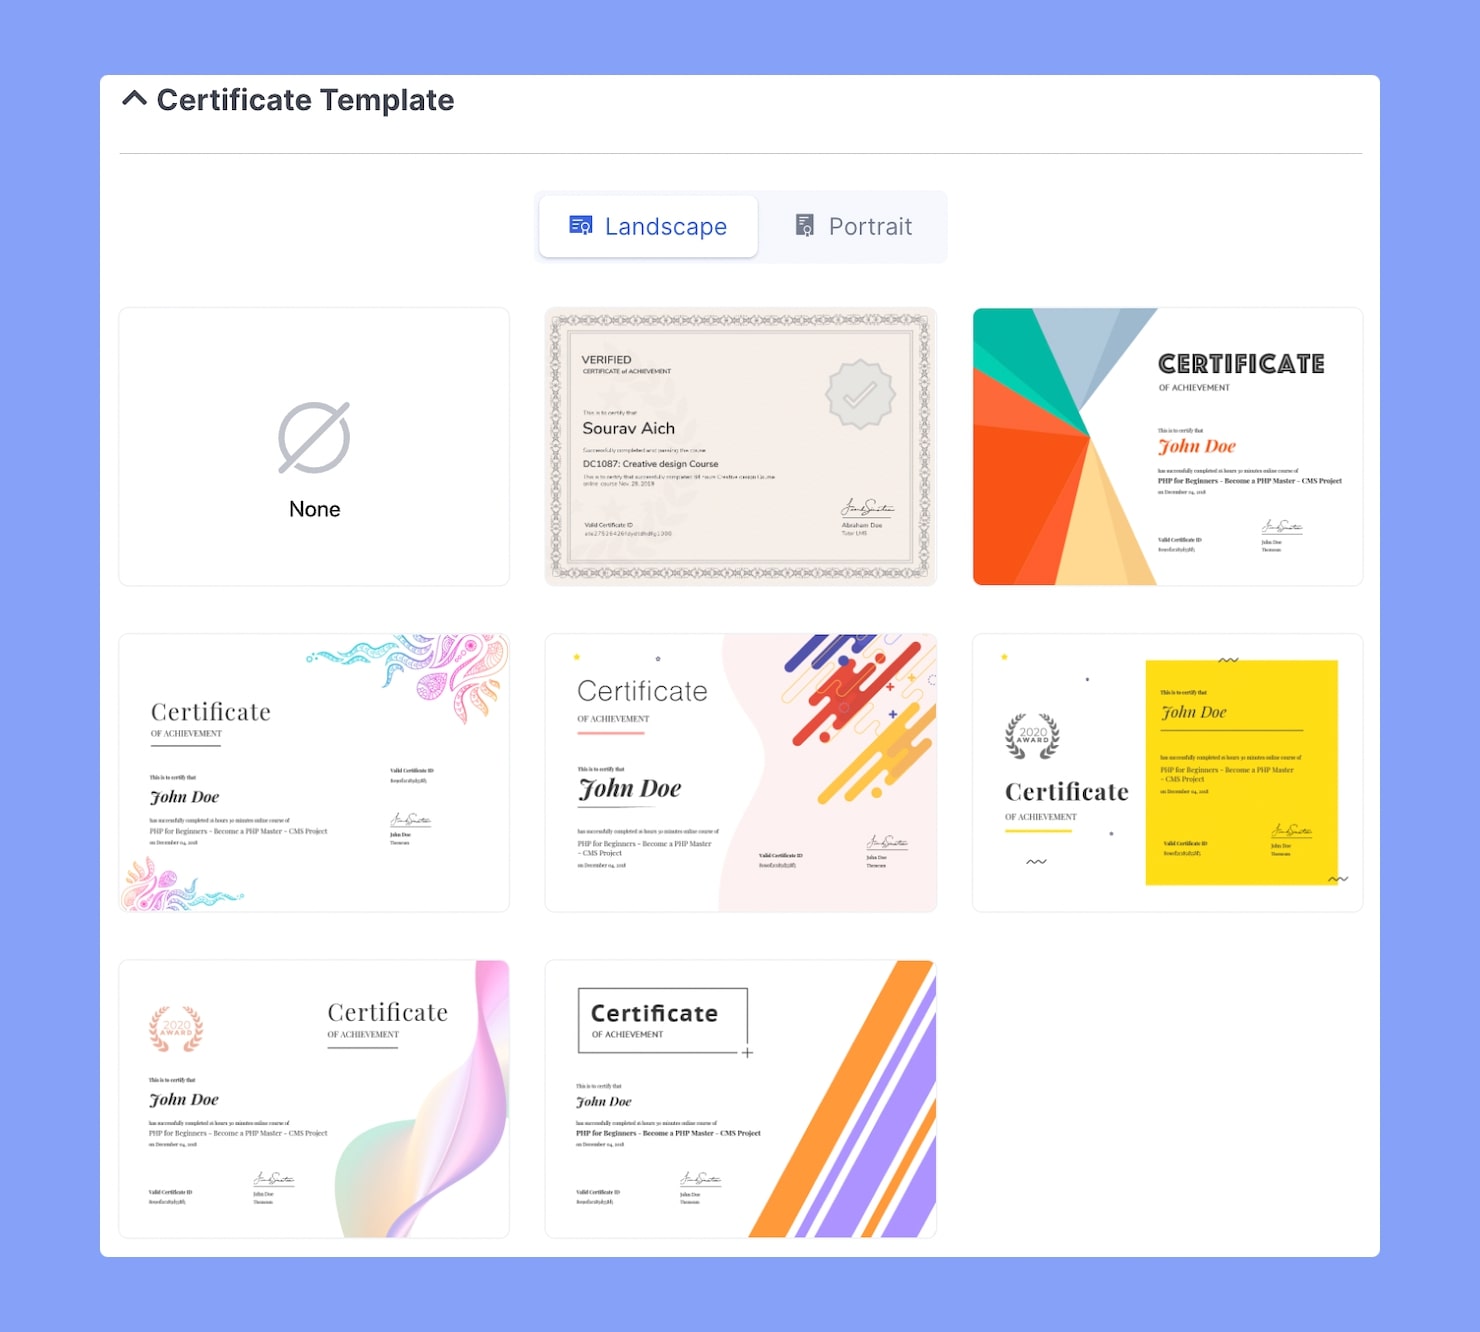
Offering a certificate upon course completion is a feature that highly benefits students. Many can include this in their resumes and also get a sense of accomplishment from it.
The Certificate add-on lets you choose from various template options and, students can download this certificate when they finish a course.
Moreover, you can also create unique your own Custom Certificates if you install the Tutor LMS Certificate Builder extension.
Final Result
And that’s it! Make sure to hit Publish Course once you’ve got everything to your liking. Click exit and head over to this new course from the frontend dashboard to see the final product.
Why Create Courses on the Frontend
The Tutor LMS plugin comes with a backend course builder but so do many other plugins out there. Creating courses on the backend is doable yet, you might find it to be complex.
On the other hand, the Frontend Course Builder is a Tutor LMS Pro feature that allows its users to create courses right from the Frontend with an interface that is more user-friendly and flexible.
Wrapping Up
Wasn’t that super easy? If you have a clear picture of your online course, then creating one on the front end will take you no time at all. But don’t worry if that’s not the case, as you can refer to this post where we discuss structuring a course curriculum in detail!
We hope you found this article easy to follow. Don’t forget to tell us your thoughts on Tutor LMS and the frontend course builder. Till next time, Adios!


cheet raval
Hey, it’s just amazing that we can create a course from the frontend but when we are accessing it from mobile view then it is not much responsive as the words are going outside the box and not equally the content is distributed so if you can improve this feature not only in a next-level update but on regular basis also you can update this quickly so that we don’t have to hesitate with responsiveness for a so long time.
Habiba Rahman
Thank you for your suggestion! We are currently working on responsiveness on our next Tutor LMS 2.0 update. Our team is working hard for a stable release. Keep an eye on our socials for the latest update. Thanks.