To create a new Mega Menu theme, or reconfigure an existing Mega Menu theme, go to WordPress Dashboard > WP Mega Menu > Themes. If you have any Mega Menu theme available on the site, the list will be shown on the upcoming page.

You can create a new Mega Menu theme using the Create New Theme option out there. The Create New Theme option brings the following interface.
Don’t forget to save settings after creating a new Mega Menu theme.
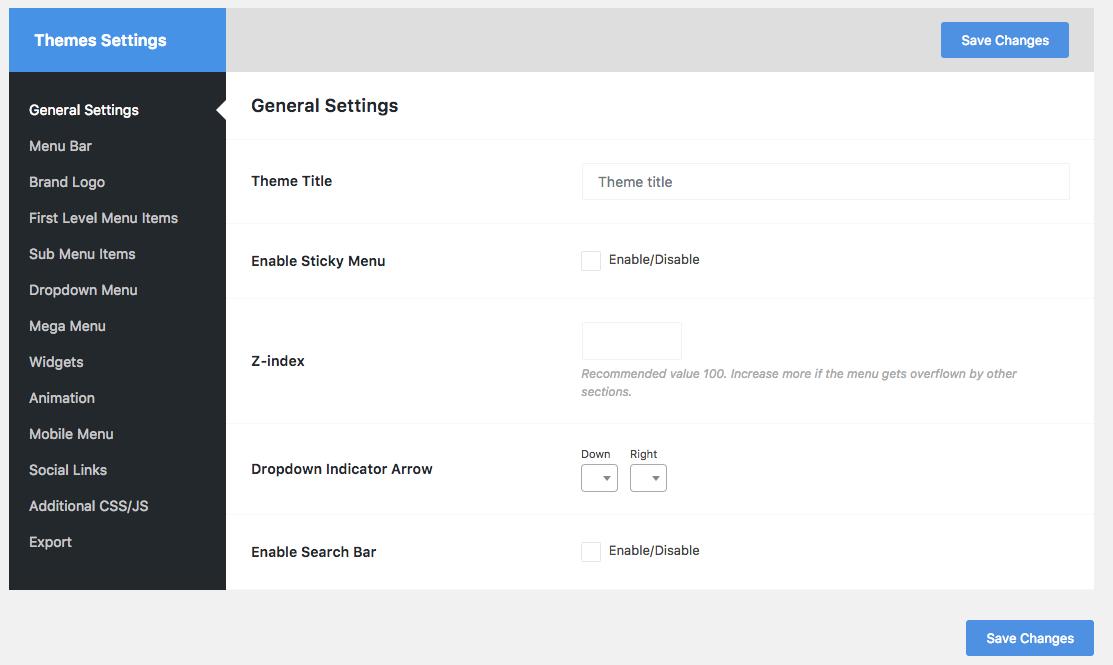
General Settings
This section contains the basic settings for your Mega Menu theme.

Theme Title: In the General Settings section, you need to set a Theme Title to identify the menu theme while choosing it for a menu bar. Go to WordPress Dashboard > WP Mega Menu > Themes, and open a Mega Menu theme in editing mode to find this option.
Enable Sticky Menu: Decide whether the menu bar will be sticky or not. If you enable this option, the relevant menu bar will remain sticky to the top of the website even while you are scrolling down to the site.
Z-index: This value ensures that the menu will not get overflown by the website’s other sections. It must be greater than that of the other contents on the site. Mega Menu’s recommended Z-index value is 100. Increase it more if the menu gets overflown by other sections.
Dropdown Indicator Arrow: If you use a dropdown menu, you can define arrows for the menu items. You can set an indicator icon (down/right) for these dropdown menu items.
Enable Search Bar: In the Mega Menu plugin, we’ve included a search bar menu item option, so you can insert a search bar inside your navigation menu. Decide here whether to use the Mega Menu search bar.
Menu Bar
This section defines the look and feel of the navigation menu bar. Here are lots of options to fine-tune your menu bar. Go to WordPress Dashboard > WP Mega Menu > Themes, and open a Mega Menu theme in editing mode to find this option.
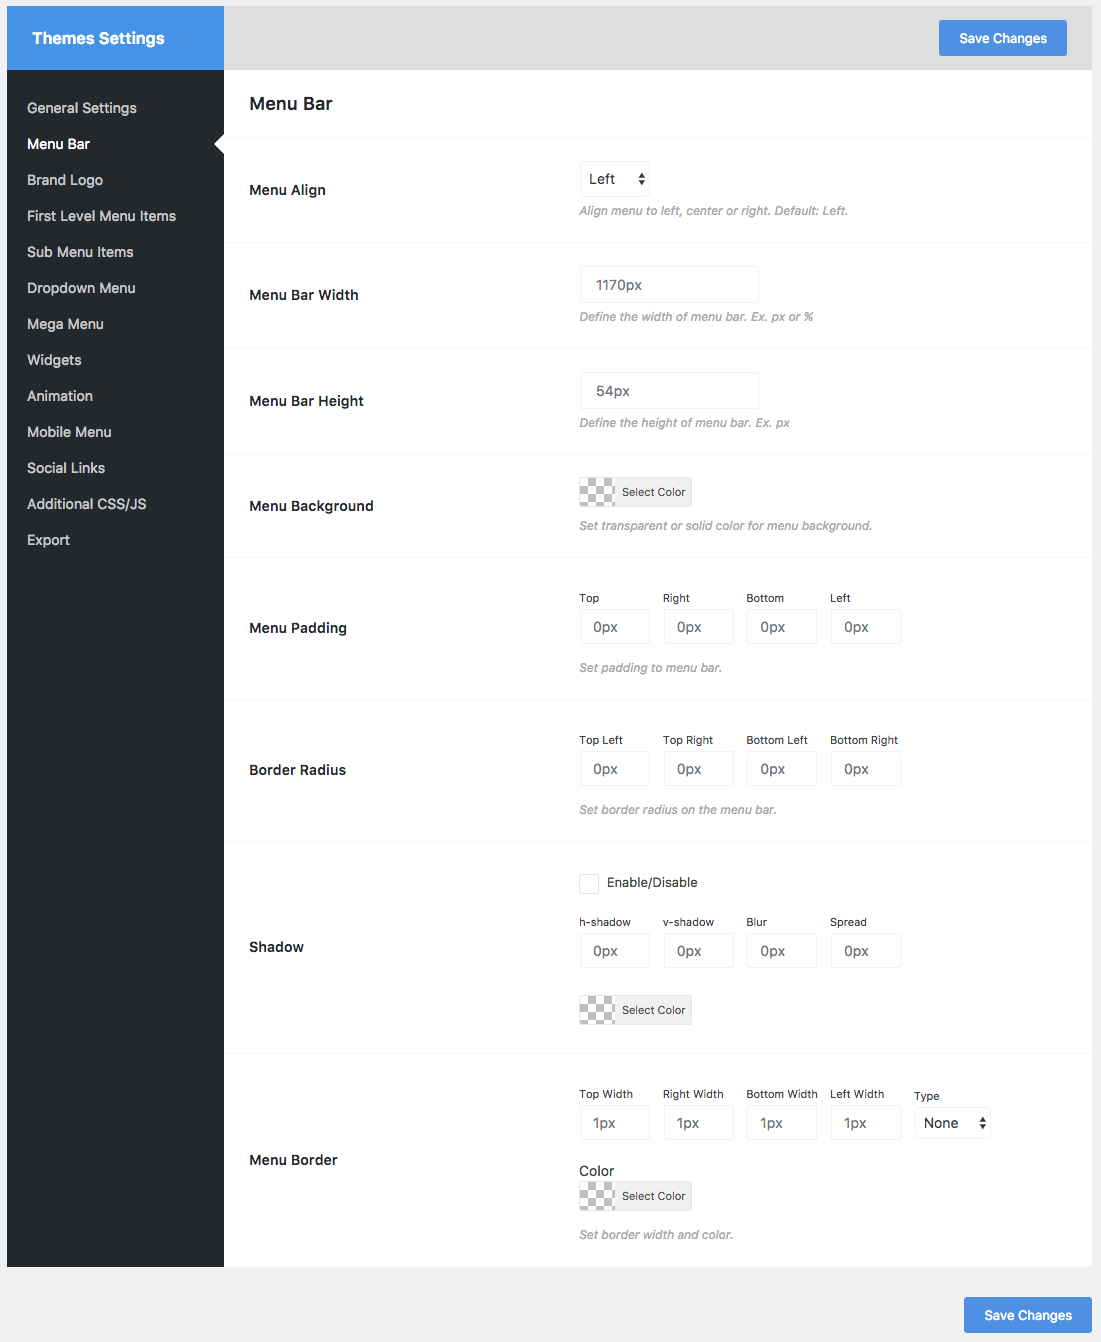
Menu Align: This option lets you decide the menu bar alignment. You can choose menu the alignment as left, center or right. Default: Left.
Menu Background: In Mega Menu, you can set a transparent or solid color for menu background. Define it here.
Menu Padding: You can set the padding for the menu bar using this option. Set padding for top, right, bottom, and left of the menu.
Border Radius: If you want to get rounded menu corners, you can use this option. Set the top left, top right, bottom left, and bottom right radius values in pixel and get rounded menu corners right away.
Shadow: The Mega Menu plugin offers a Shadow feature using which you can place some shadow around your menu bar. You can set the horizontal shadow, vertical shadow, blur, and spread amounts in the pre-defined boxes. Also, choose a shadow color using the color selector given there.
Menu Border: This Mega Menu feature allows you to set a menu border. Define the width (top, bottom, left, right), type (solid, dashed, dotted etc.), and the color here, and the menu border will be added around the menu bar. Don’t forget to save the changes!
Brand Logo
You may like to display your brand logo on your navigation bar. The Mega Menu plugin offers this functionality. Using the Brand Logo option, you can add a logo to the left side of the menu bar. Go to WordPress Dashboard > WP Mega Menu > Themes, and open a Mega Menu theme in editing mode to find this option.
Add logo: Use this option to upload your brand logo file to your website server. You can also simply place a previously uploaded logo image URL instead of uploading a file newly.
Logo width and Logo height: Adjust these fields to fine-tune your logo appearance.
Logo Margin: Set the logo margin to make it appear neat and clean.
First Level Menu Items
On a menu bar, the menu items that we see on the top (at the first glance), are dubbed as First Level Menu Items. These are also known as ‘top level’ menu items. Here is a screenshot of the first level menu item settings. Go to WordPress Dashboard > WP Mega Menu > Themes, and open a Mega Menu theme in editing mode to find this option.
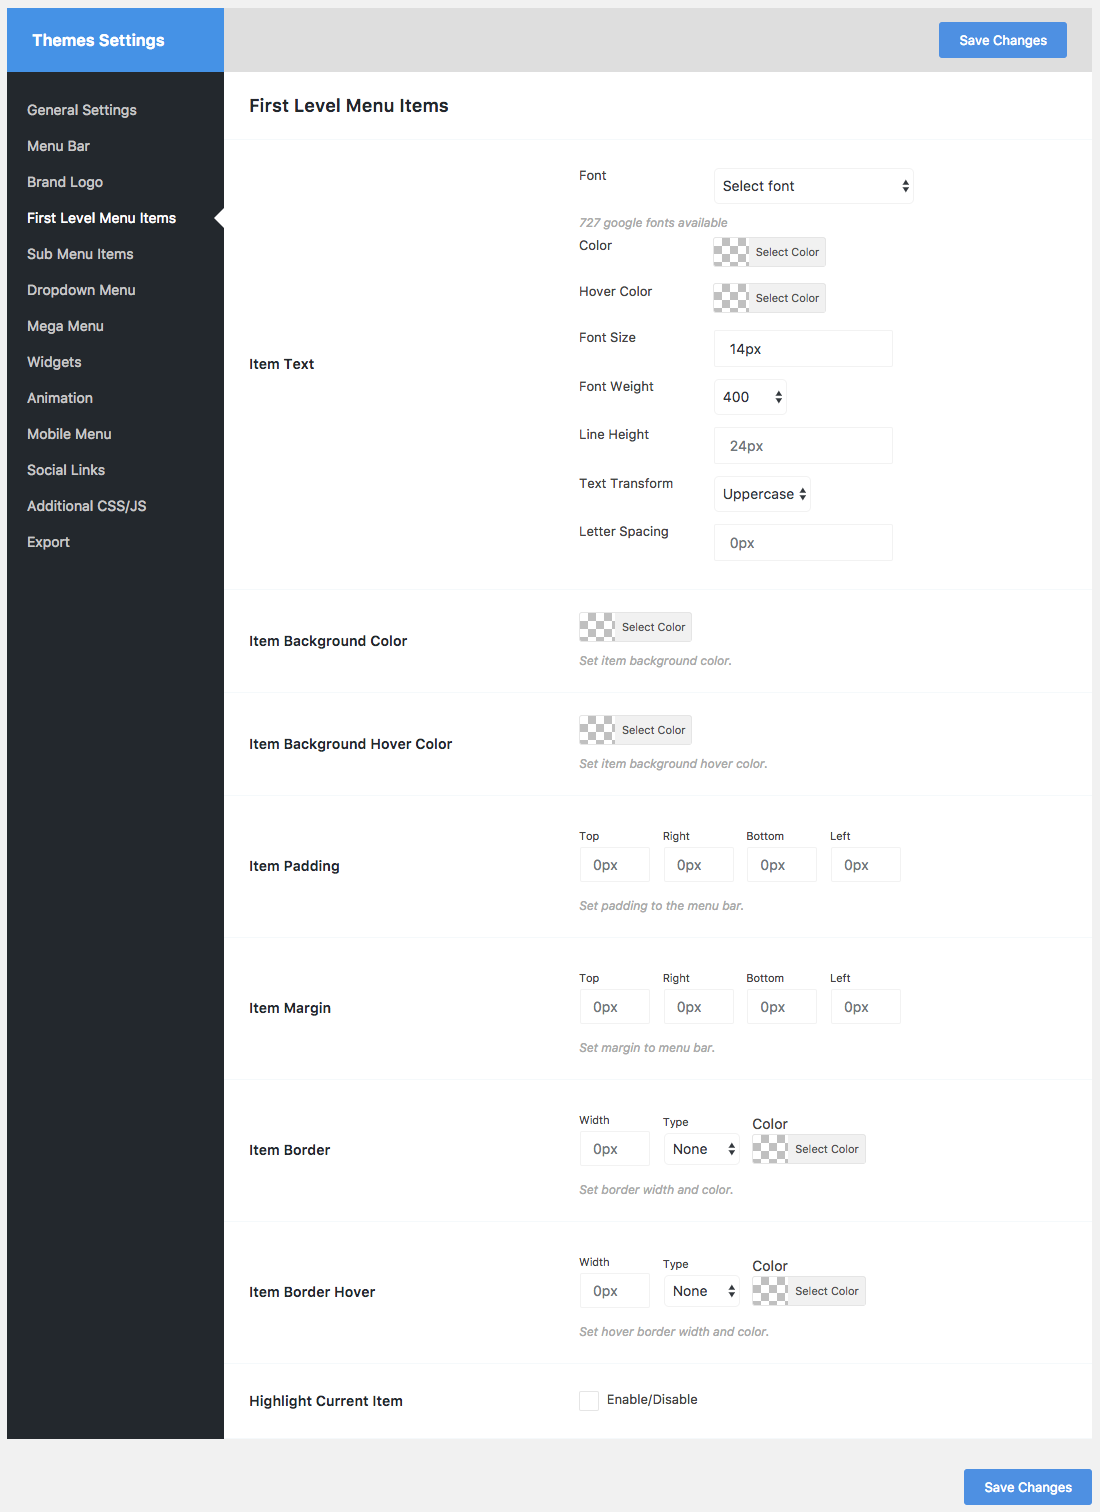
Item Text: Customize the options under this section to change the appearance of the first level menu item texts. Configuration options include font family, color, hover color, font size, font weight, line height, text transform, and letter spacing.
Item Background Color: You can change the first level menu item background color to give your navigation bar a different look. The background color and its transparency can be adjusted very easily using the given tools.
Item Background Hover Color: Set item background hover color using this configuration tool.
Item Padding: Set padding to the first level menu items with this option.
Item Margin: Set margin to the first level menu items with this option.
Item Border: If you want to set a border around the first level menu items, use this feature. You can select a border from several border types such as solid, dashed, dotted and so on. Also, you can choose an item border color as your wish.
Item Border Hover: Do you like to change the first level menu item border styling on a mouse hover? If so, you can do it using this configuration option. You can change the border width, type, and color from here.
Highlight Current Item: While visiting a first level menu item link, you can choose whether the menu item to be highlighted or not. Enable or disable the option here.
Don’t forget to hit the ‘Save Changes’ button.
Sub Menu Items
All menu items under the first level menu items are sub menu items. You can change their look and feel in this section. Go to WordPress Dashboard > WP Mega Menu > Themes, and open a Mega Menu theme in editing mode to find this option.
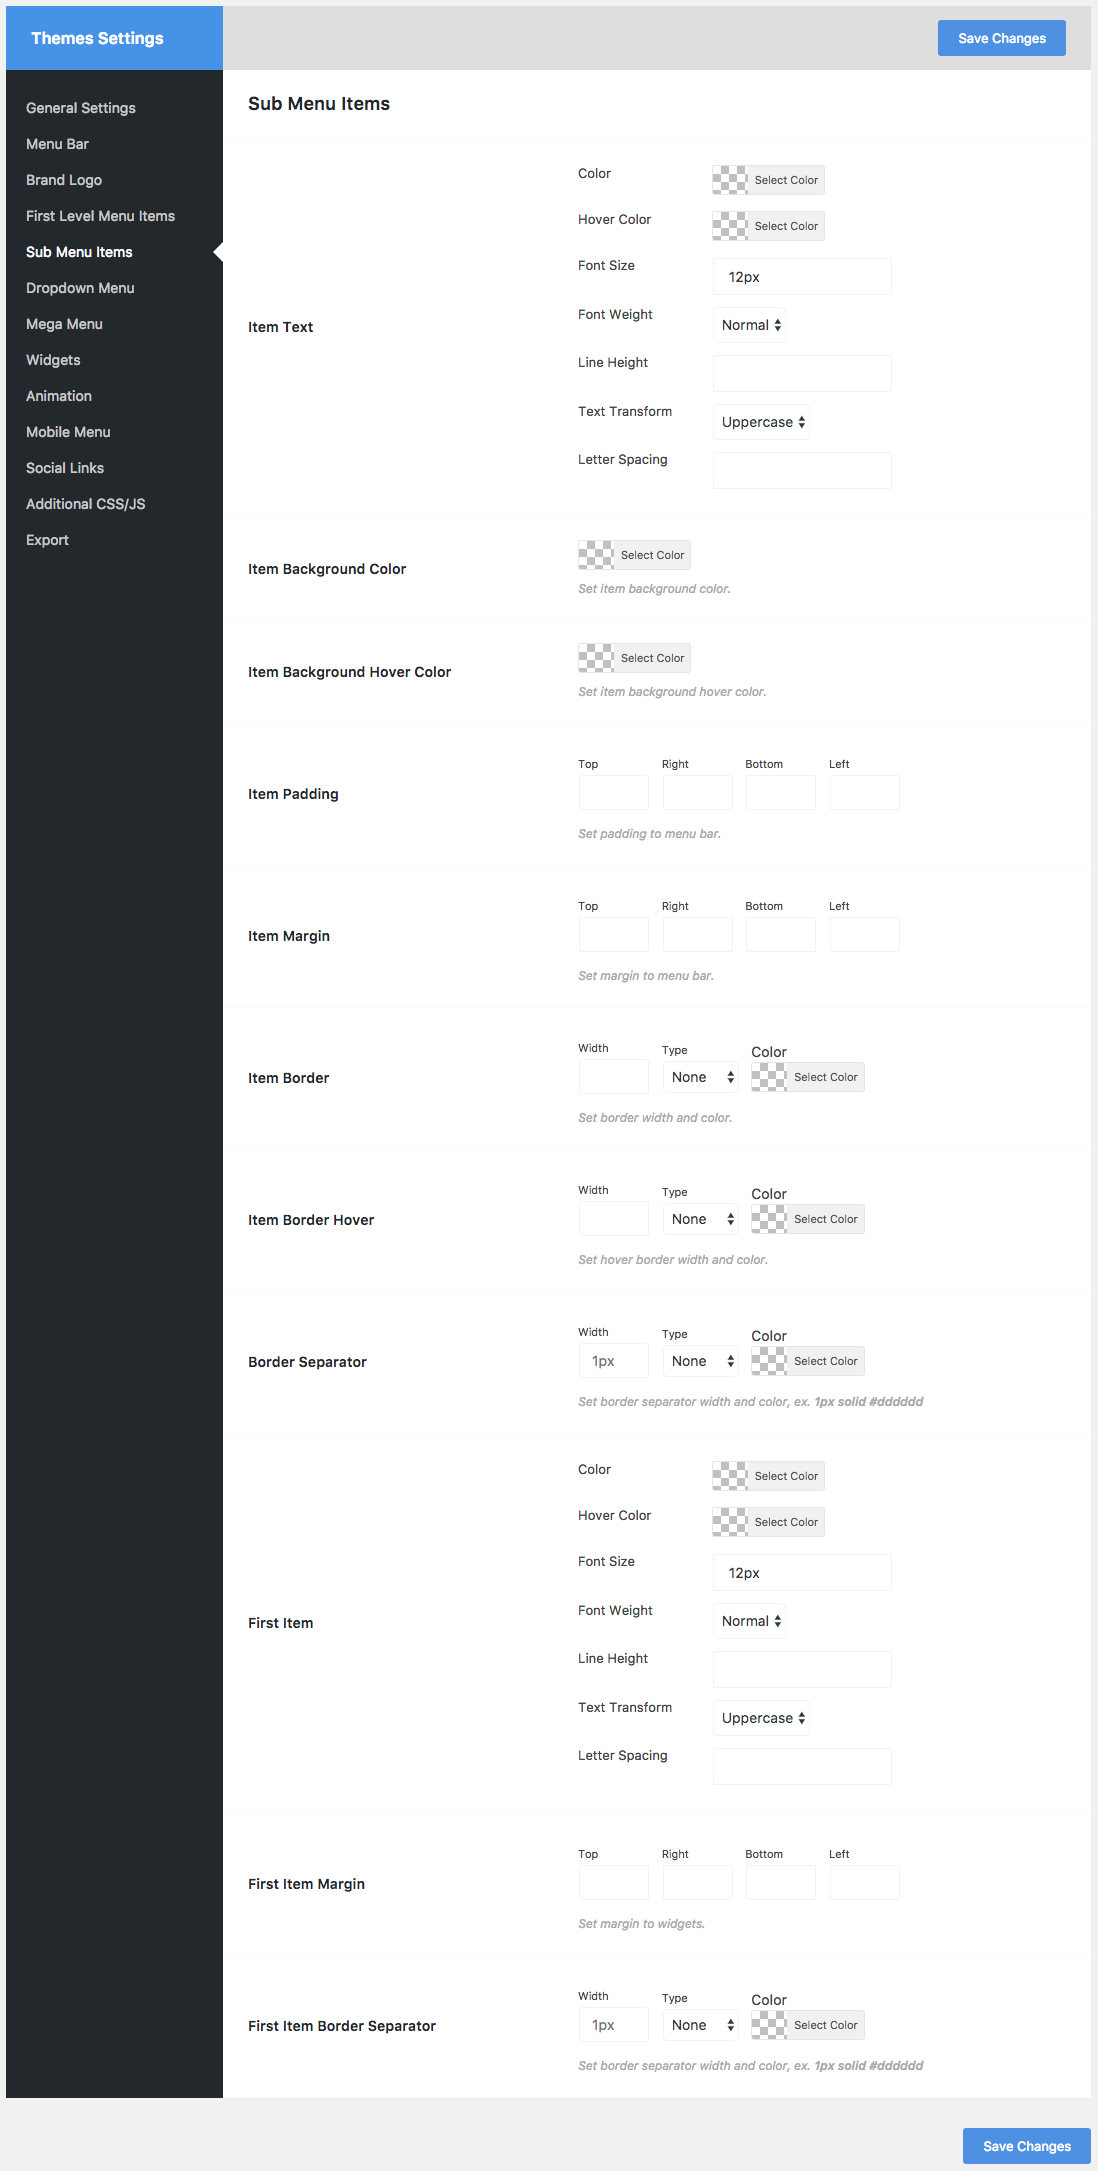
Item Text: Customize the options under this section to change the appearance of the sub menu item texts. Configuration options include font family, color, hover color, font size, font weight, line height, text transform, and letter spacing.
Item Background Color: You can change the sub menu item background color to give your navigation links a distinguishable look. The background color and its transparency can be adjusted very easily using the given tools.
Item Background Hover Color: Set item background hover color using this configuration tool.
Item Padding: Set padding to the sub menu items with this option.
Item Margin: Set margin to the sub menu items with this option.
Item Border: If you want to set a border around the sub menu items, use this feature. You can select a border from several border types such as solid, dashed, dotted and so on. Also, you can choose an item border color as your wish.
Item Border Hover: Do you like to change the sub menu item border styling on a mouse hover? If so, you can do it using this configuration option. You can change the border width, type, and color from here.
Border Separator: To separate the sub menu item borders, use this option. Choose a combination of border separator width, type, and color. Example – Width: 1px, Type: solid, Color #dddddd
First Item: The sub menu items that are located to the top of the sub menus, are called the first items in this context. You can customize the first item color, hover color, font size, font weight, line height, text transform, and letter spacing for the first sub menu item texts.
First Item Margin: Set the margin for the first sub menu item using this option.
First Item Border Separator: You can set a border separator for the first sub menu items to make them stand out from the crowd. Set border separator width and color, ex. 1px solid #dddddd.
Dropdown Menu
For multi-level navigation menu models, dropdown is a very popular choice among the developers. This configuration page offers you several tools to customize the dropdown menu appearance. Go to WordPress Dashboard > WP Mega Menu > Themes, and open a Mega Menu theme in editing mode to find this option.
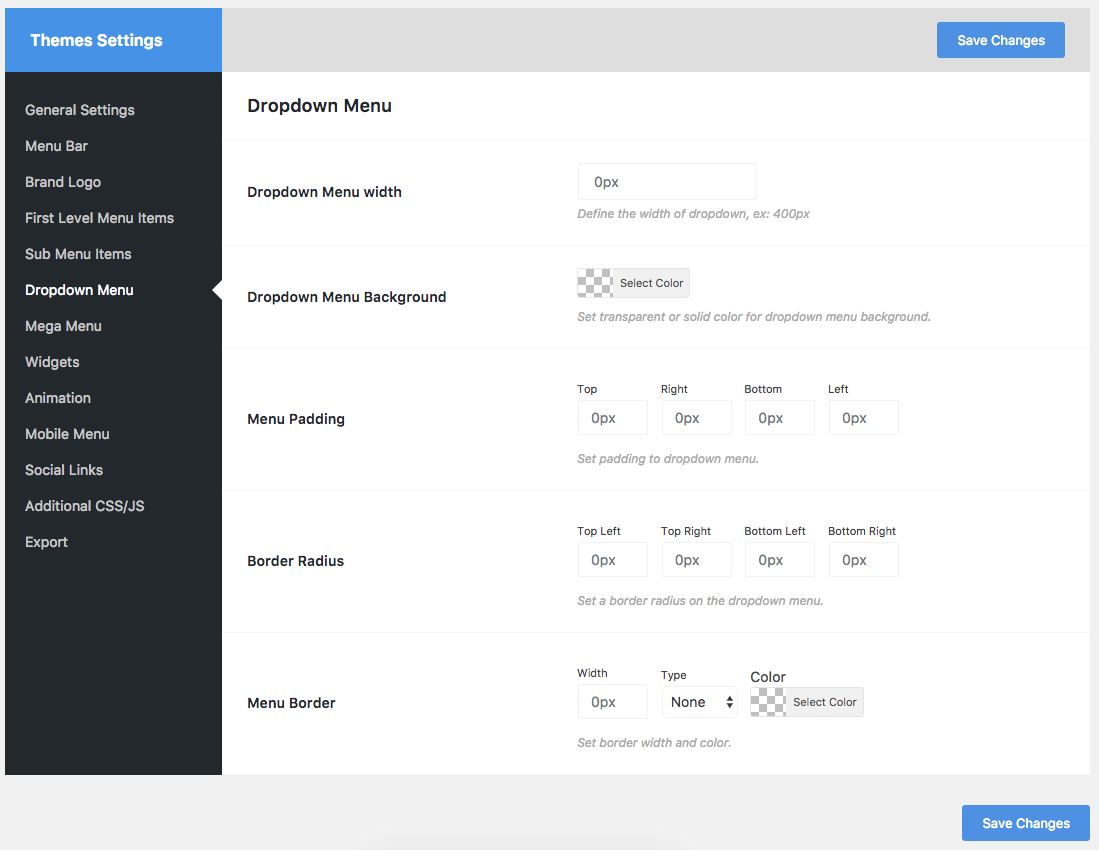
Dropdown Menu Width: Define the width of the dropdown menu, ex: 400px.
Dropdown Menu Background: Set a transparent or solid color for dropdown menu background using this option.
Menu Padding: Set and customize the dropdown menu padding with this functionality. You can easily define the top, bottom, left, and right side dropdown menu padding combination.
Border Radius: Set the border radius to get rounded dropdown menu corners.
Menu Border: Set the dropdown menu border width and color using this option.
Mega Menu
Building mega (versatile) menus is at the heart of the Mega Menu plugin. You can build and customize rich stunning navigation bars with the tool. The following screenshot shows the common mega menu theme configuration options. Go to WordPress Dashboard > WP Mega Menu > Themes, and open a Mega Menu theme in editing mode to find this option.
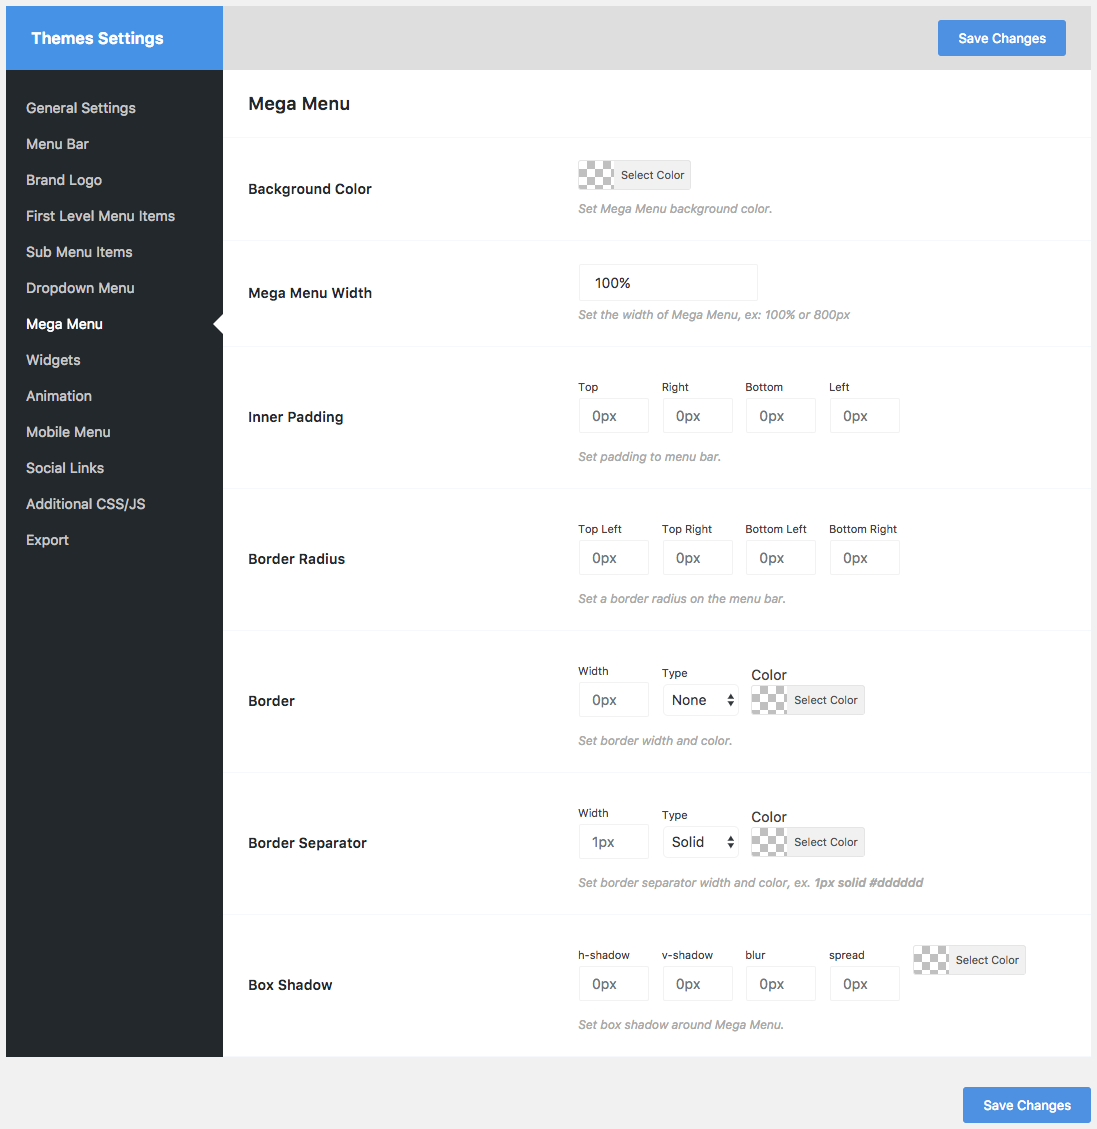
Background Color: Set Mega Menu background color using this option. Your big menu area will get this color as its background.
Mega Menu Width: What will be the width of the huge mega menu? Define it here. You can choose it in percentage (compared to the web page resolution), or define in pixel.
Inner Padding: Set the inner padding for the mega menu area. Use the boxes to define the top, bottom, left, and right side padding values.
Border Radius: To get rounded corners on your mega menu borders, use this option. Set the border radius in pixel in the defined boxes.
Border: Set a border for the mega menu area. You can choose the border width, border type (solid, dotted, dashed etc.), and the border color.
Border Separator: To separate the mega menu item borders, use this option. Choose a combination of border separator width, type, and color. Example – Width: 1px, Type: solid, Color #dddddd.
Box Shadow: To get a box shadow around your mega menu, use this function. You can set the horizontal shadow, vertical shadow, blur, and spread amounts in the pre-defined boxes. Also, choose a shadow color using the color selector given there.
Widgets
You can add and display several widgets on the menu bar via Mega Menu items. It’s so easy to add and customize. Here are the customization options. Go to WordPress Dashboard > WP Mega Menu > Themes, and open a Mega Menu theme in editing mode to find this option.

Heading Typography: For the widget heading typography, you get color, hover color, font size, font weight, line height, text-transform, and letter spacing customization options.
Padding: Set the widget paddings here. Use the boxes to define the top, bottom, left, and right side padding values.
Item Margin: Set the widget margins here. Use the boxes to define the top, bottom, left, and right side padding values.
Border: Set a border for the menu widget area. You can choose the border width, border type (solid, dotted, dashed, etc.), and the border color.
Item Border Hover: If you like to change the widget menu item border styling on a mouse hover, you can do it using this configuration option. You can change the border width, type, and color from here.
Content Color: Set the widget content color using this option.
Animation
We’ve provided several animation effects for the mega menu contents. Choose an effect from here.
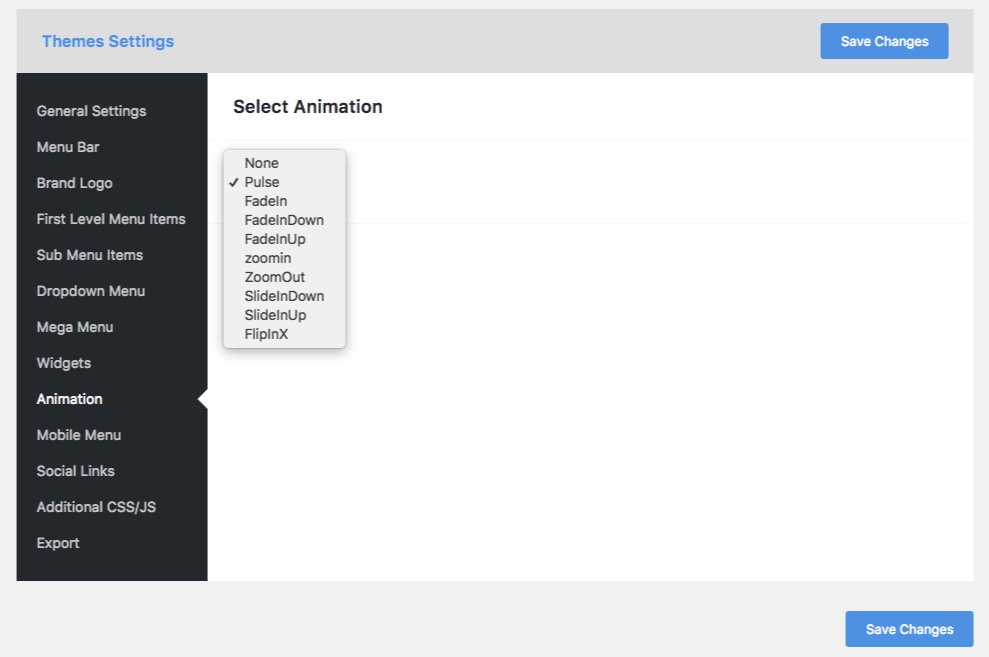
Go to WordPress Dashboard > WP Mega Menu > Themes, and open a Mega Menu theme in the editing mode to find this option.
Mobile Menu
With Mega Menu, you have the option to show or hide the mega menu on mobile devices. If you want to display the mega menu items on mobile devices, you need to configure a few things. Check the following screenshot and texts. Go to WordPress Dashboard > WP Mega Menu > Themes, and open a Mega Menu theme in the editing mode to find this option.
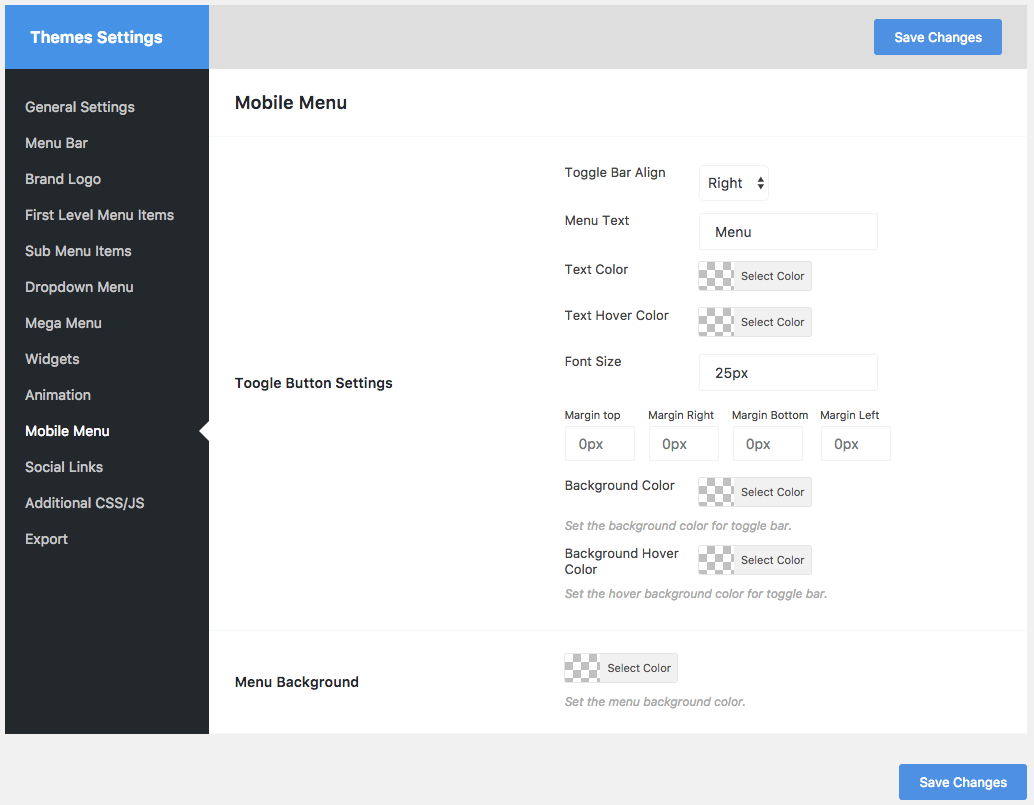
Toggle Button Settings: On mobile devices, you get smaller screens where you cannot display the mega menu items like desktops. So you need to display a toggle button instead. Tapping this button will open your menu area. You can customize the button alignment (left/right/center), menu title text, font size, text color, text hover color, hover colors, background color, margin, and so on.
Menu Background: This option lets you add a background color to your mobile menu bar.
Social Links
To let the website owners show their social media profile links on the menu bar, we’ve included the Social Links option. You can turn it on or off, whatever you want. Also, you can decide whether the social links to be opened in new or current tabs.
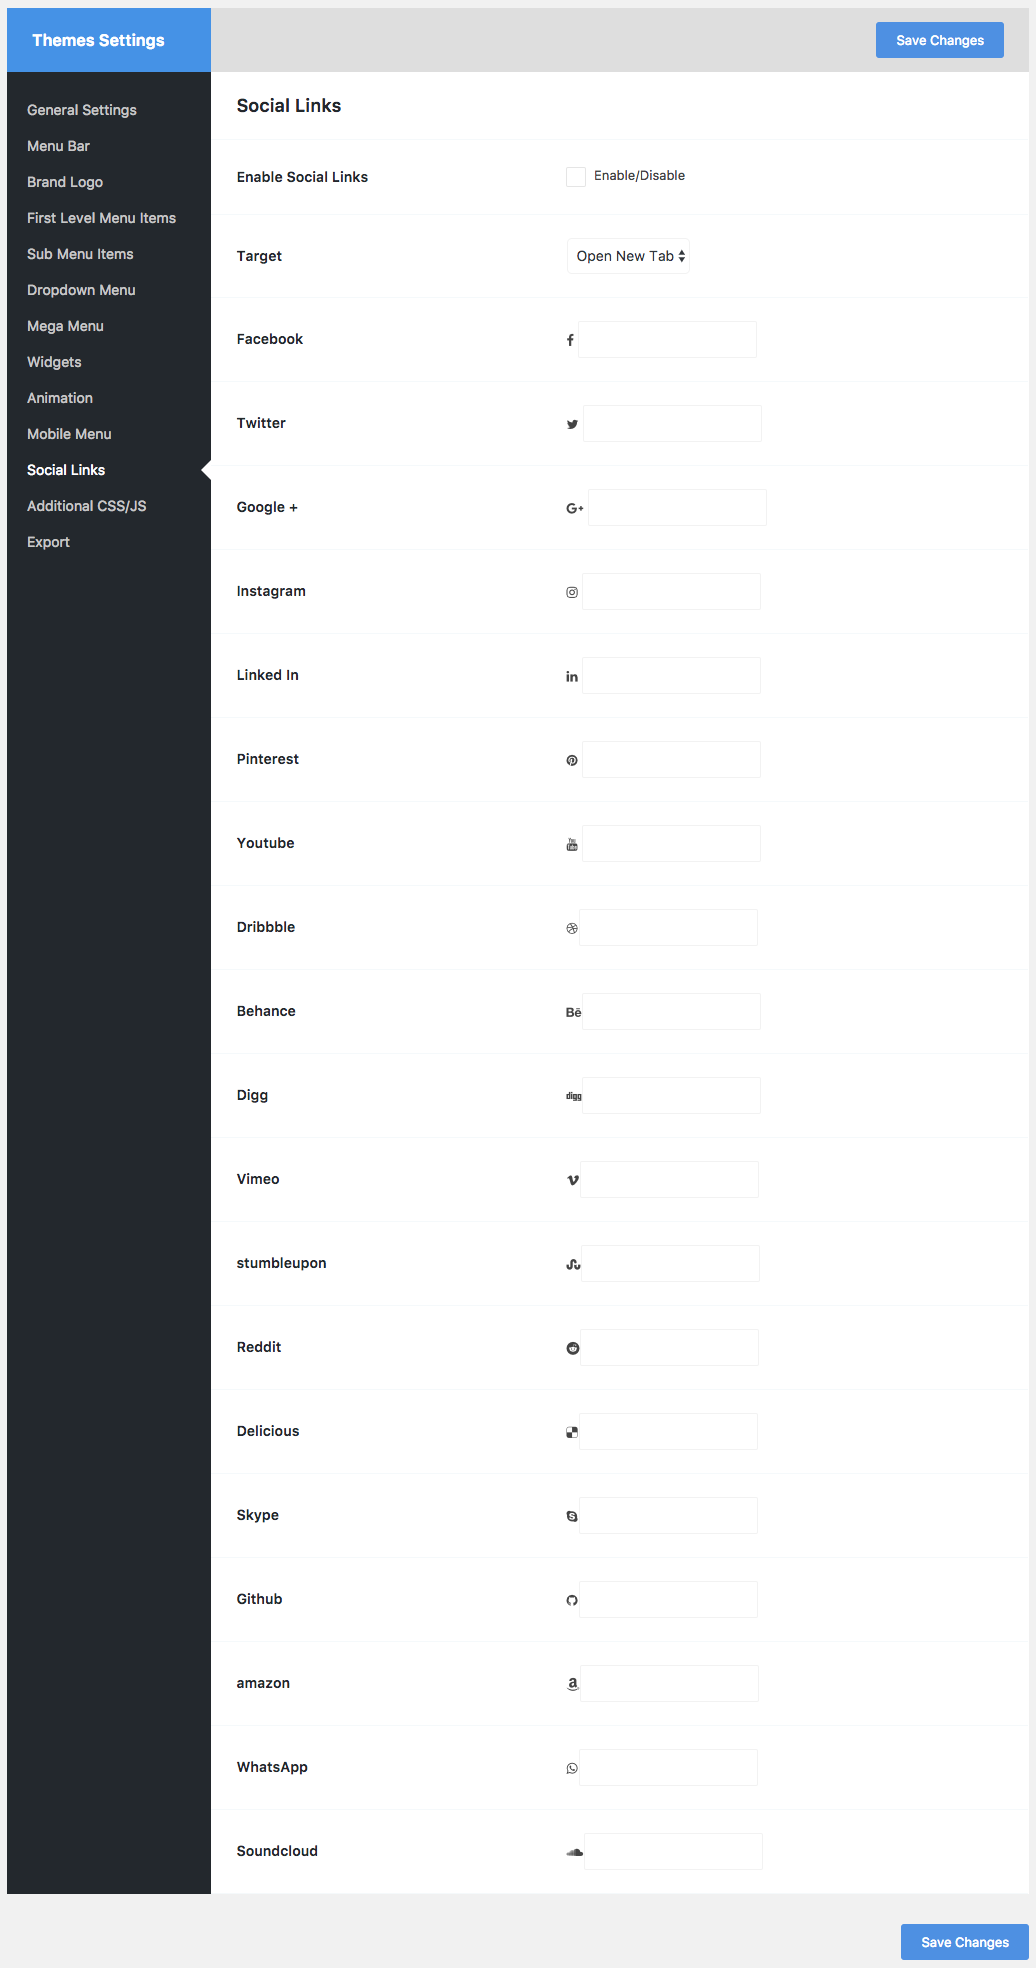
Go to WordPress Dashboard > WP Mega Menu > Themes, and open a Mega Menu theme in the editing mode to find this option.
Additional CSS/JS
You can add custom class, CSS and JavaScript codes to extend the Mega Menu functionalities.
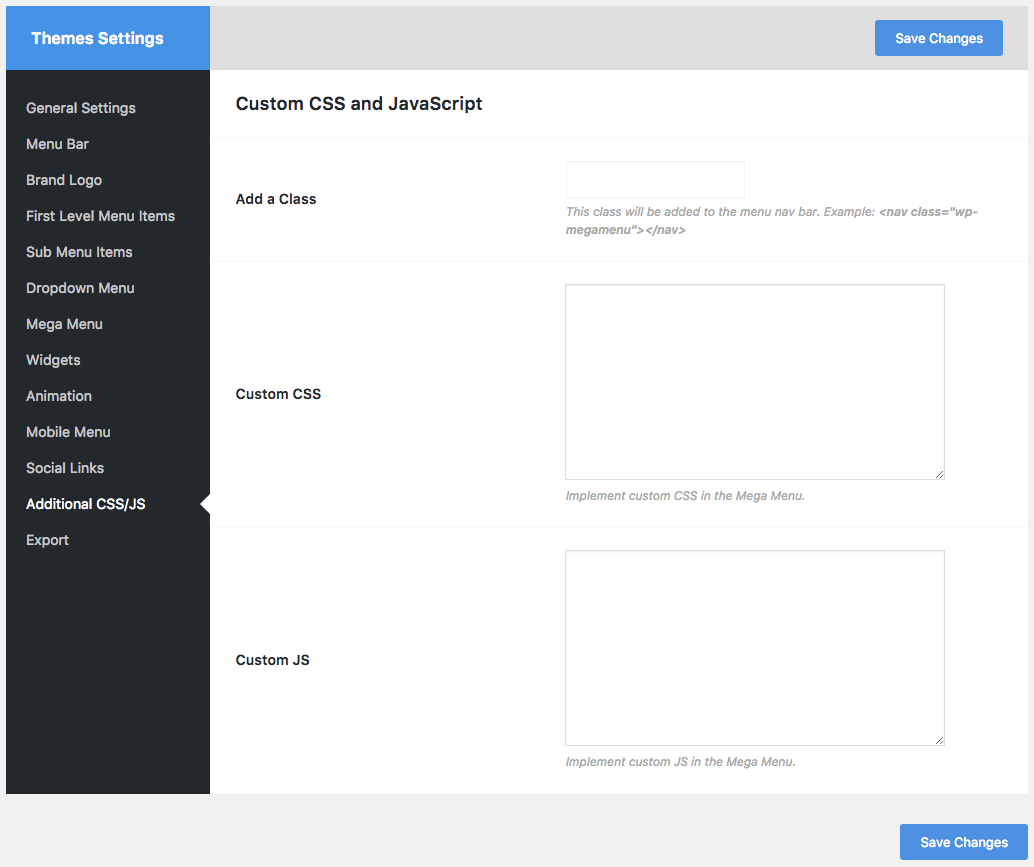
Go to WordPress Dashboard > WP Mega Menu > Themes, and open a Mega Menu theme in the editing mode to find this option.
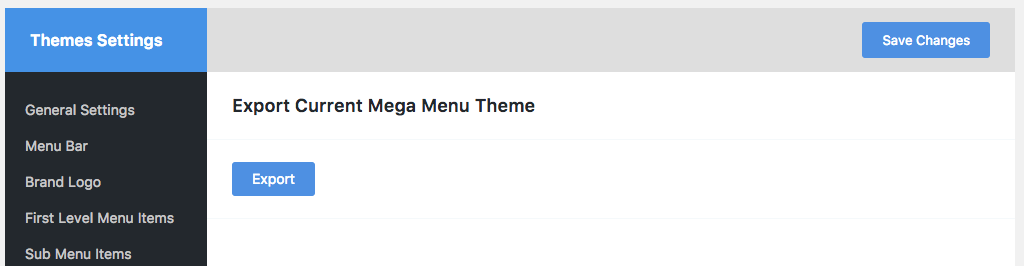
Export Mega Menu Theme
You can export a Mega Menu theme anytime to retain a backup of the menu theme design and configuration. Then you can import it anytime from the exported .txt file. Go to WordPress Dashboard > WP Mega Menu > Themes, and open a Mega Menu theme in the editing mode to find the export option.
Visit WordPress Dashboard > WP Mega Menu > Themes to find the import option.