
It is a well-known fact that when it comes to making money online, WordPress offers an unprecedented level of flexibility. And arguably, WordPress’s most popular method of making money is selling online courses through a WordPress Learning Management System (LMS) plugin.
Most entrepreneurs adapt to selling online courses as an additional source of revenue. But with the growing knowledge economy, global demand for online courses is at an all-time high. This ever-growing demand, coupled with the tendency of people trying to avoid physical classes preferring the comfort of their homes instead, makes it the best time to sell courses online.
So today, in this article, we’ll share with you a wealth of knowledge on what exactly an LMS is, how to set it up, and how you can start selling your courses online using WordPress.
What You’ll Need to Start Selling Courses Online
Before moving on to the good bits, let’s highlight a few prerequisites:
Domain & Hosting
First, you will need a domain. A domain is your website’s address and how visitors find your webpage. Simply put, it is the name of your website — this could also be your brand’s name.
Next, you will need a Web Host to store all your website’s files and data. Deciding on the right web hosting service is very important, and your choice of hosting package will vary based on your budget. Cloudways, DigitalOcean, SiteGround, and HostGator are some popular hosting companies to checkout.
Content Management System (CMS)
A CMS software application enables users to create, edit, collaborate, publish and store digital content.
Our CMS of Choice is WordPress. It is the obvious choice as a free website-building platform that powers 43% of the web.
Learning Management System (LMS)
An LMS is a software application used for planning, implementing, and assessing a specific learning process.
For this article, we will be using Tutor LMS, a WordPress LMS plugin. Tutor LMS is a freemium online education tool with multiple payment gateway support, course building, quizzes & tests, lessons, grading capabilities, and more.
Step 1: Install WordPress and Tutor LMS
WordPress is renowned for its ease of installation and is completely free. However, as mentioned earlier, other costs are associated with getting your website up and running.
Install WordPress
With the two prerequisites out of the way, you’re ready to download and install WordPress. For a detailed guide on installing WordPress, check out the official installation guide here.
Install Tutor LMS
Tutor LMS has both a free and a paid version. With the free version, you can get started with all the basics to run online courses with no hidden costs. Of course, with the pro-version, you get access to more premium features like front-end course builder, course preview e.t.c
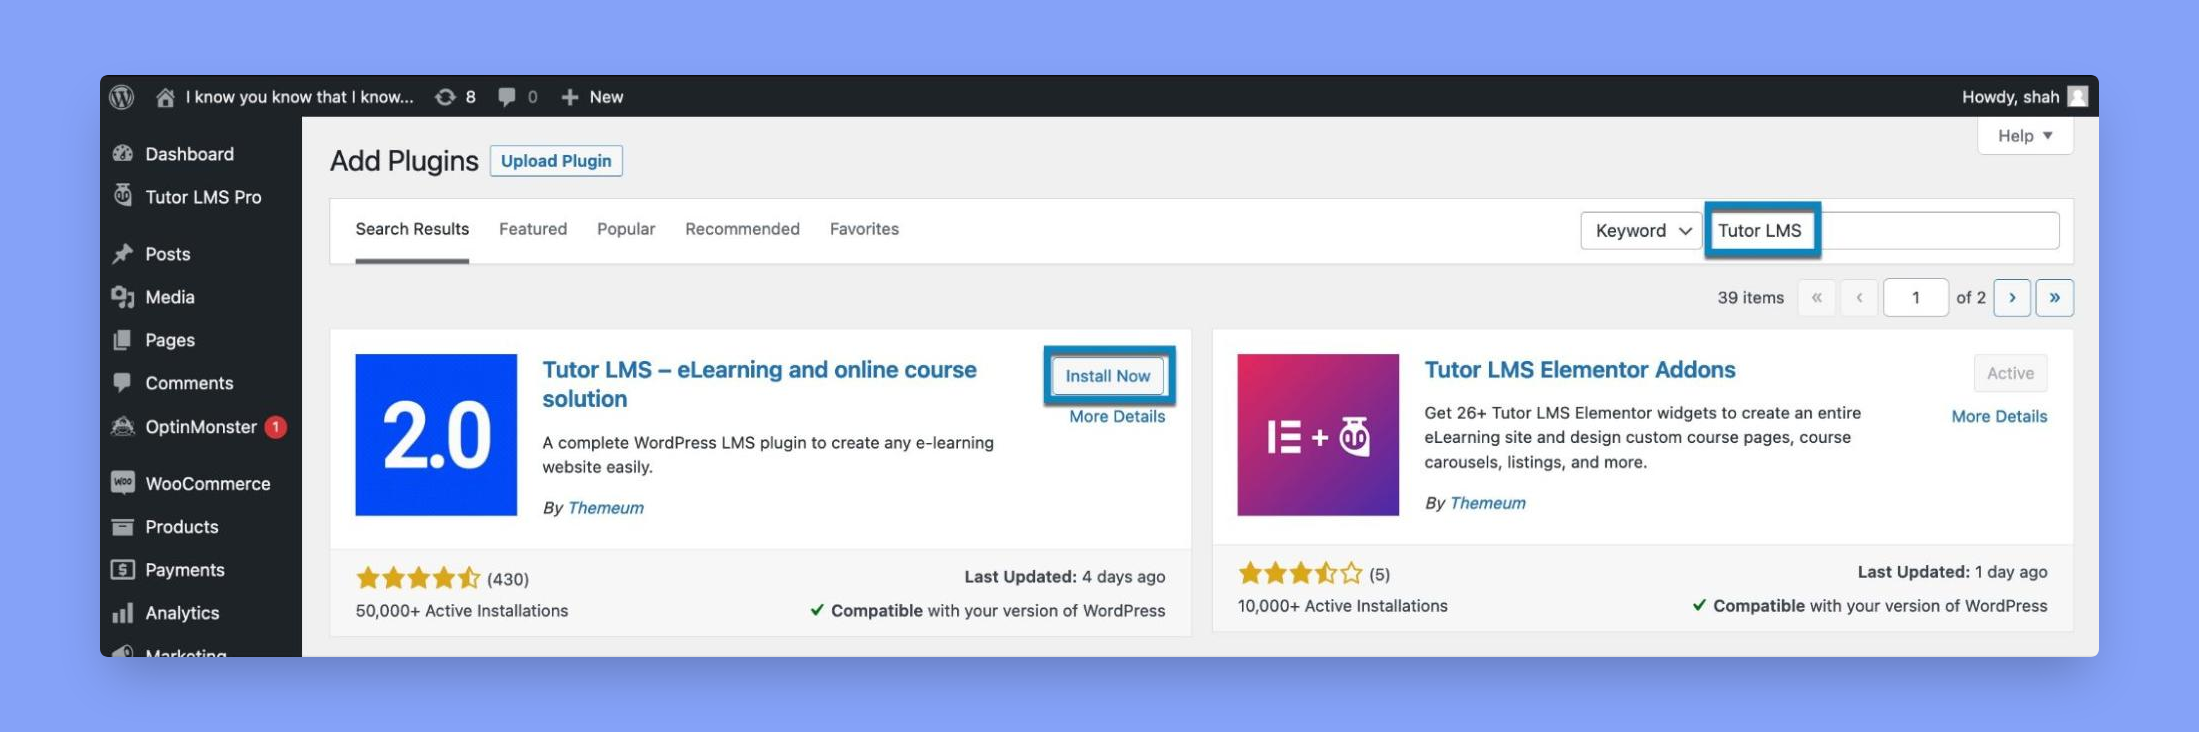
So let’s start with the free version first. The free version is available for download at the WordPress.org plugins directory. You can also install Tutor LMS from your WordPress dashboard as well. To do this:
- Go to your WordPress site Dashboard.
- Navigate to Plugins > Add New.
- Type “Tutor LMS” in the search field.
- Find Tutor LMS from the search list and click “Install Now.”
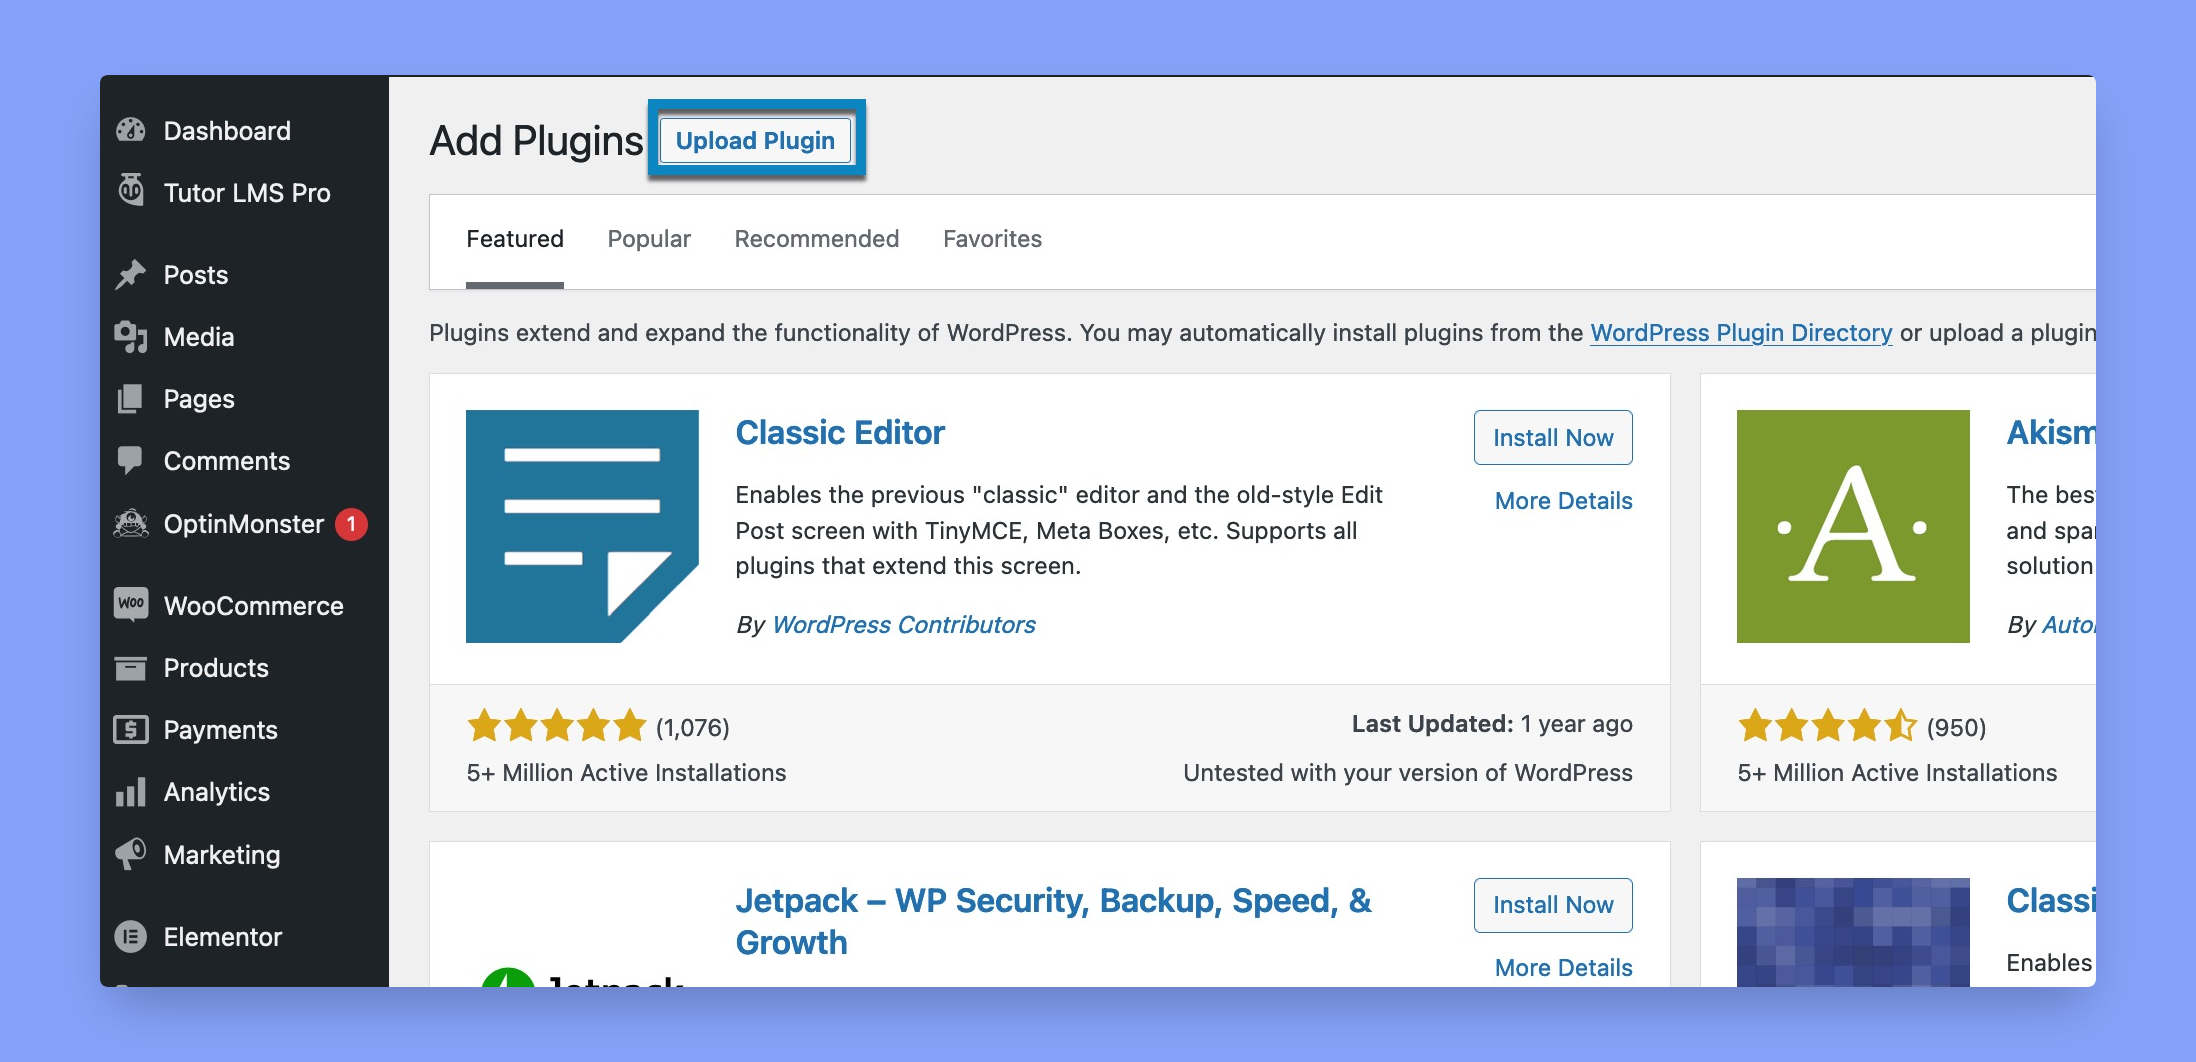
To install the Pro-version of Tutor LMS, first install the free version. Then take the following steps:
- Go to Tutor LMS’s official website.
- Decide which plan suits your needs best and click Buy Now.
- After filling in the required information, you’ll get a zip file and a license key.
- Go to your WordPress site Dashboard.
- Navigate to Plugins > Add New.
- On the top, click the “Upload Plugin.”
- Upload the file, and follow the setup’s steps.
Optional: Get a Theme
With Tutor LMS installed, you can take an optional step to beautify the look of your eLearning site. For this article, we will use the Tutor Starter theme due to its excellent optimization, visuals, and flawless compatibility with Tutor LMS. Tutor Starter is entirely free to download, and we highly recommend it.
To get Tutor Starter for free, click here. You will be prompted to download a .zip file. Afterwards, go to your WordPress admin panel and navigate to Themes > Add New > Upload Theme. Then upload the .zip file you just downloaded, install and activate the theme.
An additional recommendation is to install Tutor Mate alongside Tutor LMS. Tutor Mate is a companion plugin for the Tutor Stater theme. It is used to import predesigned stylish demo pages to eLearning sites powered by Tutor LMS.
Step 2: Create a Course in Tutor LMS
Tutor LMS’s course builder simplifies the process of course creation. To create your first course, from your site’s backend, navigate to Tutor LMS > Courses and click the Add New button to create your online course.
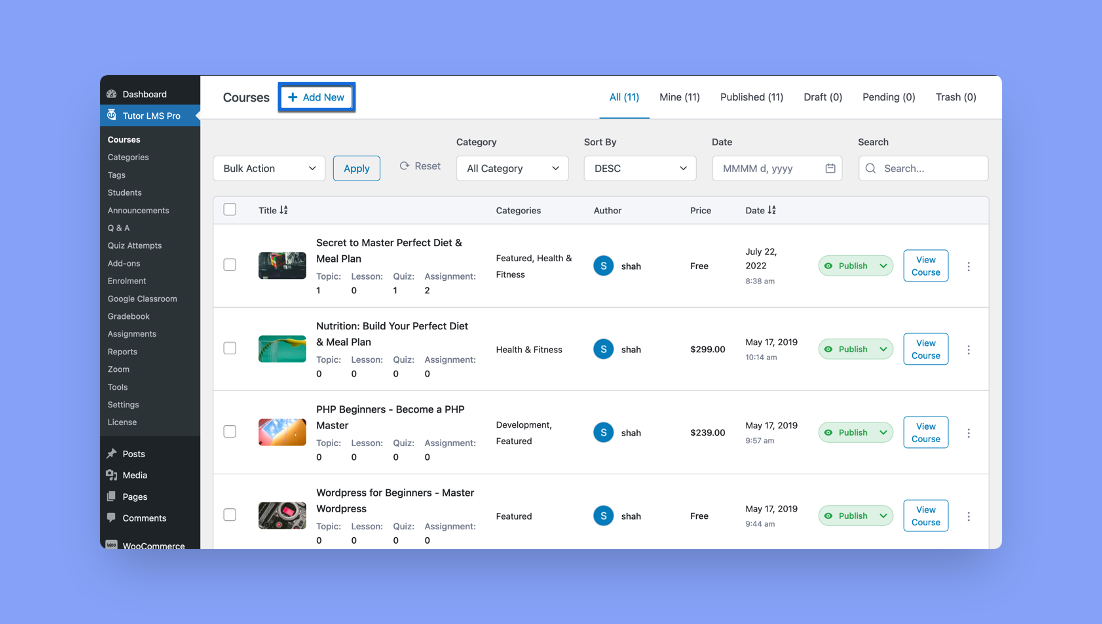
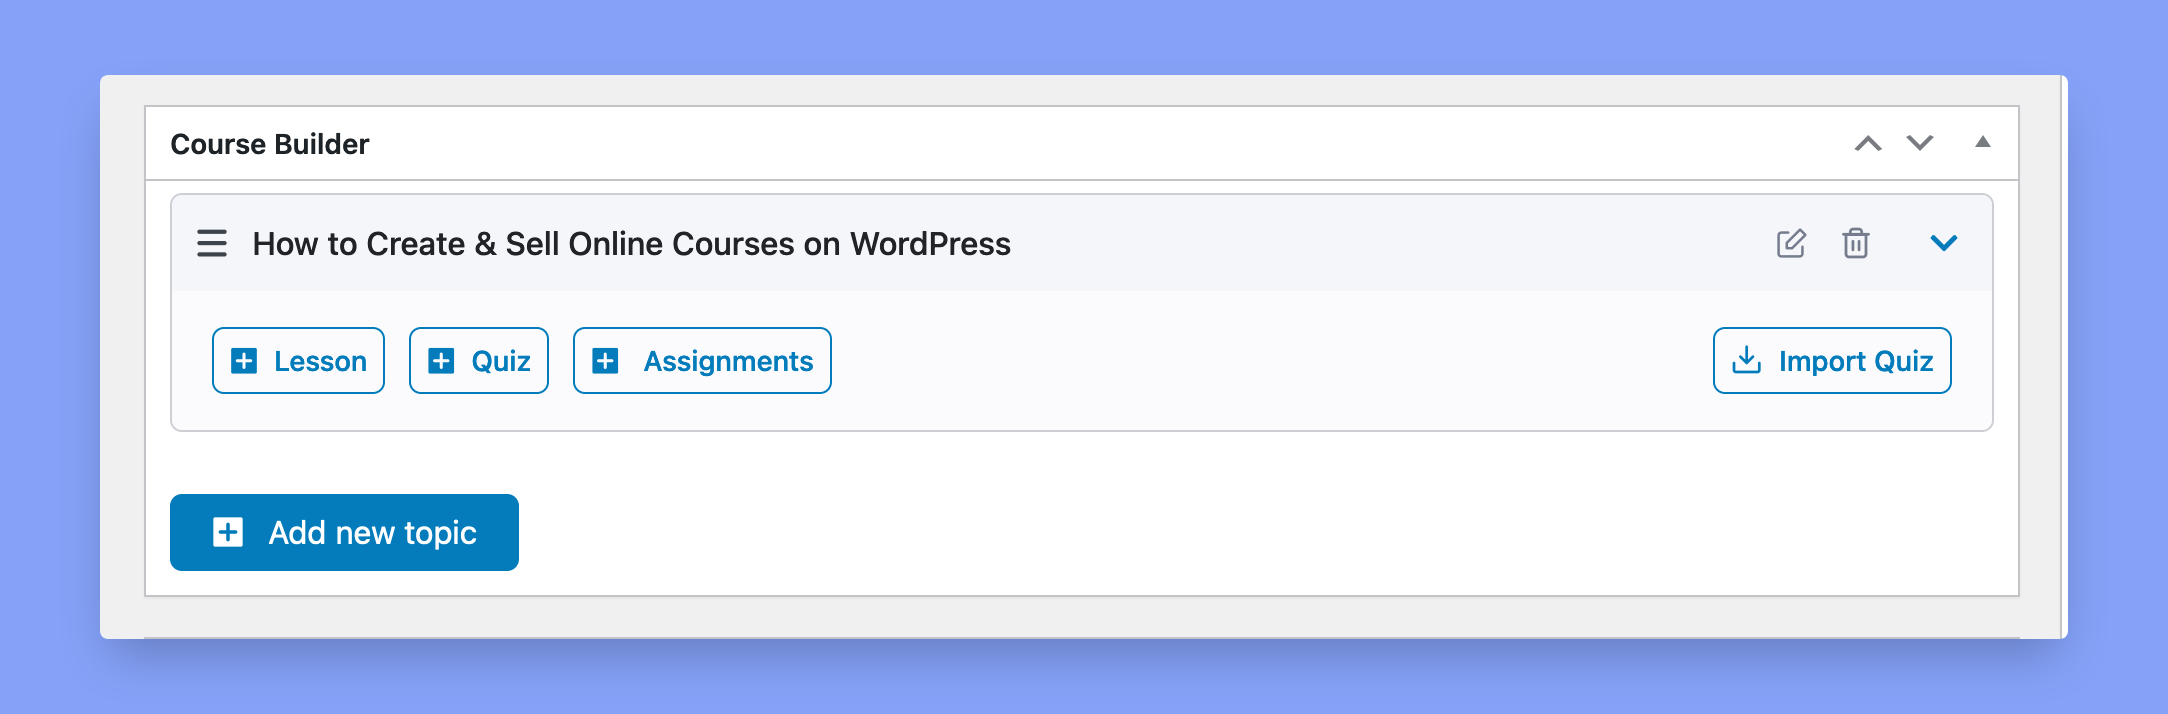
With Tutor LMS’s advanced course builder, you can freely customize almost every aspect of your course, including Lessons, Quizzes, and Assignments.
Alternatively, you can create new courses from your LMS website’s Front-end. To do this, visit your page, and from the Dashboard, select the +Create a New Course button to get started.
For those of you just starting out and wanting to learn more about creating an outstanding course in Tutor LMS front-end, you can get all the details here.

Step 3: Setting up an eCommerce with Tutor LMS
To create an online store, you need an eCommerce plugin. An eCommerce plugin manages the actual selling of products. It also connects to the payment processor of your choice to collect payments for your physical or digital products.
In this article, we will use the most popular eCommerce engine – WooCommerce– to provide a more familiar explanation of the process. But if you feel more comfortable using an alternative, please check the following list of supported eCommerce engines with Tutor LMS:
- Easy Digital Download
- Paid Memberships Pro
- WooCommerce Subscription
- Restrict Content Pro
WooCommerce Installation
Setting up WooCommerce in Tutor LMS is a straightforward process. Just follow the steps mentioned below to get you up and running. We’ve included the installation steps for both methods:
WordPress Add-ons Menu Installation
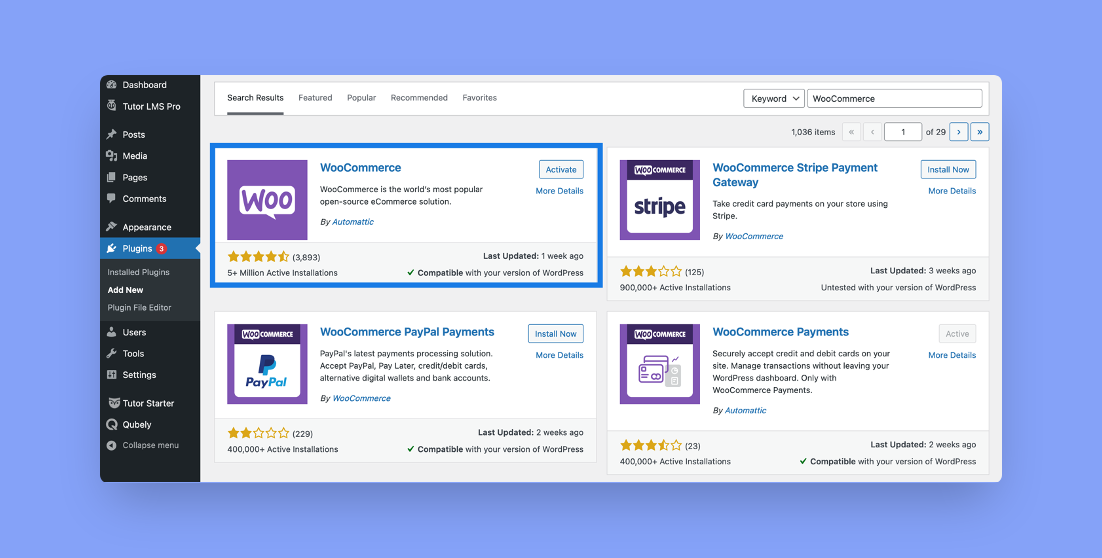
- From the WordPress admin dashboard, navigate to Plugins>Add New.
- In the Add Plugins window, enter WooCommerce in the Search Plugins box.
- Locate the WooCommerce plugin from the Search Results and click Install Now.
- Click Activate button.
Step 4: Enable Monetization
Before we start selling courses with Tutor LMS and WooCommerce, we first have to enable the Monetization option from the Tutor LMS Settings.
To enable Monetization:
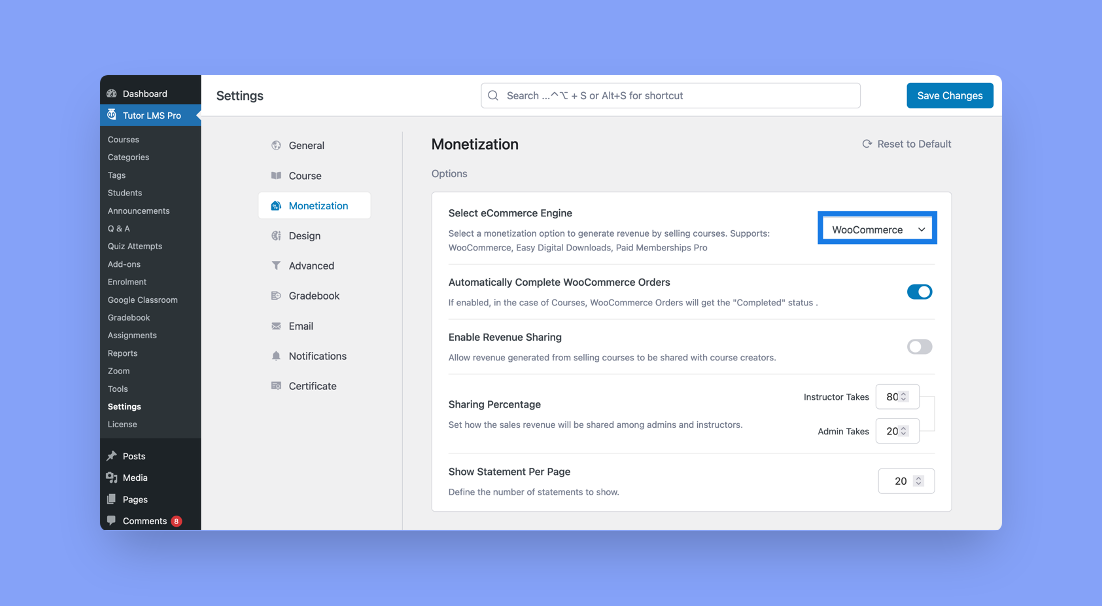
- Navigate to Tutor LMS > Settings > Monetization.
- In the Select eCommerce Engine section, click the drop-down menu item and select WooCommerce.
- Hit Save Changes to let the changes take effect.
Step 5: Publish the Course & Start Selling
Once monetization and all your course details are set, it’s time to add the WooCommerce attributes.
On the Edit Course page, scroll down to Add Product section and set the Course Type from Free to Paid. Enter the desired price (regular or discounted), then finally, Publish the course.
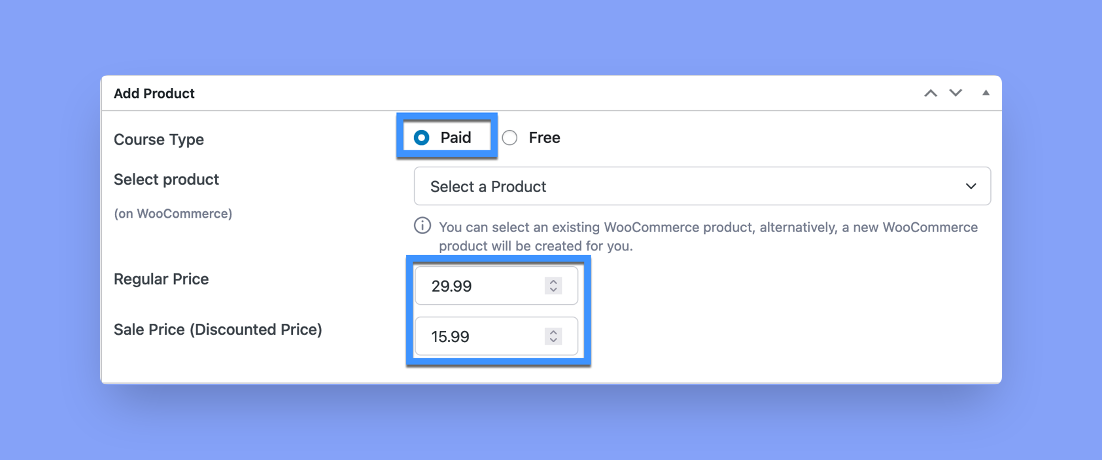
Note: With the latest version of Tutor LMS, Paid-published courses are automatically added to the WooCommerce product list.
Setup 6: Setup Your Preferred Payment Method
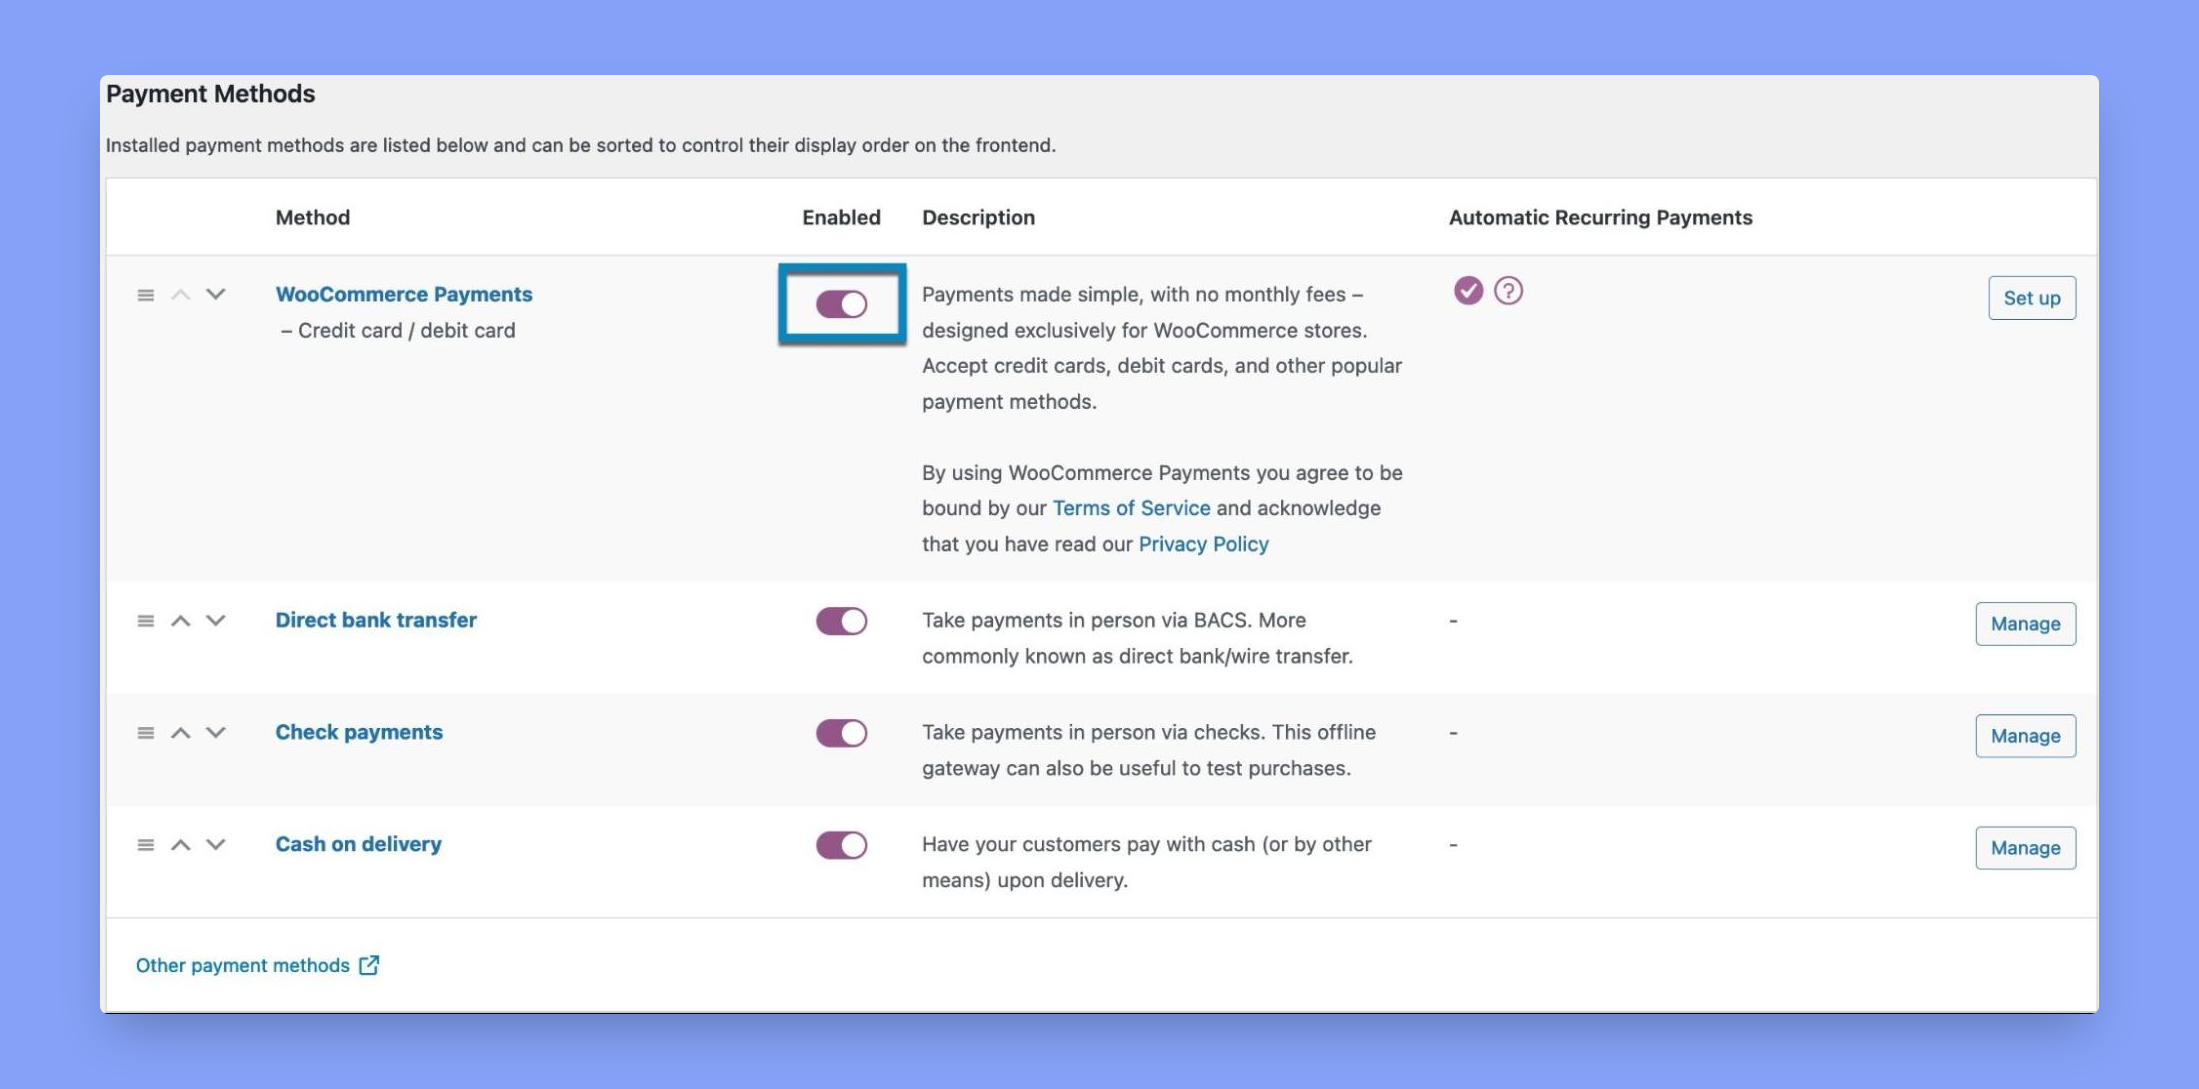
With everything all set, the final step in this process is setting up your payment method. Basically, we have to set up how customers will finalize online purchase transactions.
To find the WooCommerce payment settings option navigate to Dashboard > WooCommerce > Settings > Payments (tab). Enable WooCommerce Payments and then follow the onscreen instructions to configure your preferred payment method.
Extend your Money Management Capabilities with Tutor LMS
Now that you are all set to sell courses and earn online, it’s time to start learning more about automated money management.
Tutor LMS is one of the few multi-instructor-based eLearning solutions available. This means that one can run an educational platform independently, or multiple people can collaborate and create an educational institute.
So when multiple instructors are involved, problems with sharing percentages may arise. To help avoid such issues, let’s look at the baked-in money management features in Tutor LMS that helps you better manage your earnings.
Automated Revenue Sharing & Fees Deduction
Revenue Sharing and Fees Deduction are two mechanisms by which you, the administrator, can manage the cash flow of your eLearning website.
When multiple instructors sell their courses, all of the revenue gets transferred to the single account provided in the monetization process. Hence, the question might arise, who receives how much?
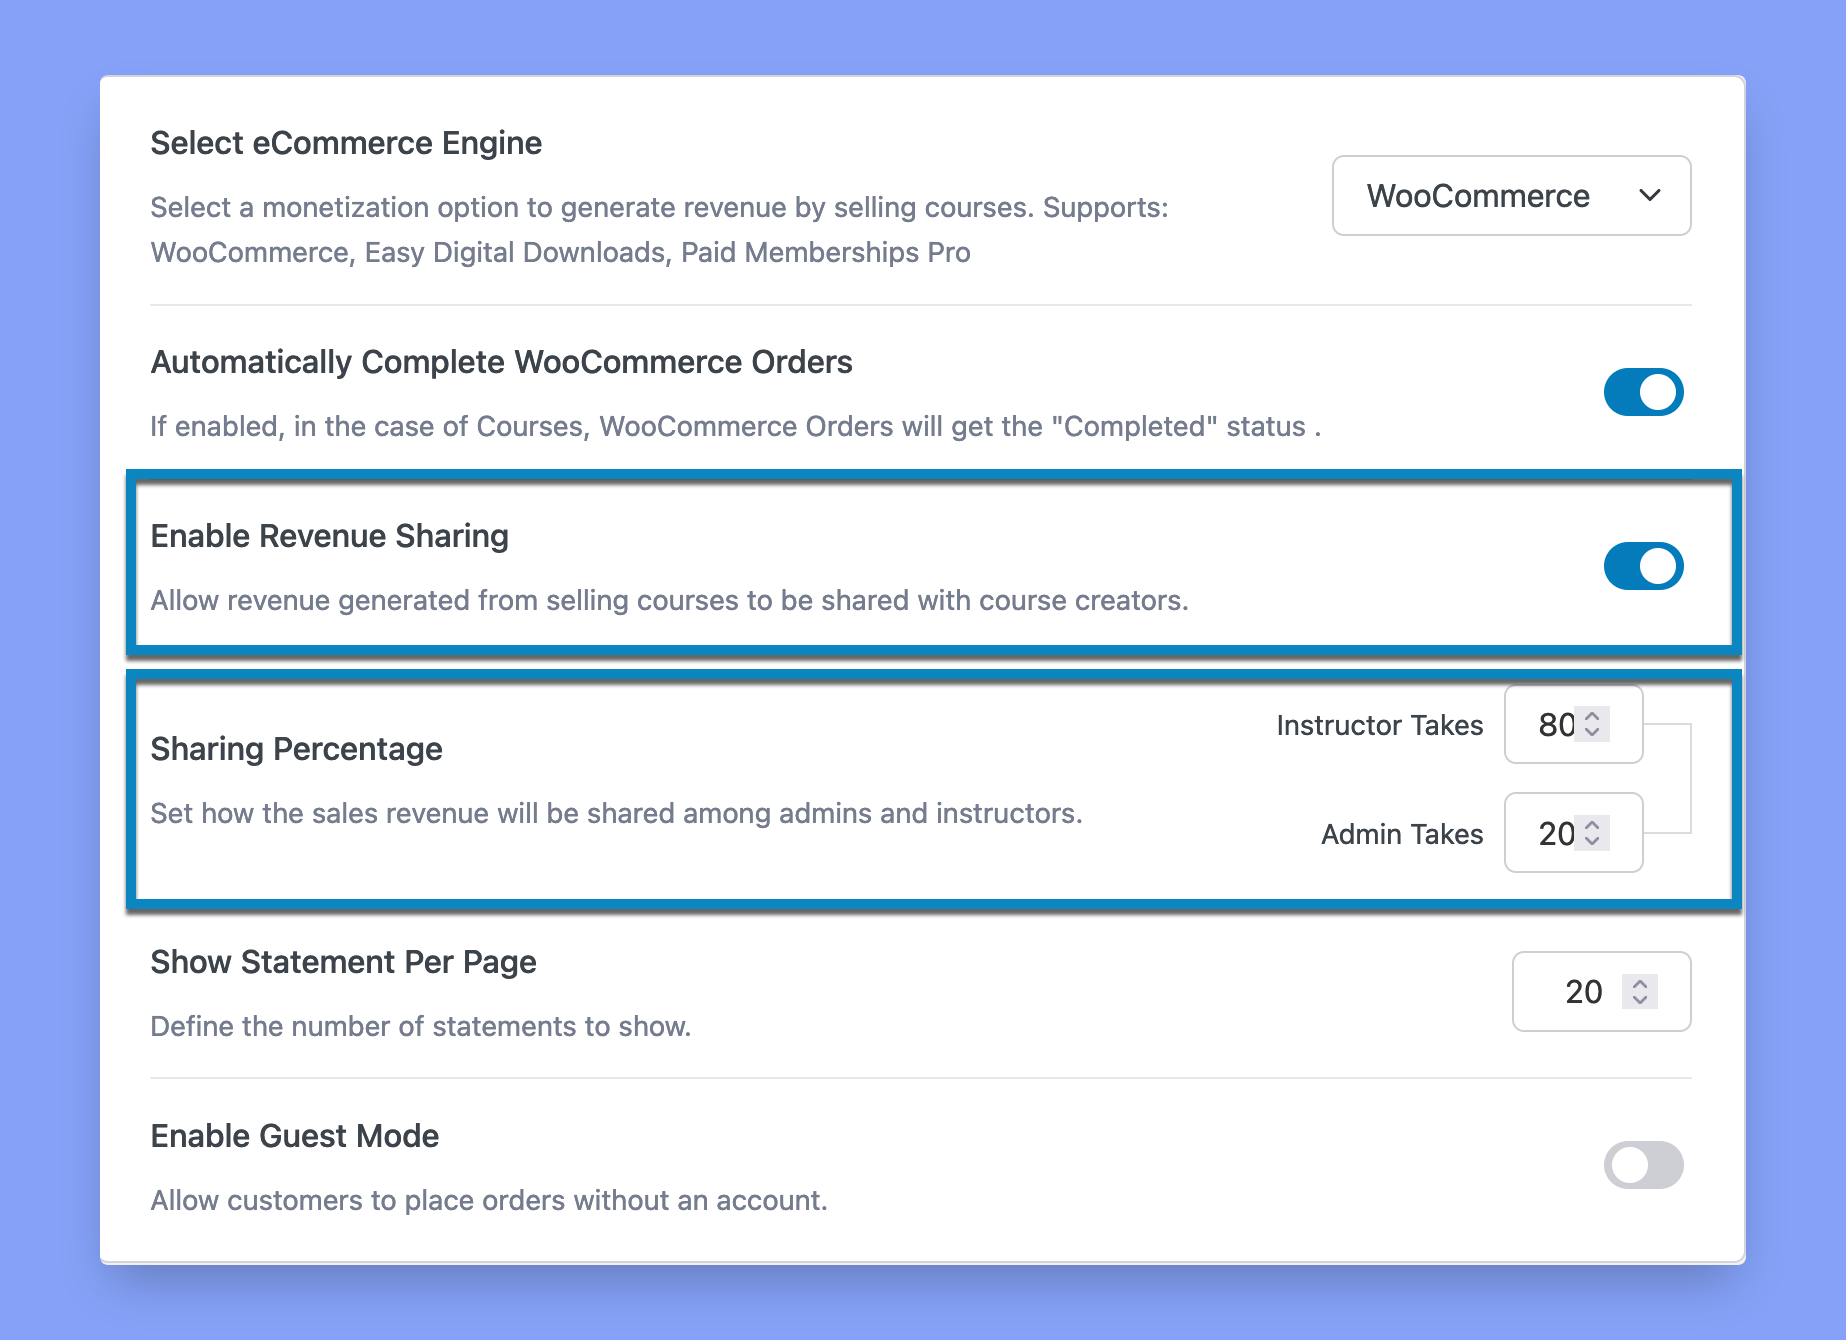
To make matters easier with Tutor LMS, simply navigate to WP Admin > Tutor LMS > Settings > Monetization. Once here, enable the Revenue Sharing option and set the Sharing Percentage. The sharing percentage defines the ratio by which the revenue gets shared amongst instructors and admins.
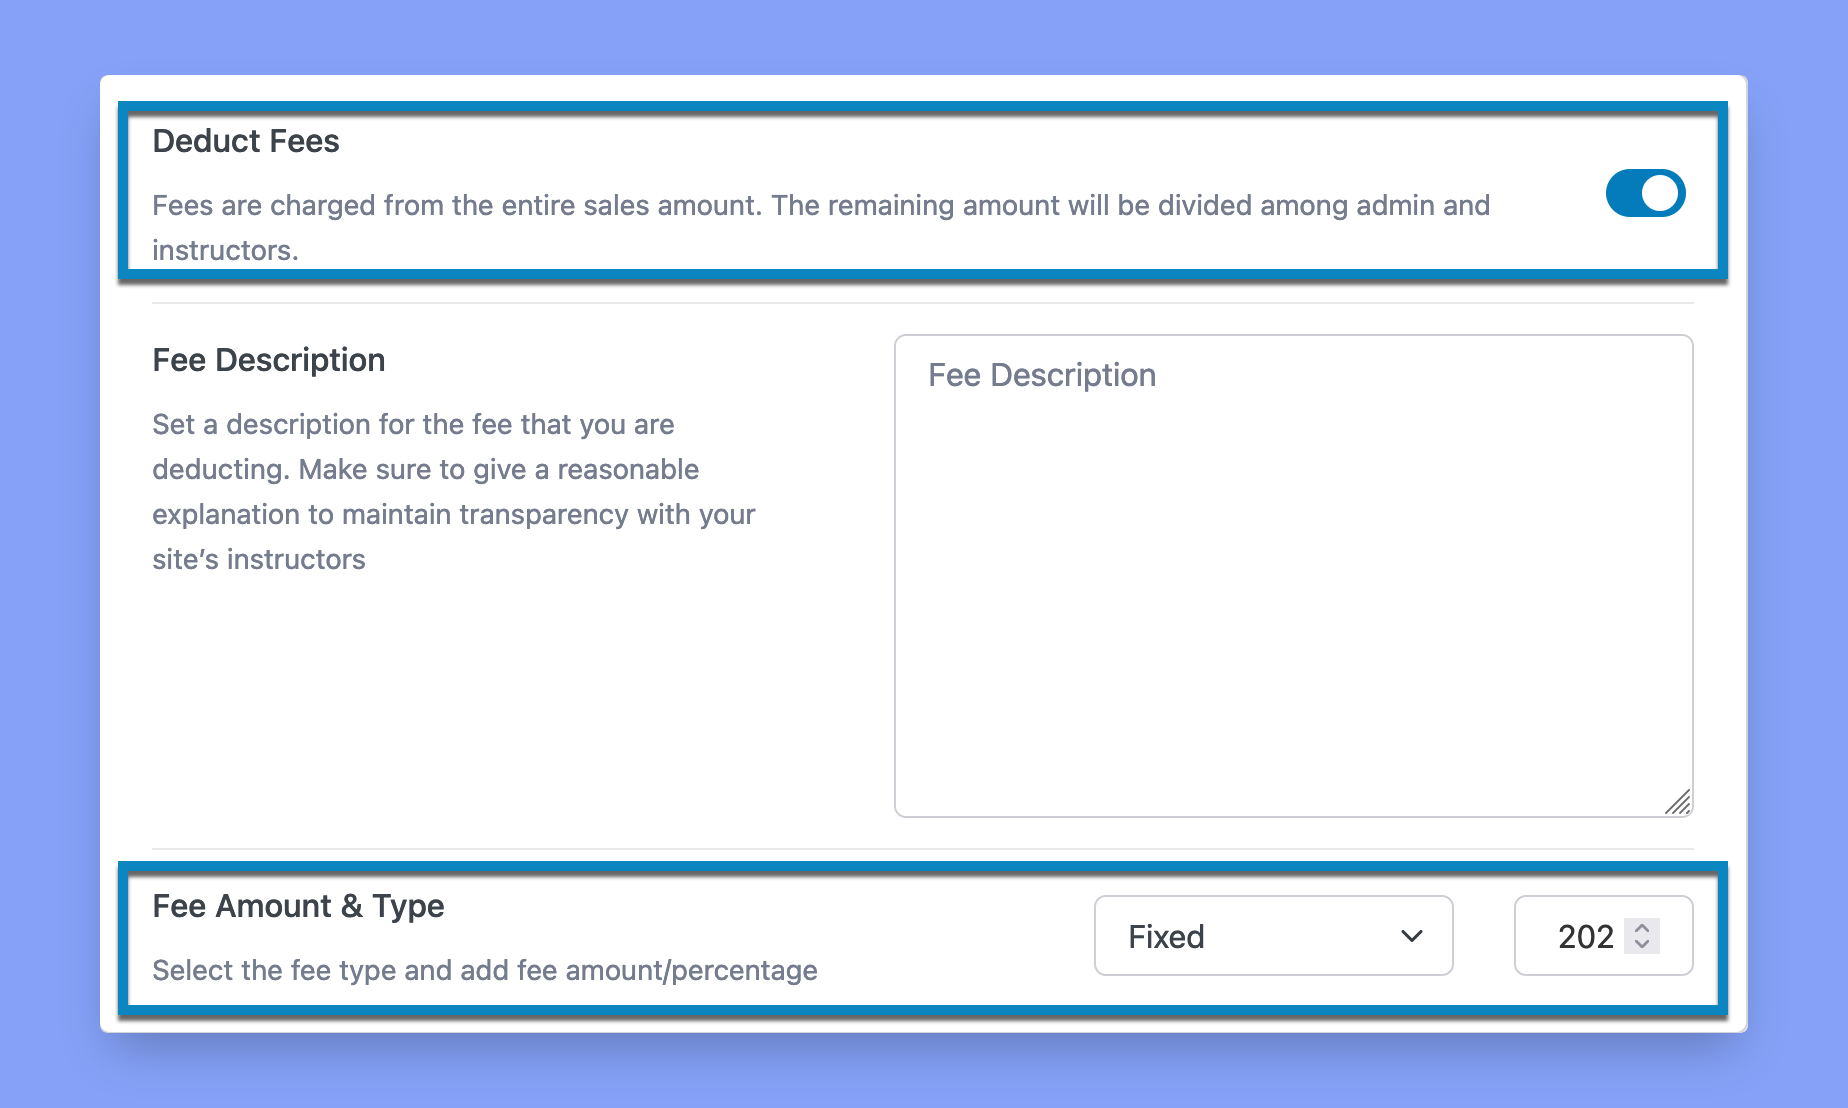
Next, take a look at the Deduct Fees option, which allows the administrator to allocate costs or fees to be automatically subtracted from the site earnings. The allocated fees are directly deducted from sales revenues and act as the first mechanism to impact your cash in-flow.
Tutor LMS has two types of Fees: Fixed and Percentage Fees. As the name suggests, fixed fees are a predefined amount automatically deducted from all site purchases regardless of the purchase price.
Percentage Fees deduct a set percentage from the purchase price. This is a convenient feature as it helps cover the cost associated with running your eCommerce site, such as subscriptions and hosting costs.
To enable Deduct Fees navigate to WP Admin > Tutor LMS > Settings > Monetization.
Setting up Tutor LMS Withdrawal System
With all the information we have discussed thus far, this is arguably the most important part of this process. Yes, we will now discuss how you can withdraw your hard earn money from your website.
The Money management process in Tutor LMS is designed to give administrators complete control over cash flow. But we also wanted to create a system that maintains mutual trust amongst instructors and administrators.
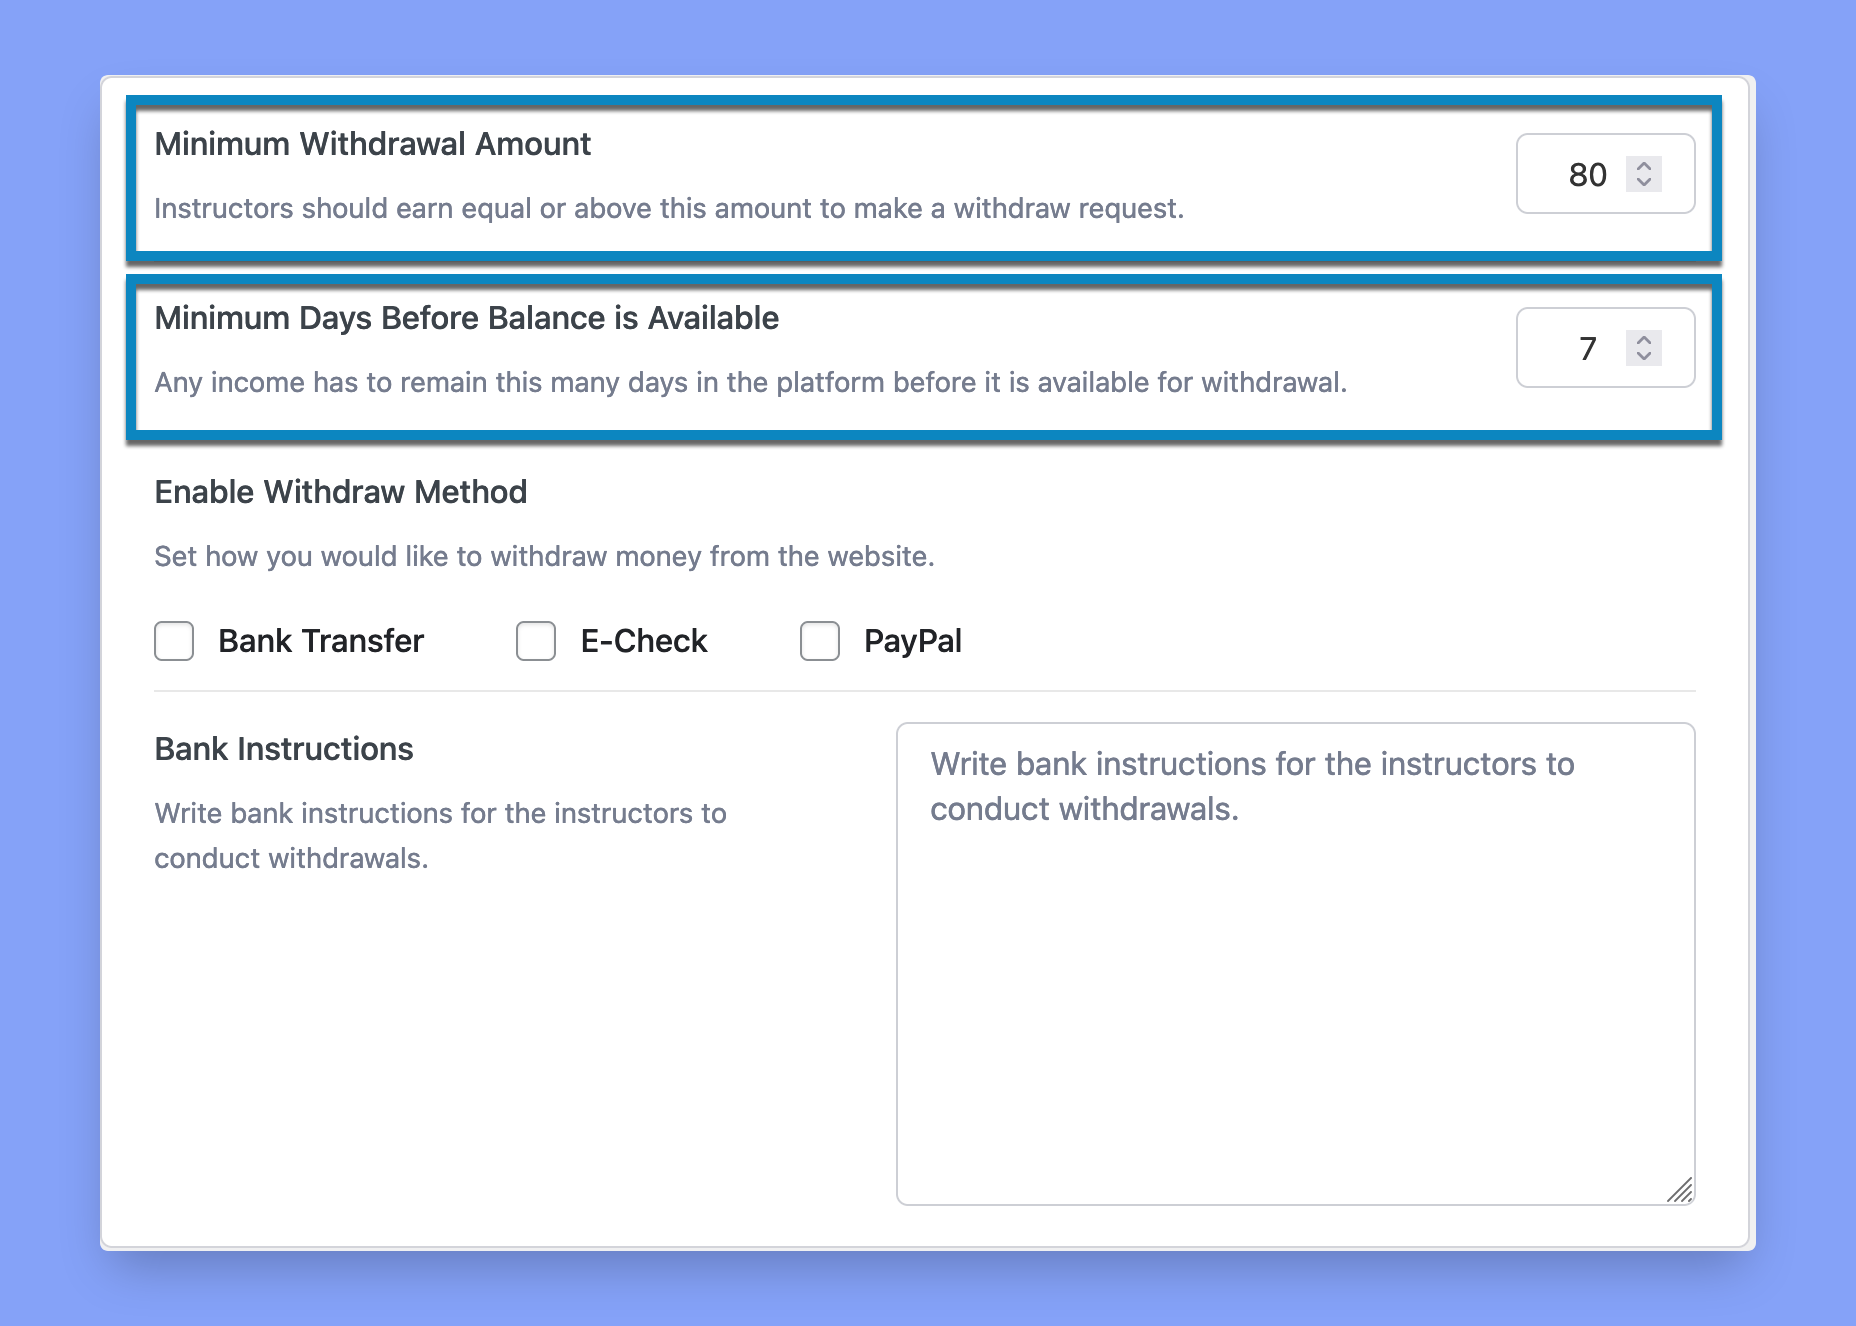
In Tutor LMS, instructors must issue a withdrawal request to the administrator. Instructors only become entitled to a withdrawal when their earnings exceed a specified amount. The Minimum Withdrawal Amount option in Tutor LMS acts similarly to a safety deposit. To find this option navigate to Tutor LMS > Settings > Monetization > Withdrawal.
Another important feature in withdrawal control in Tutor LMS is Minimum Days Before Balance is Available option. This enables admins to regulate the number of days any earnings has to stay on the platform before making it available for withdrawals. This feature ensures fund availability for customers asking for a full refund.
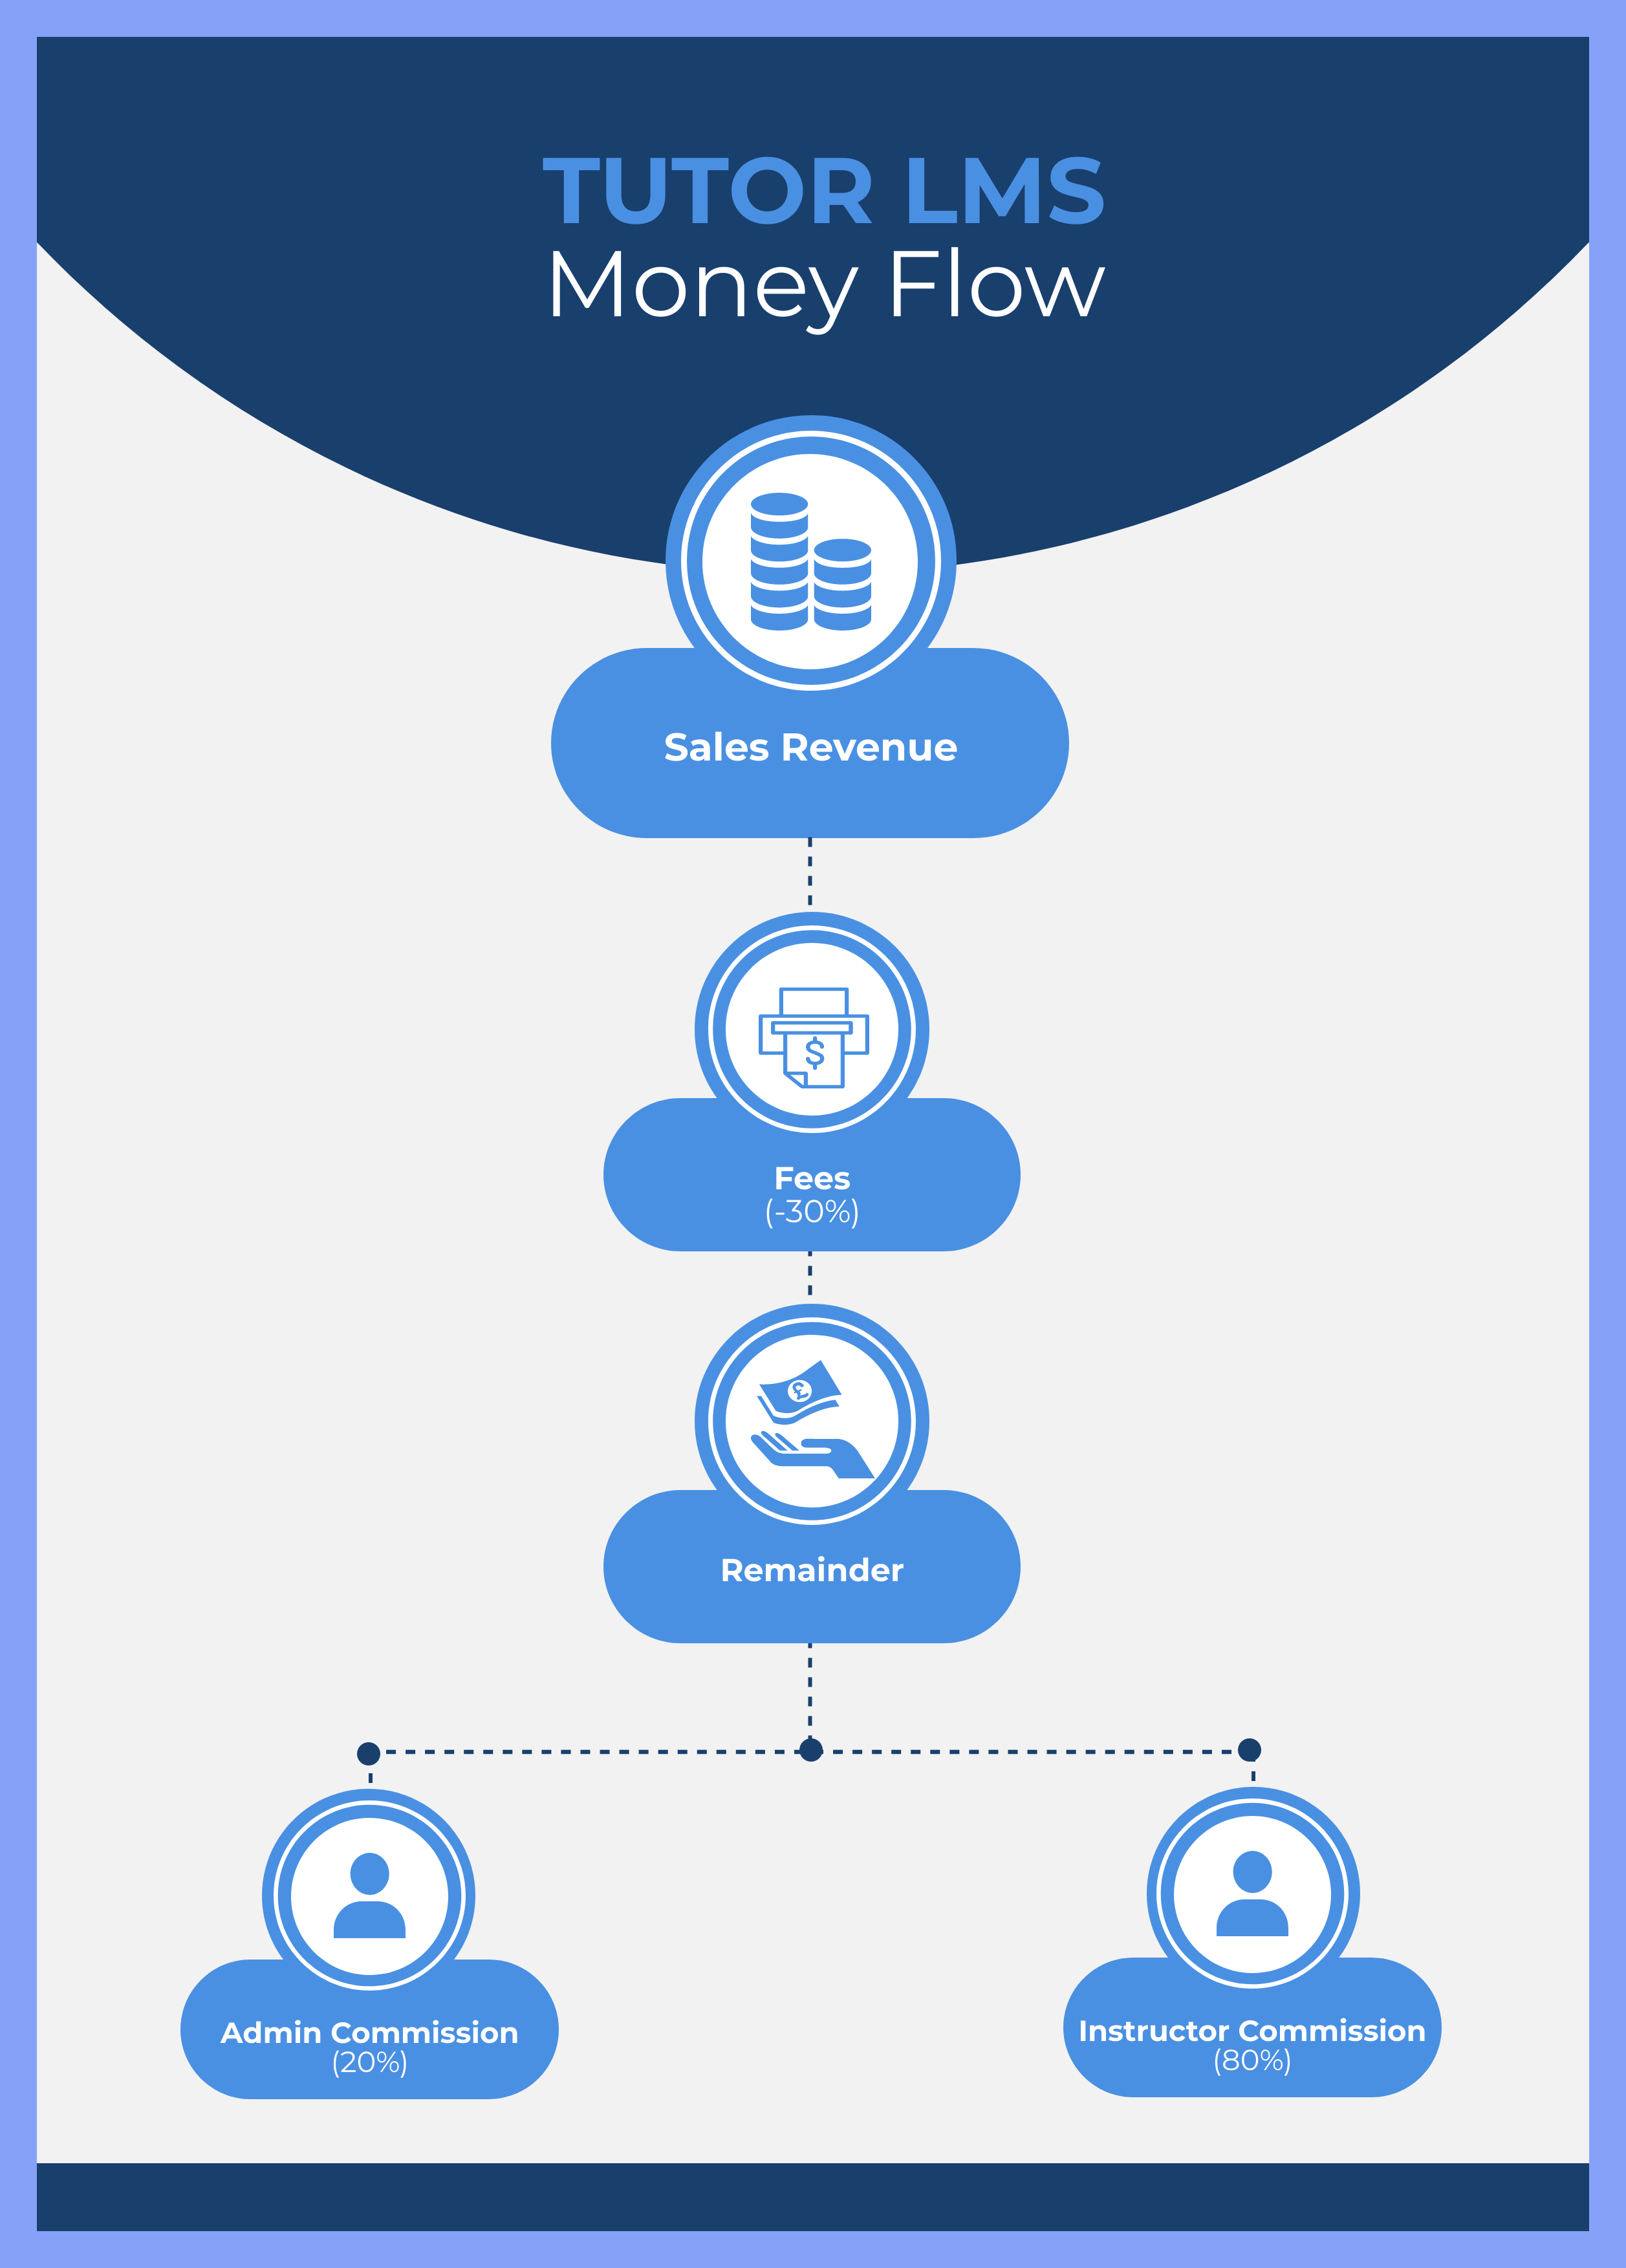
The process may seem complicated at first, but once you get the gist, it becomes rather simple. Here is a flow chart for you to understand the money flow in Tutor LMS:
Let’s Start Sharing Knowledge
Monetizing your course content is a great way to increase your return on investment, build your brand and establish authority. However, you will find it a much more difficult road to sell courses without the right LMS and pricing strategy.
On that note, check out our brief video on Tutor LMS Monetization Settings below to learn how it can make your life easier!
With Tutor LMS, it’s effortless to start building your LMS site and selling online courses. So, what are you waiting for? The perfect time to start was yesterday!