

Tutor is our WordPress LMS plugin that helps you create an online course portal. It’s designed for course marketplaces that lets you build a professional certification course. One of the most helpful things that you can offer to your students is a well-structured learning path. Today you know how to create a learning path like Lynda.com or other similar sites in just 3 steps!
One of the main reasons for writing this tutorial for you today is actually the feedback our team received from you. Some of you wanted to know how to build a complete learning path using Tutor LMS- so this is for you.
What is a Learning Path?
A learning path is a sequence of courses created for a certain topic. Some topics are too vast that needs to be divided into certain courses. By dividing the topic into small steps, you enable users to take in the information effectively. To do that right, you need a proper sequence or roadmap to guide students to follow the courses they need to take which is the learning path.
For instance, if you want to create “Become a 2D animator” course, you can have a sequence of learning animation principles in 2D, learning Adobe and so on as a series of steps. That way all the students know exactly which courses to do in which order to complete the course successfully using the learning path.
3 Steps to Create a Learning Path
Before we dive into how to build a learning path we look at some of the requirements you need for it.
Please keep in mind that these steps are mainly for advanced users of WordPress. Developers will understand this one easily. If you’re a regular user, you might have some complications in understanding the process of creating the learning path because here I discuss the major steps only.
Features to Design a Learning Path:
- Shortcodes
- Prerequisites (pro)
- Certification (pro)
The shortcode feature is available on the free version but to provide prerequisites or certificates, the pro version is needed. If you’re creating an absolute professional eLearning system with a great learning path, then having the pro version is necessary.
Note: If you want, you can do all of the processes with the free version but due to not having the prerequisite feature, users will be able to enroll in any course they want and continue from any lesson they want. So the sequencing option will not be available if you are using the free version of our WordPress LMS plugin.
Required Tools
- WordPress 5.2 or later
- Edumax (recommended)
- WooCommerce 3.6.5 or later
- Tutor LMS 1.3 or later
- Tutor LMS Pro 1.3 or later
- Qubely Blocks (optional)
First Step: Beginning of The Funnel
Start the funnel from your home page just like Lynda.com– that’s the easiest way that I am following. However, you can have a separate landing page too. For the grid view, I am using the Qubely Blocks plugin that gives me all the functions that I require. All the plugins and theme mentioned above are already installed. Now I will create the first section to drive people on the specific learning path.
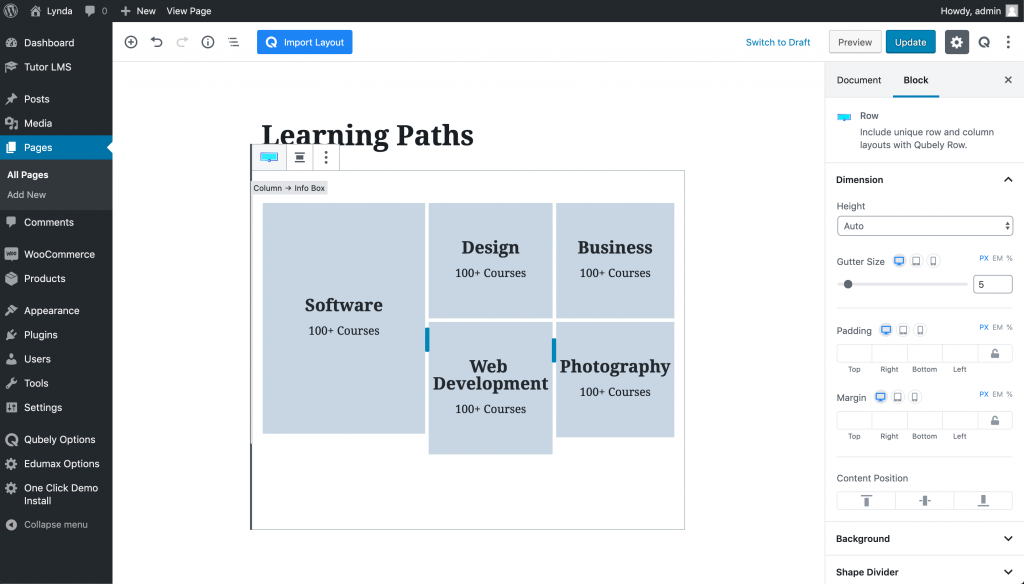
For now, I am not going into how I designed the rows and columns. If you want to know how to do so, please read the documentation of Qubely to use it or you can use a page builder if you want. Here’s how the learning path will look on the frontend-

If you are not feeling too fancy with the design and list all the learning paths, that works too. You can just make a list of the landing pages for each learning path and have text links anywhere that seems suitable to you.
Second Step: Landing Page of Learning Path
In the header section, I have used the Info Box block of Qubely which has a title, description and button feature. Then I have added the Tab Block of Qubely to add different sections to show courses from a specific category. This is just for decoration purpose and matching with Lynda.com only. You can skip using the tab block and use the shortcode on a plain section.
Inside the tab content, I have used Tutor LMS shortcodes to get courses from a specific category. The shortcode does not have any feature to control the number of columns shown. You have to modify that from the settings option of Tutor LMS.
You may use a specific template for this page from the document settings to have a full width or boxed outline. Also, you can design a template for the landing page if you want. We also have documentation on how to use the CartFlows plugin to design landing pages and purchase funnel. You can take inspiration from there as well.

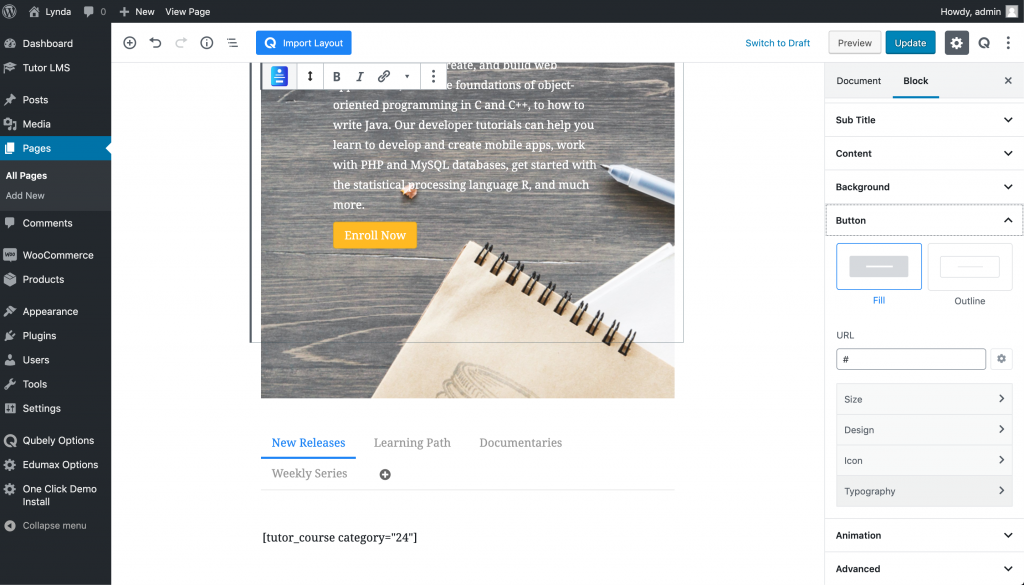
The main task is complete! Now, you need to set prerequisites for each course if you have not done so already.
Last Step: Adding All the Courses to Cart from One Button
When you click on the “Add to Cart” button, it only adds a single product to the cart. But as we are trying to sell multiple courses here, we need to add all of them at once. WooCommerce does not support adding multiple products to the cart via URL. So we will have to hack the system to achieve a bundle like pricing.
If you are using a self-developed theme for Tutor LMS, then copy the following code to your themes functions.php file. If you are using Edumax – LMS theme, you can download the child theme from the link below and install to add the feature automatically to the system. It has the code added on the functions.php file.
Having a child theme means you will not lose the changes when you update the theme. If you already have a child theme, then you have to copy the code there. You can make a plugin with the code if you want.
Now, on the yellow button (see the above screenshot), we have to place the link to add all the products to the cart. The link should be something like this-
yourdomain.com/?add-more-to-cart=123,234,351
Here, add-more-to-cart is the custom feature we have added which helps to add multiple products on the cart. The numbers after the equal sign are the product IDs. You have to separate each product ID with a comma.
Wrapping Up
We offer one-on-one support to our Pro version users. So if you are a Tutor Pro user and facing any difficulty during the process mentioned above, please feel free to comment below for more clarification. Or you can use the contact form to send us a mail.


One Comment