Recently Google has announced that their Chrome browser will flag non-HTTPS sites as ‘Not secure’ starting from the software’s version 68. Google has been already prioritizing HTTPS based websites in search result listing since 2014. That means if your WordPress site doesn’t use secure HTTP/SSL, it may be under-ranked on Google.
 The above figure shows how Google Chrome ‘Not secure’ warning appears for non-HTTPS sites.
Why HTTPS?
HTTPS enhances user-privacy by encrypting information passed between the web server and the client device. So you should enable HTTPS on your WordPress site as soon as possible to ensure the best experience. But how to do it? Let’s see.
How to enable HTTPS on WordPress?
You can enable SSL or HTTPS on your WordPress site in different methods. One of the easiest and free methods is the Cloudflare Flexible SSL method. In this post, we will see how to add HTTPS to a WordPress site using Cloudflare Flexible SSL service.
Note: If you’ve already connected your WordPress site to Cloudflare, then start directly from the Step 3.
Step 1: Start the process with Cloudflare
- Sign-up on Cloudflare
- Add your website (domain) to your Cloudflare account
- Fetch your site’s DNS records on Cloudflare
- Check your site’s DNS record to ensure it’s live
- Complete the set up procedure (check this official tutorial in case of any difficulty)
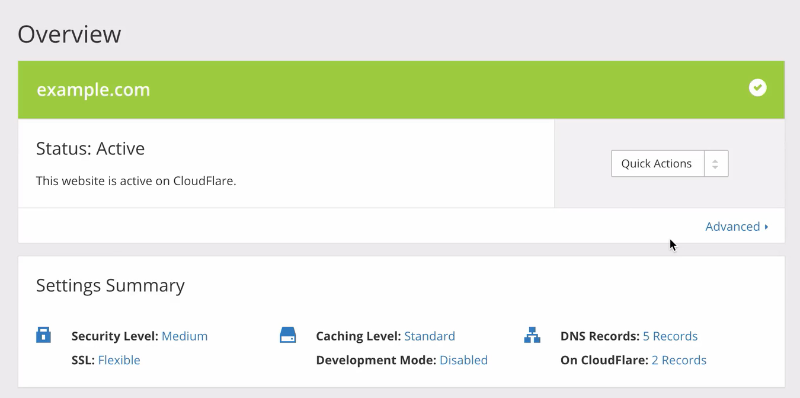
 Once the setup is done, you’ll see your site is ‘Active’ on Cloudflare just like the example screenshot above.
Step 2: Update your site’s DNS record

- Login to your domain registrar and change your domain’s Name Servers as provided by Cloudflare (this can take a few hours)
Step 3: Create a Page Rule on Cloudflare

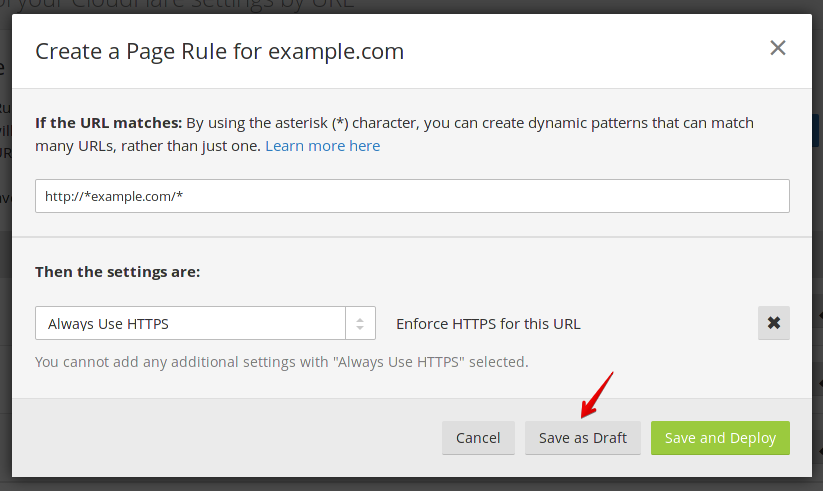
- Create an ‘Always HTTPS’ Page Rule on Cloudflare for your domain just like this: http://*yoursite.com/* (shown on the screenshot above, details on this official help article)
- Save the ‘Always HTTPS’ Page Rule as draft (we’ll deploy/activate it later)
- Go to the Crypto section of Cloudflare and set the SSL option to Flexible (see the screenshot below).

Step 4: Install and setup the necessary plugins on your site
- Login to your site’s WordPress dashboard
- Install and activate the Cloudflare plugin
- Connect Cloudflare plugin to your Cloudflare account
- Install and activate Cloudflare Flexible SSL plugin
- Install Really Simple SSL plugin (we’ll activate it later)
Remember, all the 3 plugins are necessary. Follow the sequence described above, otherwise your site may face a downtime. If any unexpected issue occurs, you can deactivate these plugins via FTP by renaming the respective plugin folder to something else than the existing name.
Step 5: Activate HTTPS on your site
- Switch ON the ‘Always HTTPS’ Page Rule that you’ve created in the 3rd step
- Turn ON ‘Automatic HTTPS Rewrites’ option under Crypto section in Cloudflare (for your site)
- Activate the Really Simple SSL plugin
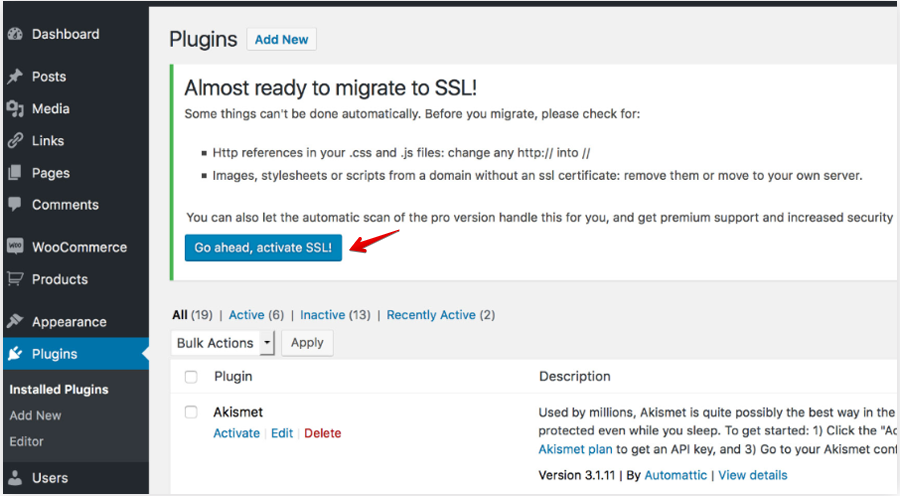
- NOW on the the WordPress admin interface, you will see a button “Go Ahead, activate SSL!’ (displayed by the Really Simple SSL plugin)
- Click the “Go Ahead, activate SSL!’ button (see the screenshot below)
 Clear cache on you browser and on the server (Cloudflare cache and WordPress caches that you might have created using caching plugins). You may need to sign-in to your site again when HTTPS gets activated.
It’s done! Your site is now live with HTTPS. Still, you may get some pages with mixed contents (menus, images etcetera) with old HTTP links. In the Really Simple SSL plugin settings, you’ll get an option to fix mixed content warnings automatically. Turn that ON if it’s not ON already. This should fix that issue. If not, try using the SSL Insecure Content Fixer plugin. You can also manually fix some of these URLs by adding the new secure links.
Wrapping up
So, this was one of the easiest and free methods to activate SSL or HTTPS on a WordPress site. If you face any issue with these steps, please share with us via comments. Also, don’t forget to let us know your thoughts and suggestions. Have a great time!


