In this quick tutorial, we will show you how to make a WordPress transfer to a new hosting platform – provider. When you build a website based on WordPress 4.2+ for your client sometimes you have to use your own server or localhost to build and test it, and once it is approved you have to move from server A (yours) to final server B (client) without losing any content and theme settings.
First, do not make a beginner mistake, and do not cancel an existing web hosting plan before the move is fully complete and tested. It means also that process of transferring should begin at least one day (2 days) before last day of current month’s service or subscription fee.
There are many ways to transfer WP site to another host, some of them are easy, some others not really. We decided to describe a solution which includes 3in1, is very simple, free and fast – mostly it takes less than 15 minutes. But it requires PHP 5.3.4 or later. But we hope that both host uses this version for a long time.
We think that migrate your blog, company website to a different server or different location with Akeeba Backup plugin, it’s a piece of cake! Basically, to make a WordPress migration from one host to another consist of three parts – cloning the files, moving the package and installing.
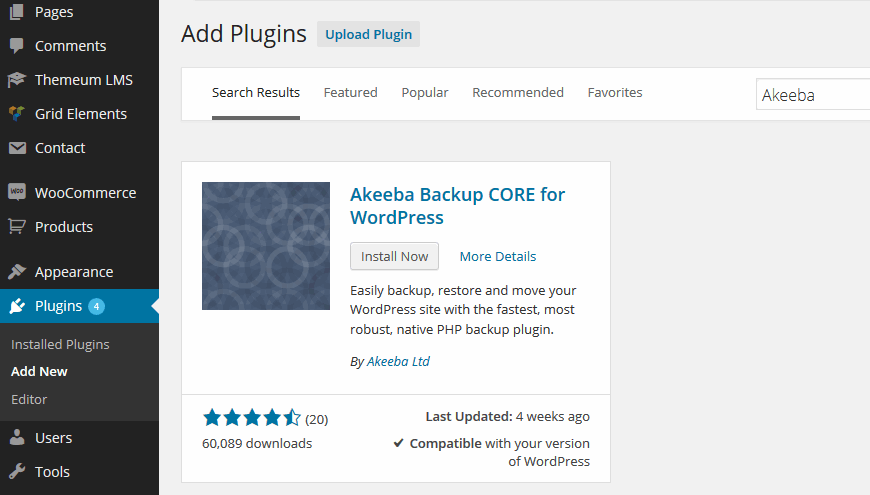
Step 1: First you have to find and install Akeeba Backup plugin. Yes, you can use also free “core” version.
Step 2: After installing Akeeba Backup for WordPress you have to activate it to get access to all features. If you would forgot click active link, do not worry. Go to your site’s wp-admin section and click on Plugins, Installed Plugins. Under “Akeeba Backup for WordPress” you will see the Activate link.
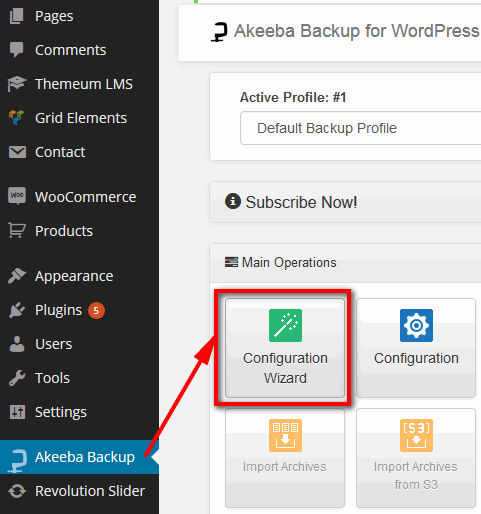
Step 3: Now you should see a new link on the sidebar, called Akeeba Backup. Clicking on it will take you to your Akeeba Backup Control Panel page. On that page click on the button.
Akeeba Backup for WordPress will automatically configure after a series of benchmarks on your server to determine the optimal backup settings for your site. This periods up to 5 minutes, depending on your server speed. Please do not navigate away from this page.
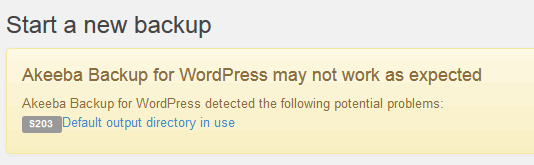
Step 4: Once this initial setup is performed you can simply click on the button. Clicking on it takes you to the Backup page. If you will see any waring or messages there (as on following example) we strongly suggest to fix them before next step.
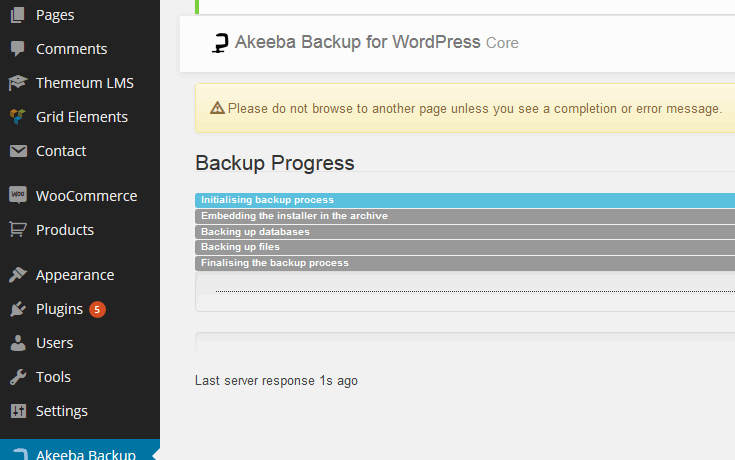
Step 5: Then click on the button and sit back as the application is taking a backup of your site. This periods may take from 2 to 7 minutes, depending on your site size and server speed. Please do not browse to another page unless you see a completion or error message.
Step 6: Finally, you can view your just taken backup from the Manage Backup page. You can access it by clicking on the button at the end of the backup process, then you will see all made backups – of course choose the last one and click download or part button.

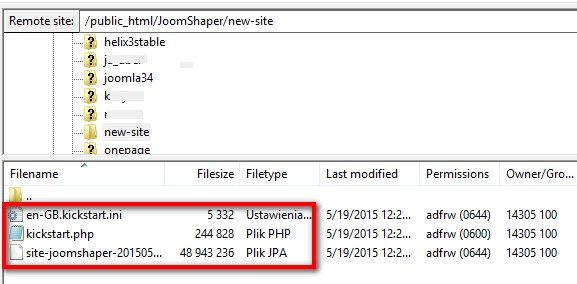
It allows you to download whole backup to your local computer or pendrive. Developer of this plugin suggest to download it using FTP client, because .jpa files are stored also on hosting in folder: wp-content/plugins/akeebabackupcore/app/backups/
From my private experience it doesn’t matter how I downloaded .jpa file is always worked after.
Step 7: Users of the free (Core) version can only restore their backups manually using Akeeba Kickstart script (akeebabackup.com). It is a simple to use script which allows you to extract your archives directly onto the server, as well as recreate and configure the WordPress environment from the Akeeba backup JPA file. Kickstart is not an installer. It is only an archive extraction tool. You have to upload the kickstart.php and your language file (the INI files are translation files) and of course your archive to the target server.
Remember also to prepare a new MySQL database for the WordPress copy.
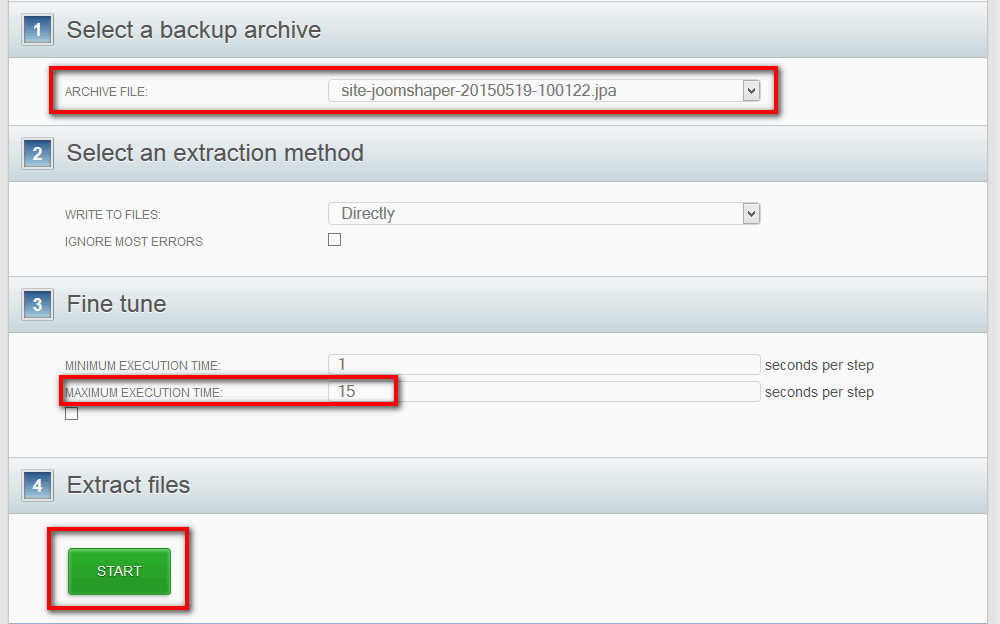
Step 8: The last step is to start-up a script which is done by calling the appropriate address on a browser address bar in the following format: http://www.YourSite.com/kickstart.php – this will start backup installation wizard.
Next page will show you Extracting page, and next one whole configuration. In most cases all you have to do is click Next button on top bar, but do not forget to fill new database fields. After whole process you have to remove kickstart files and /installation folder if it wouldn’t be removed. That’s it! Your main theme, posts and media are now successfully transfered!
After you’ve uploaded your package file and restored your cloned site, your next step will be to test your website and ensure that all WP and theme features are working properly. You can test your website using your account’s temporary or final URL. In most cases you do not have to change anything, but if you changed also domain name sometimes you have to check static links which you added into content (post, pages) which may have still “old” URLs. Fix all of them. When everything is working just like it used to, then you can cancel the old hosting plan.
I hope that you are able to create a Quickstart package easily with the above steps. Using this same method you can create a WP with universal basic settings, universal themeum theme and collection of installed plugins.
That’s all there is to transfer a website to another hosting provider. Now that you’ve learned the process of moving a website from one provider to another along with the free site migration tools, you’ll sleep easier at night when you actually do go through the process of transferring website!
© 2026 All Rights Reserved. An Ollyo company