
February 22, 2017
Share


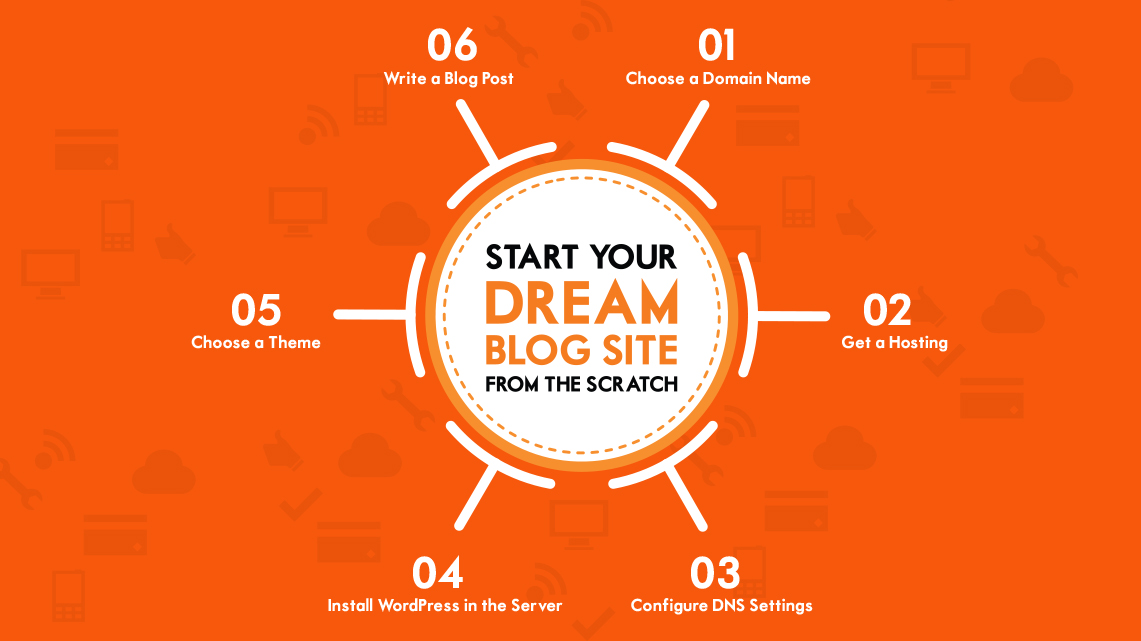
If you are thinking about starting your dream blog and don’t know how to go about it, then you are in the right place to get the best guide on starting your dream blog site from the scratch. There are tons of ways on the internet but you could be tired of searching the perfect one.Here in this article, I will give you a complete guideline on setting up a blog site from the start to finish.
Many people like you think it requires a vast knowledge of coding to start a blog site. But I will walk you through a process which will give you the best blogging experience without even knowing a single string of code. Wondering how I am going to do this? No problem, I chose WordPress, the most popular and the easiest blogging platform ever created. I recommend you to follow the process and start blogging right away.
Now you are just a few steps away from your dream blog site.
A domain name is the address of your site on the internet. It is the first impression to your website visitors. It is something like www.google.com, www.themeum.com. You have the freedom to choose any website only if that is available. Domain name affects your ranking in the search engine. Choose a brandable name which is easy to type and pronounce. it is better to keep it concise.
To have a better understanding on how to buy domain name click here.
Hosting is something that keeps your site live so that it is available on the internet for the visitors. Choosing a hosting is one of the most important things about any type of website. It affects your website’s performance. If you want to dig deep into web hosting, we would recommend you to click here and read this article.
After purchasing the domain name and the hosting space, you need to tie the domain with the hosting server. Collect the nameserver related information/IP from your hosting support, and add them to your domain’s DNS settings. This procedure will create a link between your domain name and the hosting server so that the website address can show contents from the host. Contact your hosting and domain support service to learn more specific information regarding this.
Your exciting blog site is just one step away. When you have a domain name and a hosting, you can jump right into building your dream blog site. But there are few more things to do before that.
You have to go to your web hosting control panel and install WordPress in your hosting server. Installing WordPress via the web hosting control panel has several methods. Most of the hosting providers offer one-click simple WordPress installation tools (e.g. Softaculous). See your hosting company’s support documents to find out the applicable WordPress installation method for you. Or you may have a quick look on this link to learn how to install WordPress.
Installing WordPress via FTP is a manual process. There are several steps to get it done. You need to create a database on your server, download WordPress package, extract the package, upload the files to the server and tie WordPress with the database. It’s a long process. If you are using a VPS, you might need to follow slightly different procedures. If you use a LAMP stack (Linux, Apache, MySQL, and PHP), see this tutorial.
Or in case you are using LEMP (Linux, Nginx, MySQL, and PHP), see this one.
Again, if you use cPanel or any other control panel on your hosting dashboard, you can find the easiest WordPress installation method in your host’s support documents.
Remember, manual WordPress installation method involves a good number of steps that are very important for your site’s safety and performance. So you should see your host’s knowledge base/support documents first.
Although a default WordPress theme comes ready to use with every new WordPress installation, you may install and activate a different theme if you like.
How your blog looks completely depends on the theme you use. There are many themes for blog sites. Each comes with different types of customization flexibilities. If you are a beginner, I would recommend you to go for the default theme for the time being. But if you want to have more functionalities and customizations you may try Personal Blog which will ensure your best blogging kickoff.
To change your WordPress blog theme, you need to click on the Appearance menu in the Dashboard.

Click add new as marked in the photo above.
There are thousands of free themes in the WordPress directory with varieties of designs and functionalities. You can choose any of them. You can search themes and sort your search by different categories.

Once you find your preferred theme, just hover the cursor over the theme and click install as they appear on the screen.
After installation completes, activate the theme. You can activate the newly installed theme from the screen that comes just after its installation. Or do it by going to Appearance again and then activate the particular theme you intend to use.

Now your site is almost ready to publish your first blog post.
You can start writing on your blog right away. Hover over the posts in the Dashboard and click on “Add New” as marked in the picture bellow.

A text editor will appear just after clicking ‘Add New’.
A ‘ + New’ sign appears on the top black ribbon while you are logged in to the site. Pressing that button will also bring the WordPress ‘Add New Post’ interface.
Here you can compose your blog post along with links, images, videos and different text stylings.
When you are done with writing your post you can either publish your blog post immediately, schedule or save it as a draft to publish in future. Choice is all yours.
There is a Publish section on the right to the text editor having three different buttons in it. Using them you can publish the post immediately or save as a draft or see a preview.

To save a post as a draft, click on the Save Draft button.

To see the preview of a blog post before publishing, click the Preview button as marked in the picture bellow

And finally, publish the blog post by hitting the ‘Publish’ button. Now your post is live and available to the world.
In this post, we’ve tried to offer a detailed series of guidelines on how you can start your own blog site with WordPress. Now let’s wrap it up at a glance:
The Personal Blog theme could be a nice choice for bloggers of all levels, especially for sharing personal stories and experiences. Both themes have a lot of functionalities. One varies from another by a slight margin. Use any of these themes and have a successful blogging experience.
We focused on all the basics you need. Here we’ve given the important ideas and ways to choose your domain name, hosting, theme and processes to publish your first blog post. We hope this post is quite helpful for you to start a fully functioning blog site. If you need any further help, do let us know in the comments. Thank you!
© 2026 All Rights Reserved. An Ollyo company