
Assessments are a key part of learning. Well-designed quizzes and assessments allow teachers to measure student’s understanding, identify knowledge gaps, and tailor their instruction appropriately. While traditional paper tests have their place, technology is reinventing assessment for the digital age.
In this article, we’re diving deep into the art of crafting the best quiz activities for online assessment. We will examine all the tools and techniques Tutor LMS provides to assess student mastery and grasp of course material.
So whether you’re a student aiming to excel on online tests or an educator eager to engage your learners, fasten your seatbelts. We’re about to embark on a journey to discover how to create the best quiz activities for online assessment. Let’s make learning an adventure!
First Things First
Quick heads up before we dive in – this article assumes you already know the basics of creating a course and adding lessons with the Tutor LMS Course Builder. It’s a required first step, after all!
If you need a little refresher on that part, no worries! Click right here to access a quick tutorial that will brush up your skills on setting up courses and lessons in Tutor LMS.
How to Add and Set Up a Quiz
Let’s dive right into the heart of assessment: quizzes! Imagine them as the cornerstone of your learning journey. Now, Tutor LMS takes this essential element and makes it a breeze with our amazing “Quiz Builder.”
You can effortlessly craft a diverse array of questions and even sprinkle in some audio and video elements to make the learning experience not just educational but engaging and exciting.
Our Quiz Builder offers a smorgasbord of ten question types. These are not your run-of-the-mill questions; they’re modern, innovative, and designed to put your students’ knowledge to the test in fun ways.
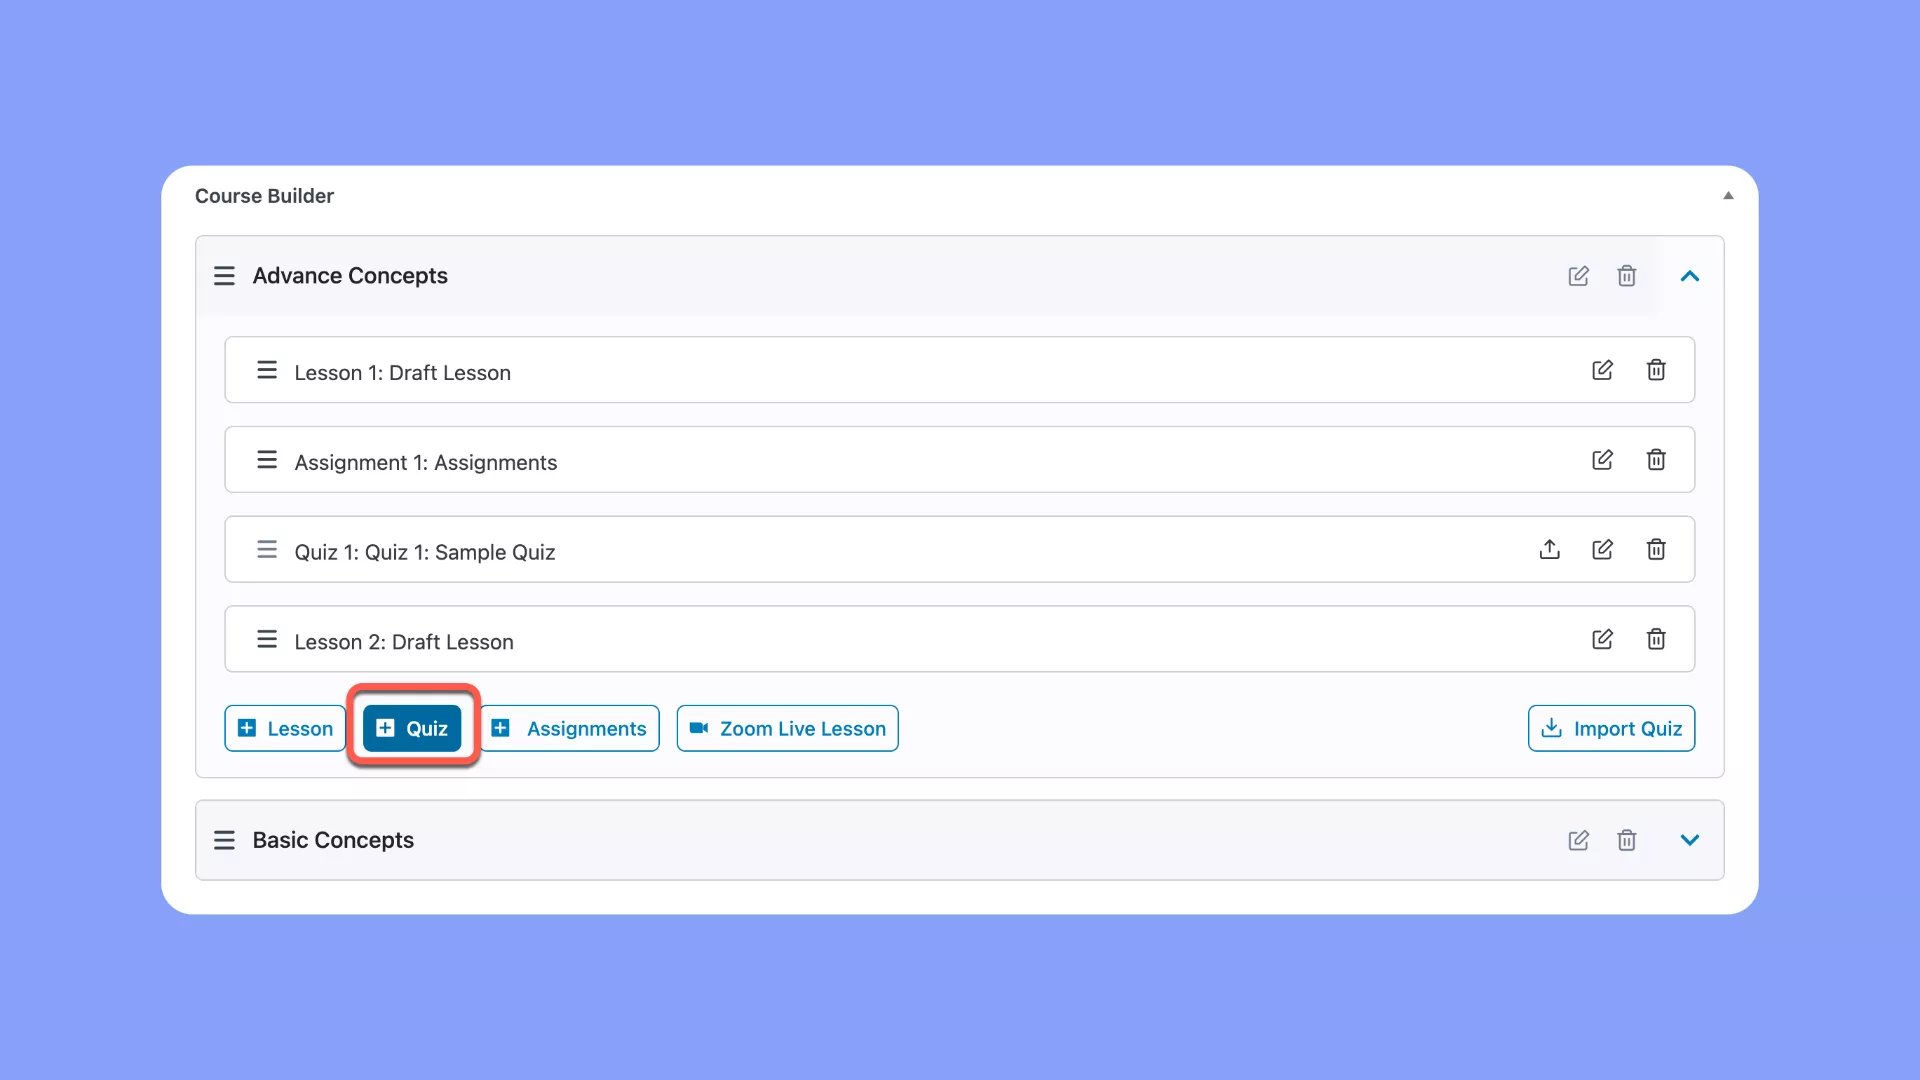
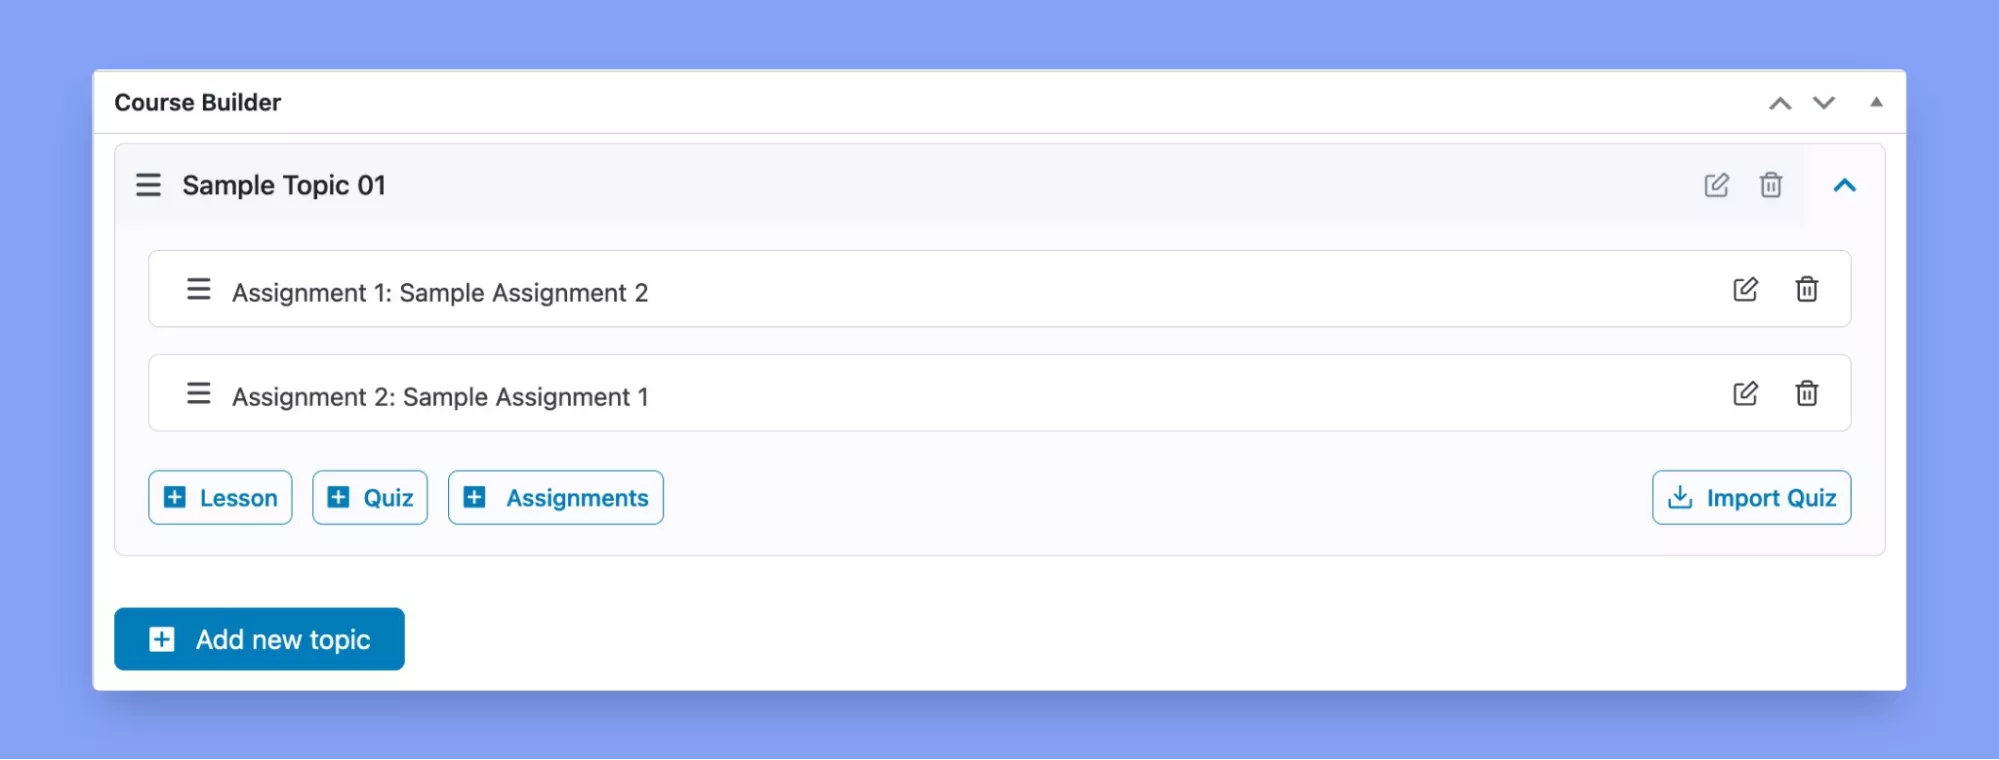
To add a new quiz to your lesson plan, follow these steps to access the quiz builder easily:
1. Click on Tutor Lms>Courses from the navigation menu
2. Select your course and hit the “Edit” button on the right.
3. As the “Edit Course” page unfolds, scroll down to the “Course Builder” section.
4. Click on the “+ Quiz” button to initiate the quiz-building process.
Crafting Effective Quizzes with Tutor LMS
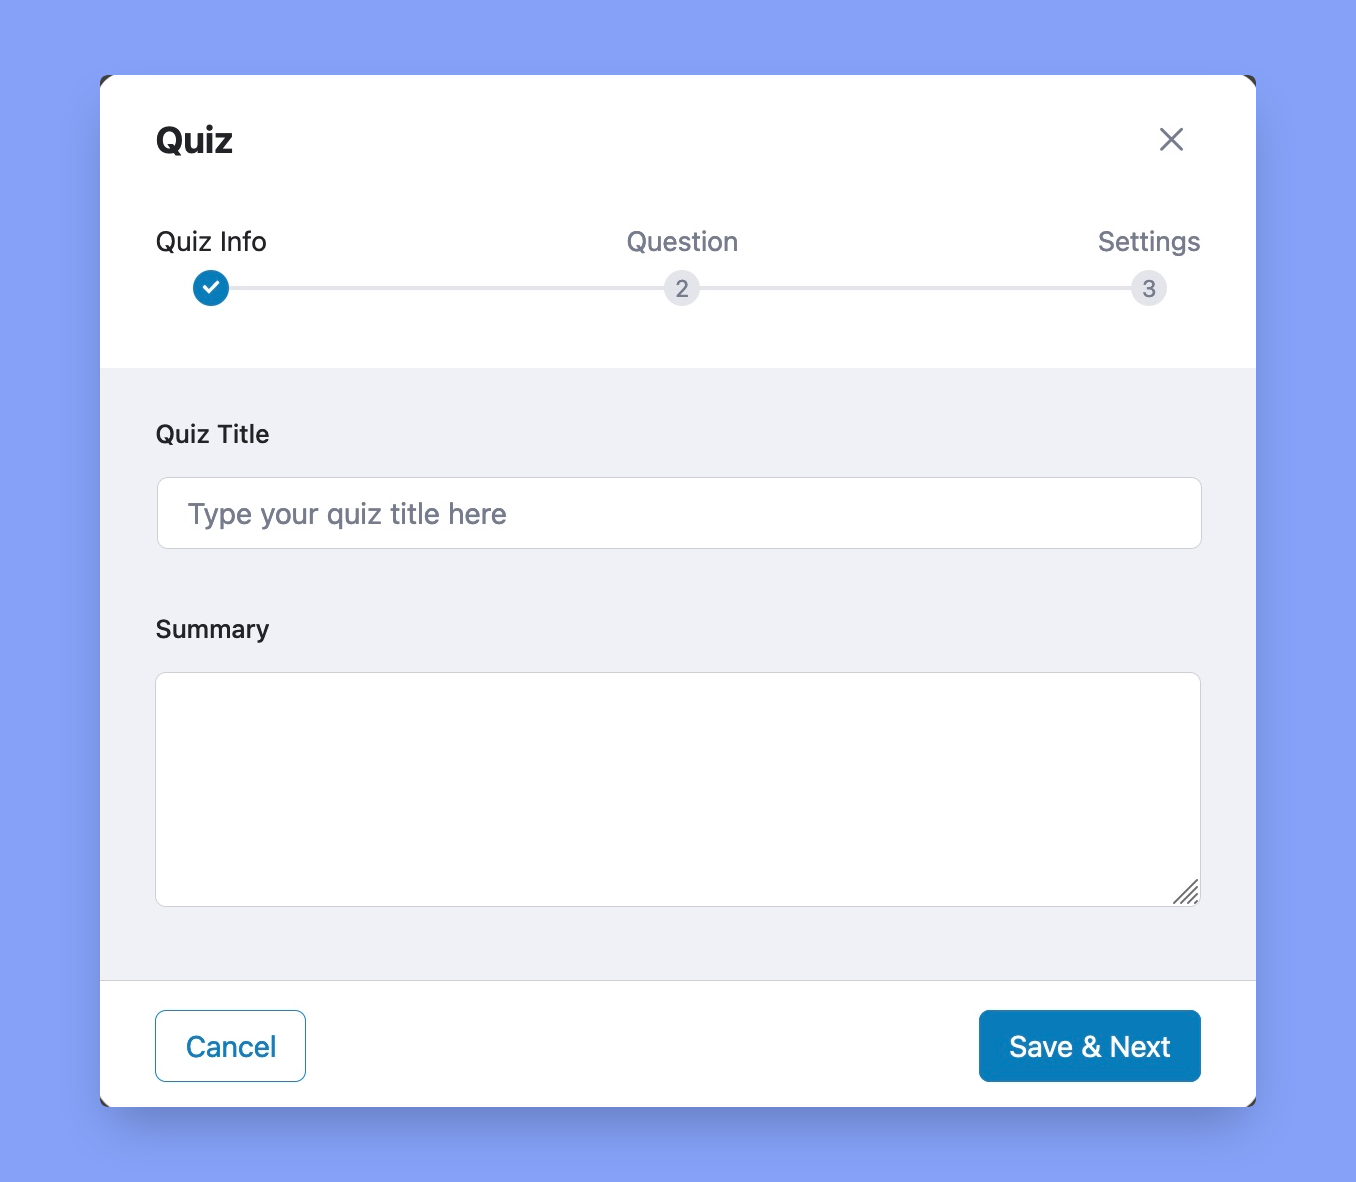
In the “Quiz Info” section, give your quiz a unique title. Providing a meaningful title for your quizzes helps learners understand its purpose. Once the required information is submitted in the Quiz Info section, click the “Save & Next” button to continue to the “Question” part of the process.
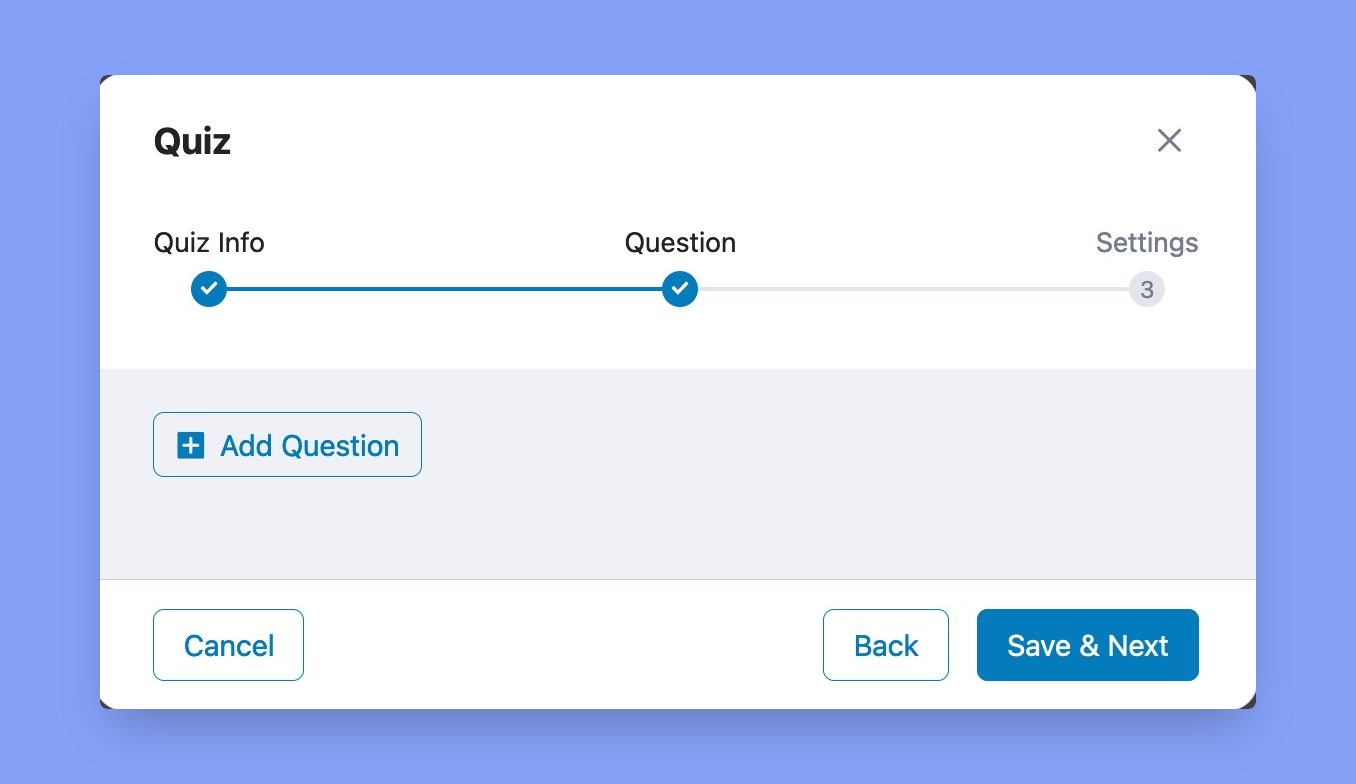
Adding Quiz Questions
To build up your question bank, click the “+Add Question” button. You’ll then be able to choose from tons of interactive question types.
Choose Question Types
Tutor LMS Pro offers a wide range of interactive question types to cater to different learning objectives. These include:
- True/False
- Single Choice
- Multiple Choice
- Open-Ended/Essay
- Fill In The Blanks
- Short Answer
- Matching
- Image Matching
- Image Answering
- Ordering
By choosing the appropriate question type, you can tailor your quizzes to assess different skills and knowledge levels effectively. Each question type serves a specific purpose, making your quizzes more engaging and educational for your learners.
Understanding Question Types Better
Adding interactive quizzes and assessments is key to boosting student engagement. With Tutor LMS, creating them is a breez. With a few clicks, you can add engaging questions to evaluate your students’ progress. But with so many question types available, it can get confusing. We’re going to shed some light on this topic today. We will walk through steps to build some of the most popular quiz question formats in Tutor LMS. So Let’s dive in!
Multiple Choice
Ideal for assessing a student’s ability to select one or more correct answers from multiple options, ensuring a clear understanding of a concept.
Creating multiple-choice questions in Tutor LMS Pro is a breeze. Follow these steps:
- Step 1: Type your question in the “Write your question here” field. This is the main question you want to ask your learners.
- Step 2: Select “MultipleChoice” from the question type options. In multiple-choice questions, there can be more than one correct answer.
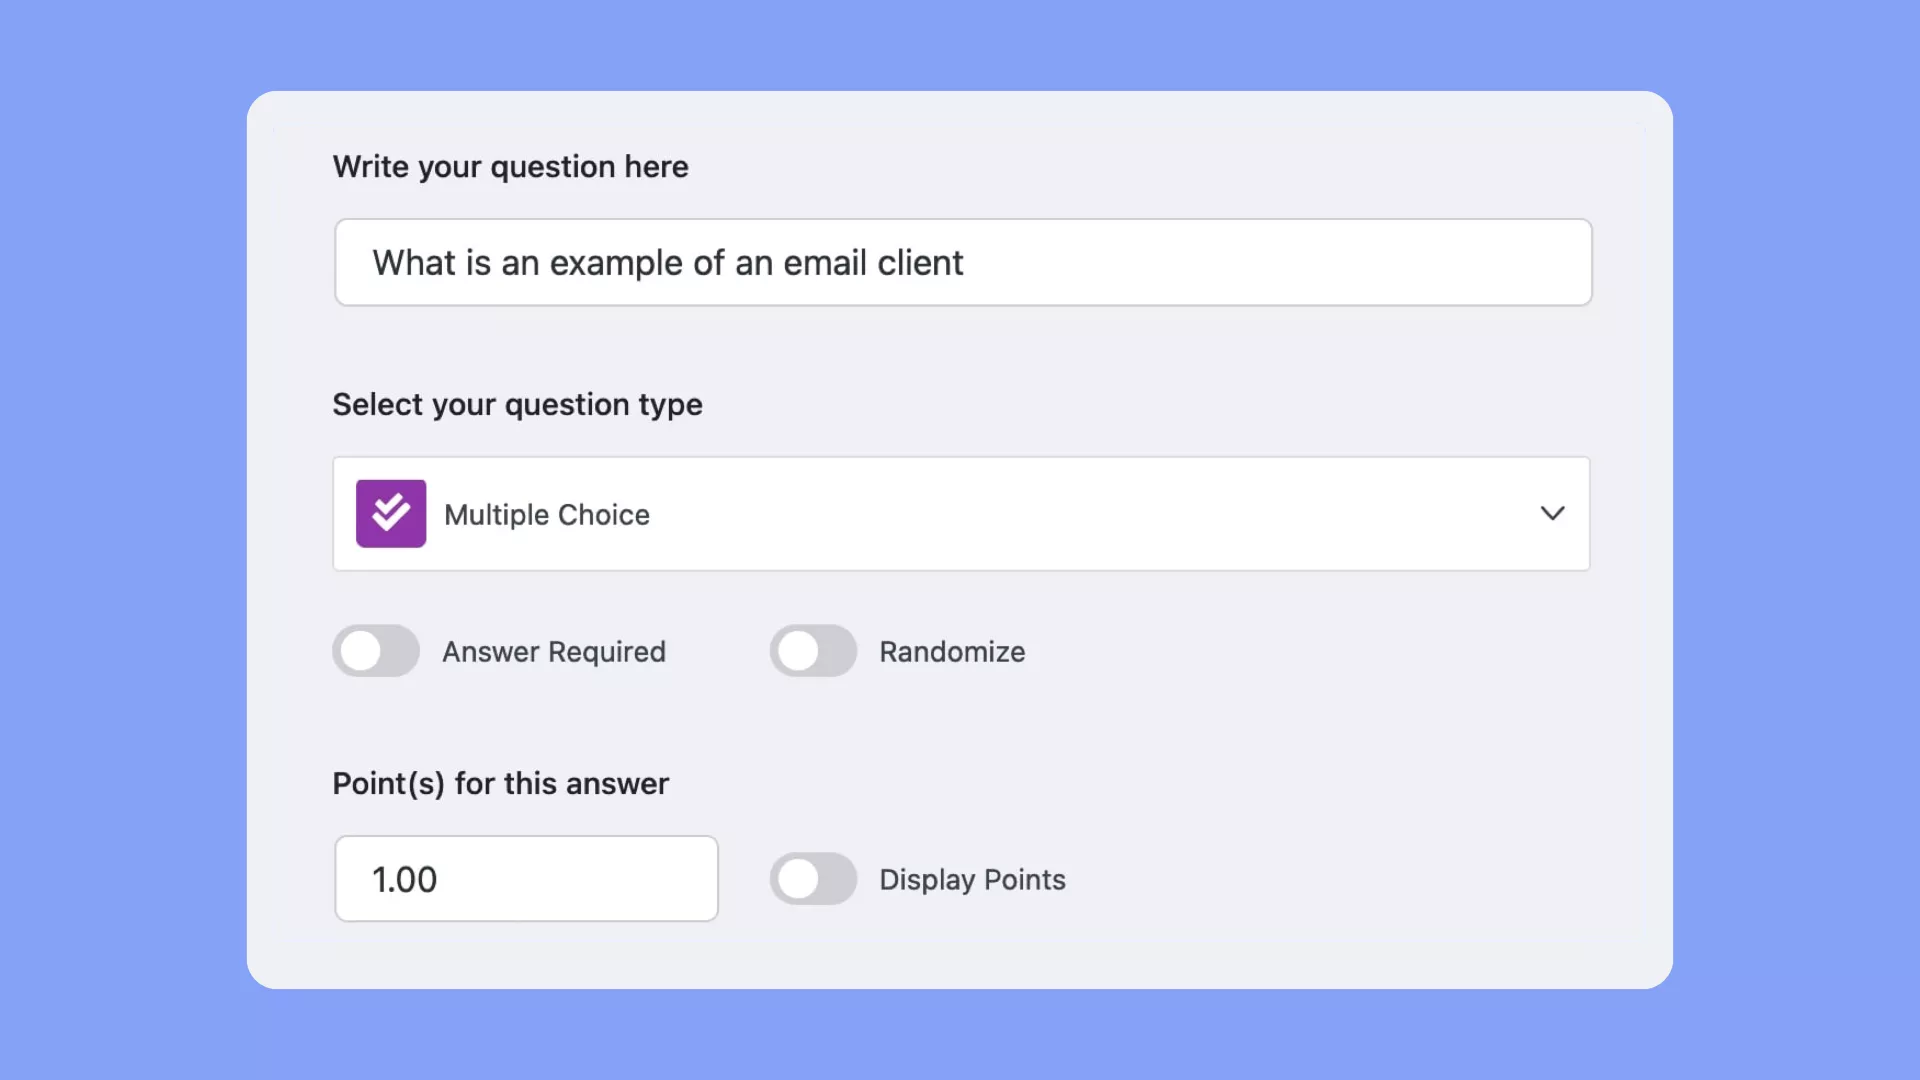
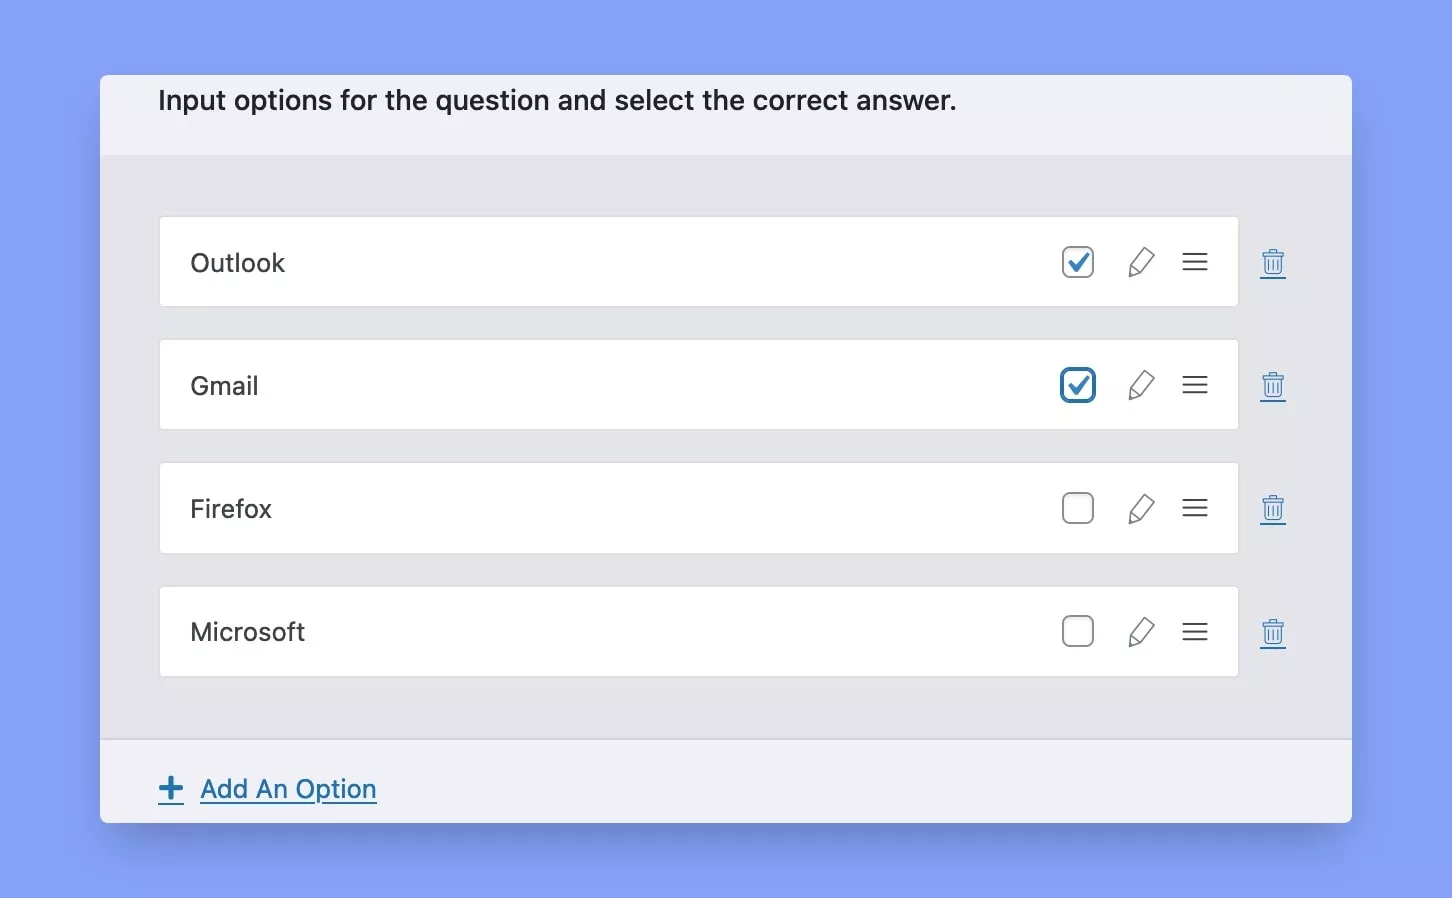
- Step 3: To add answer options, scroll down and select “+ Add An Option.” Text entered in the “Answer Title” will appear as an option in the quiz question. You can add each option individually.
- Step 4 (Optional): If you prefer, you can use images instead of text by selecting the “Only Image” option or combine text and images by choosing “Text & Image both.”
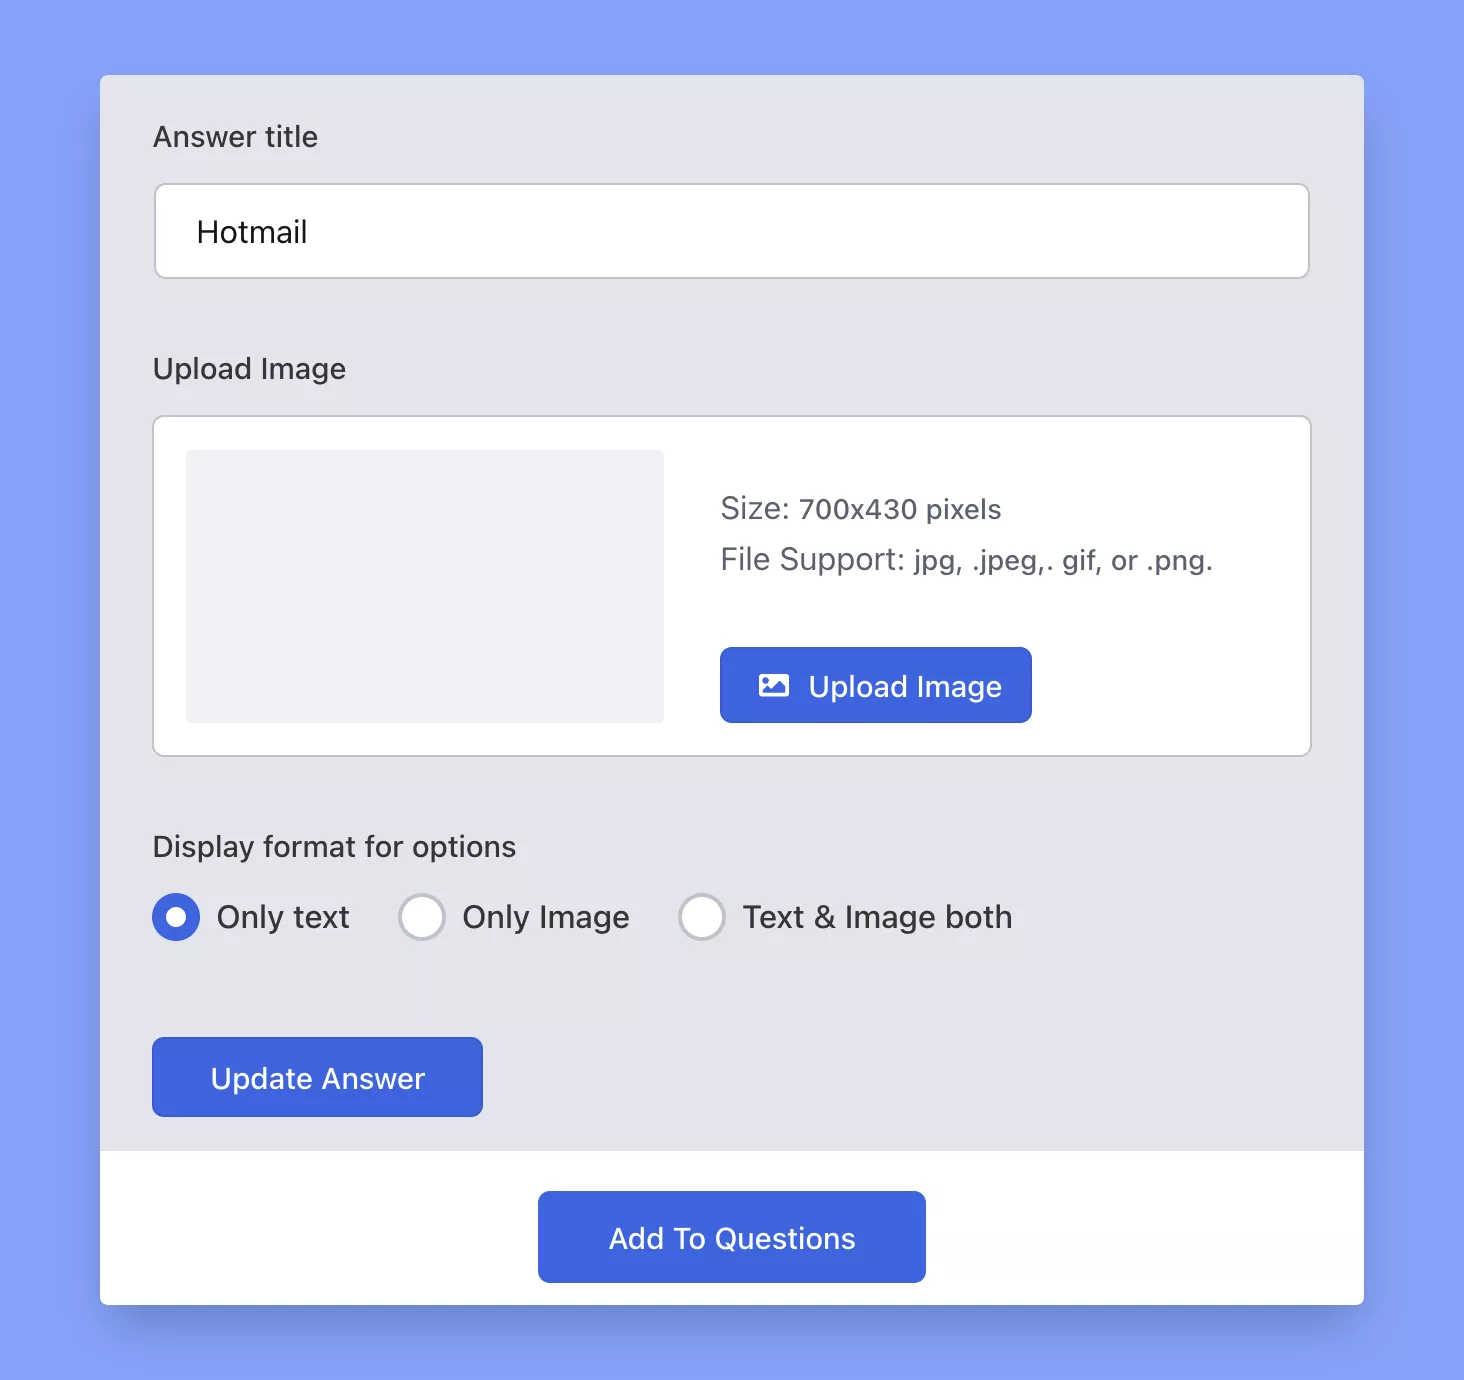
- Step 5: Click “Update Answer” to save your option, and you’ll return to the previous menu. Once all the choices are confirmed, select the correct answer/answers. Any unchecked options will be considered incorrect answers.
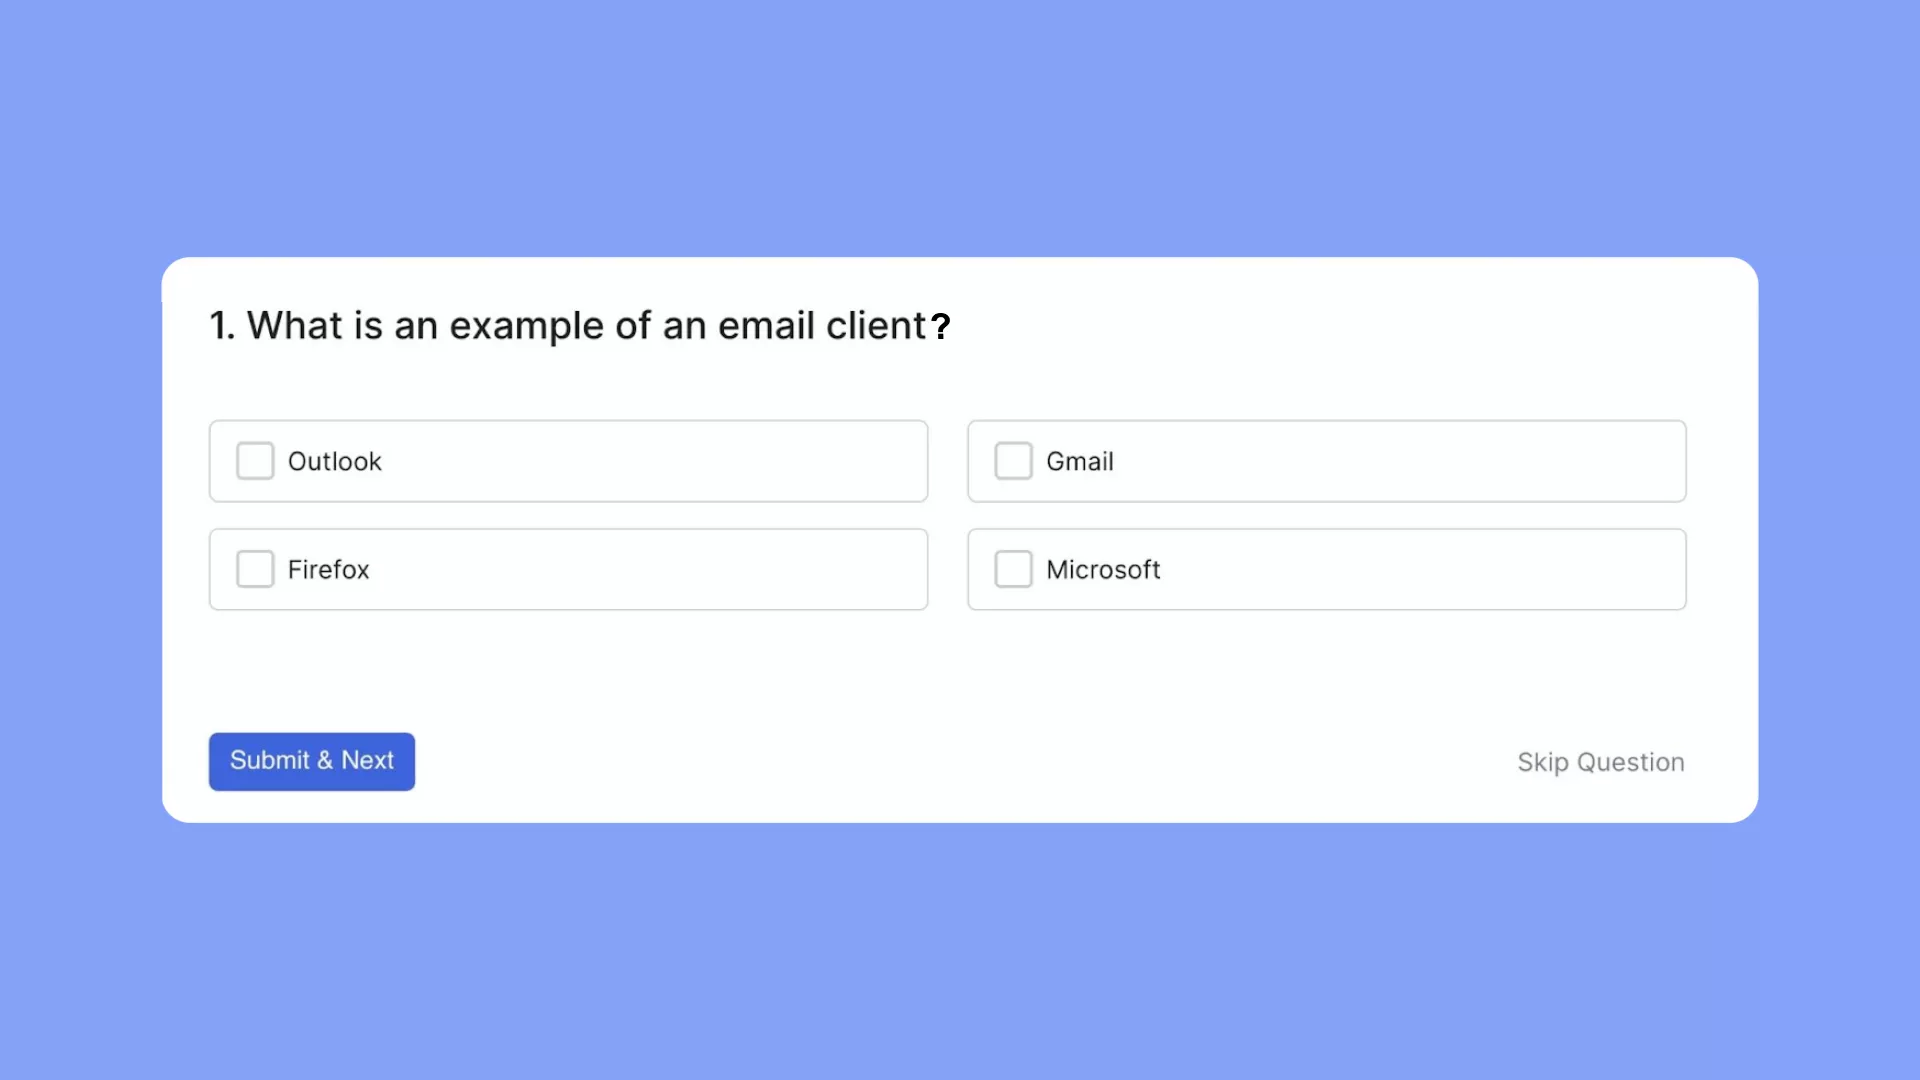
The following image depicts how Multiple Choice questions will appear in the actual quiz.
Fill In The Blanks
This is probably one of the most common types of questions on our list. Therefore, its frequent use alone warrants a small walkthrough. Fill in the Blanks questions are great for testing knowledge recall. Here’s how to create them:
- Step 1: Enter your question in the “Write your question here” field and select “Fill in the Blanks” from the question type options.Step 2: Ensure there’s a blank space in your question text, representing where the answer should go.
- Step 2: Ensure there’s a blank space in your question text, representing where the answer should go.
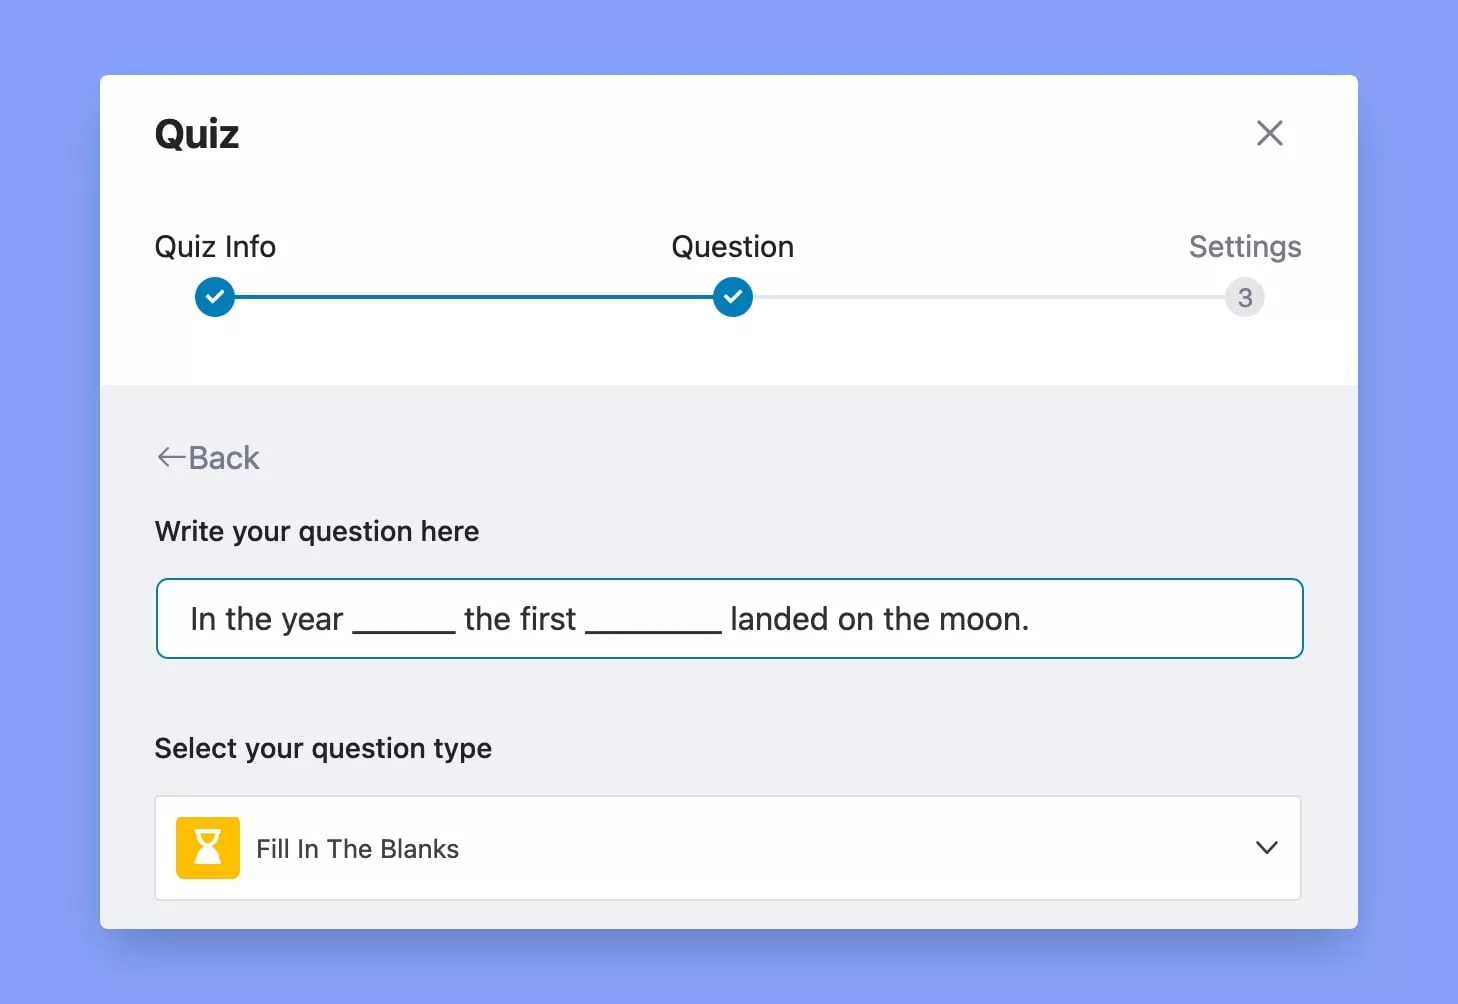
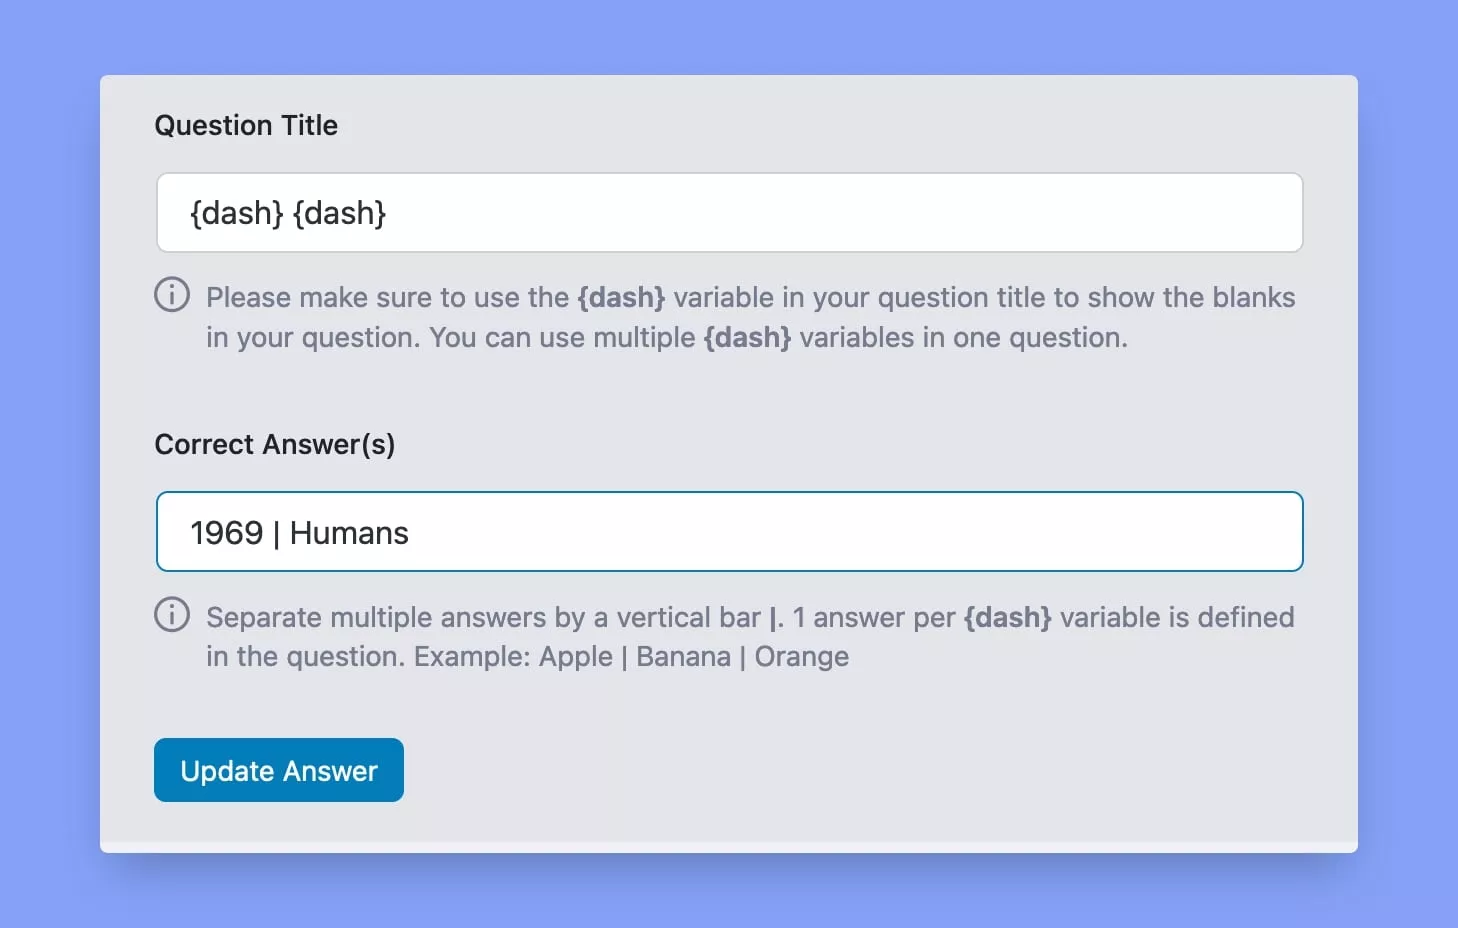
- Step 3: Scroll down and select “+ Add An Option” to configure the answer(s) for the question. Use the “{dash}” variable in your “Question Title” to indicate the blanks in your questions. In the “Correct Answer(s)” box, enter the answer(s) to the blanks. You can input multiple answers separated by a vertical bar (|).
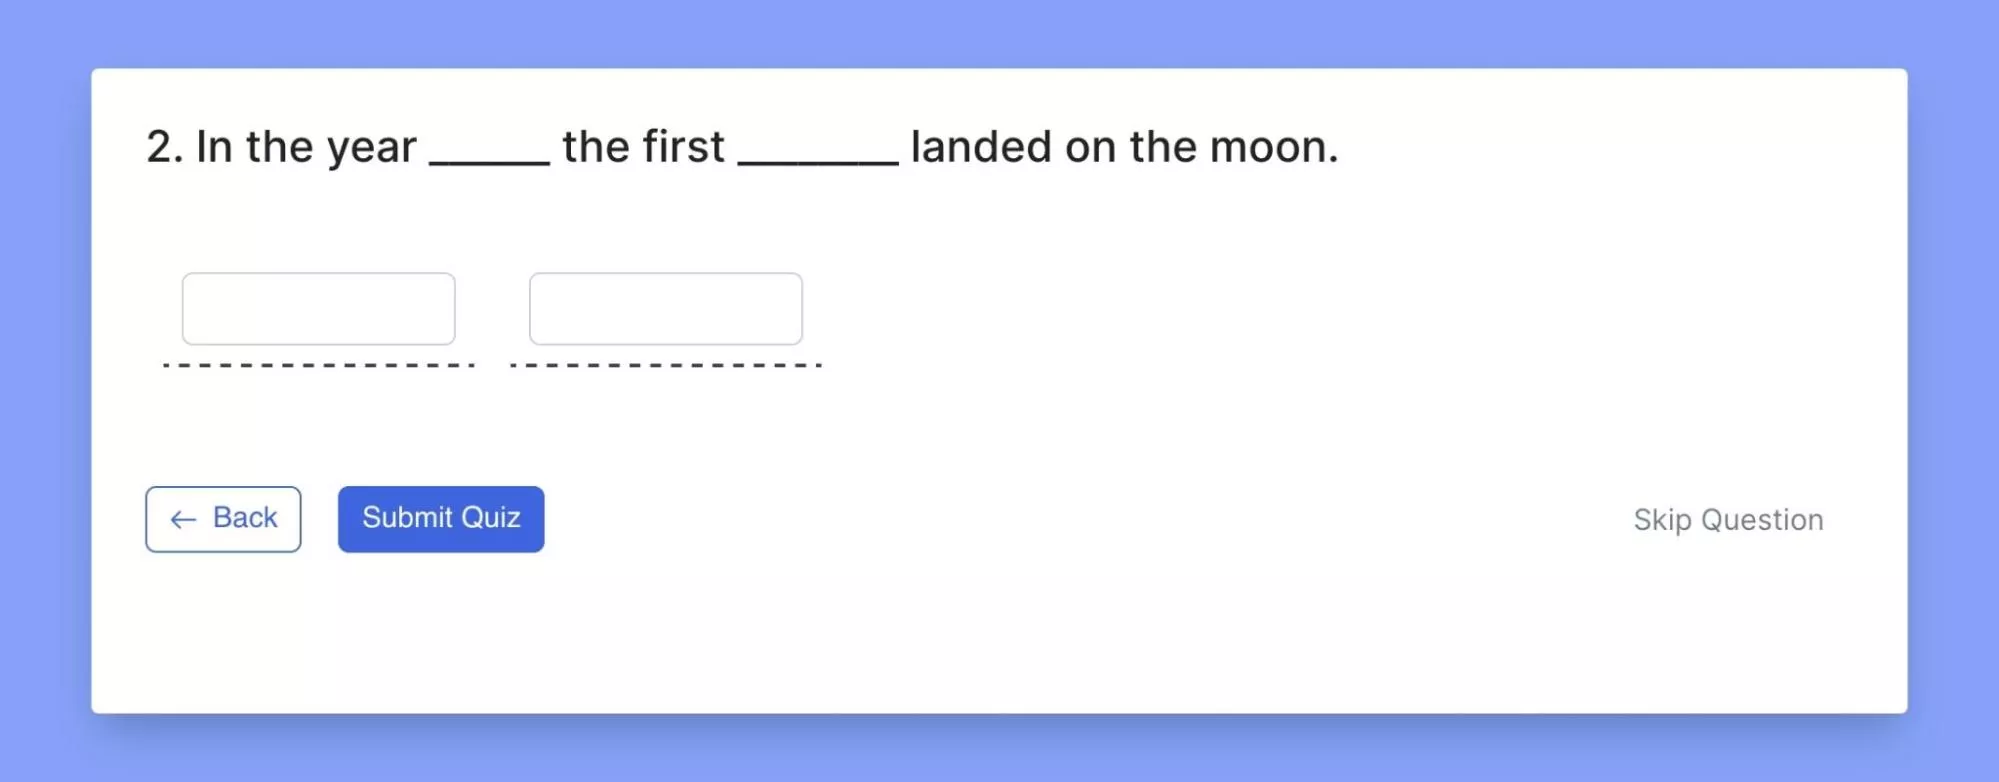
The following image depicts how Fill in the Blanks questions will appear in the actual quiz.
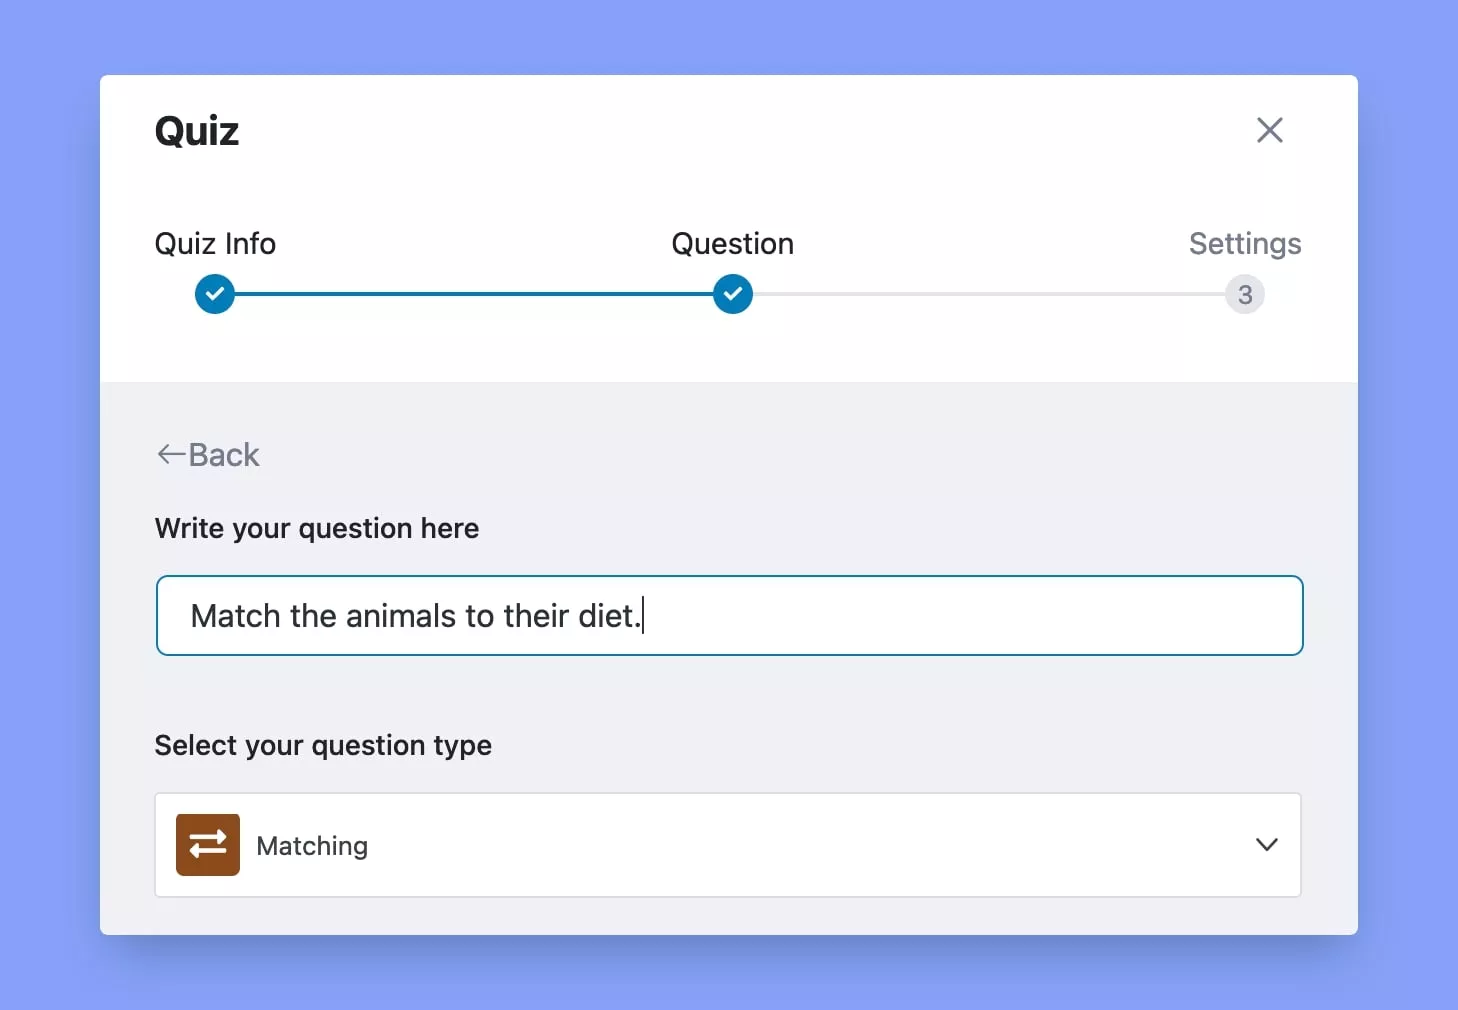
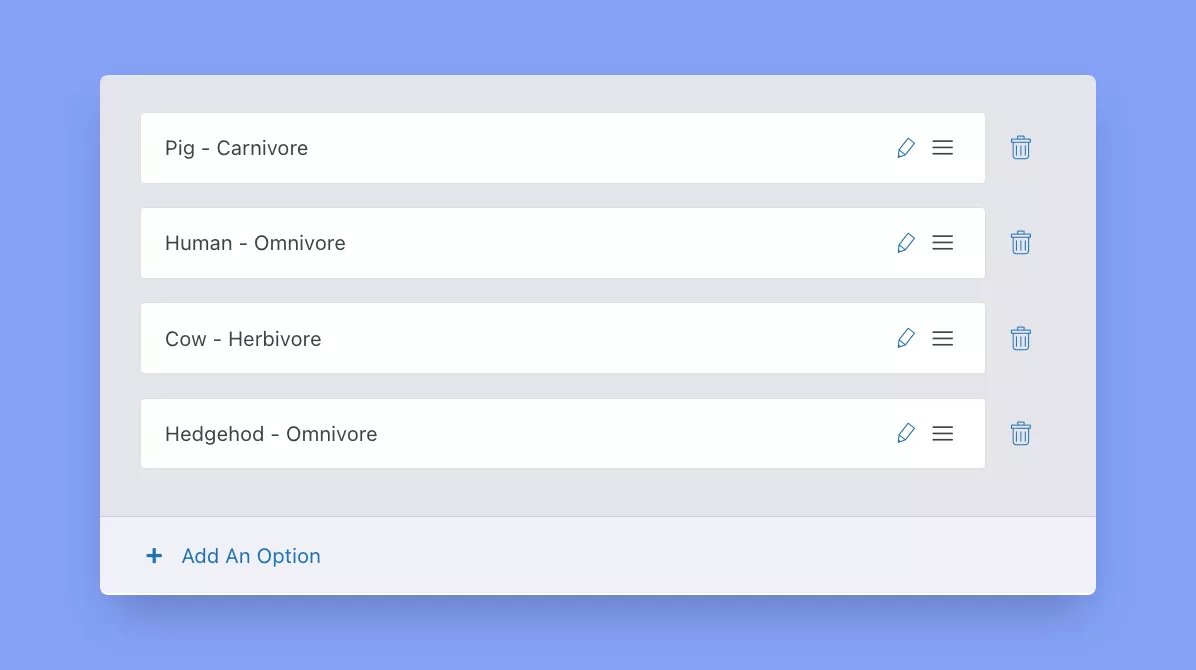
Matching Questions
A matching question is two lists of related words, phrases, pictures, or symbols. Each item in one list is paired with at least one item in the other list. Students achieve marks by successfully matching the correct items.
Matching questions assess students’ ability to associate related items. Follow these steps:
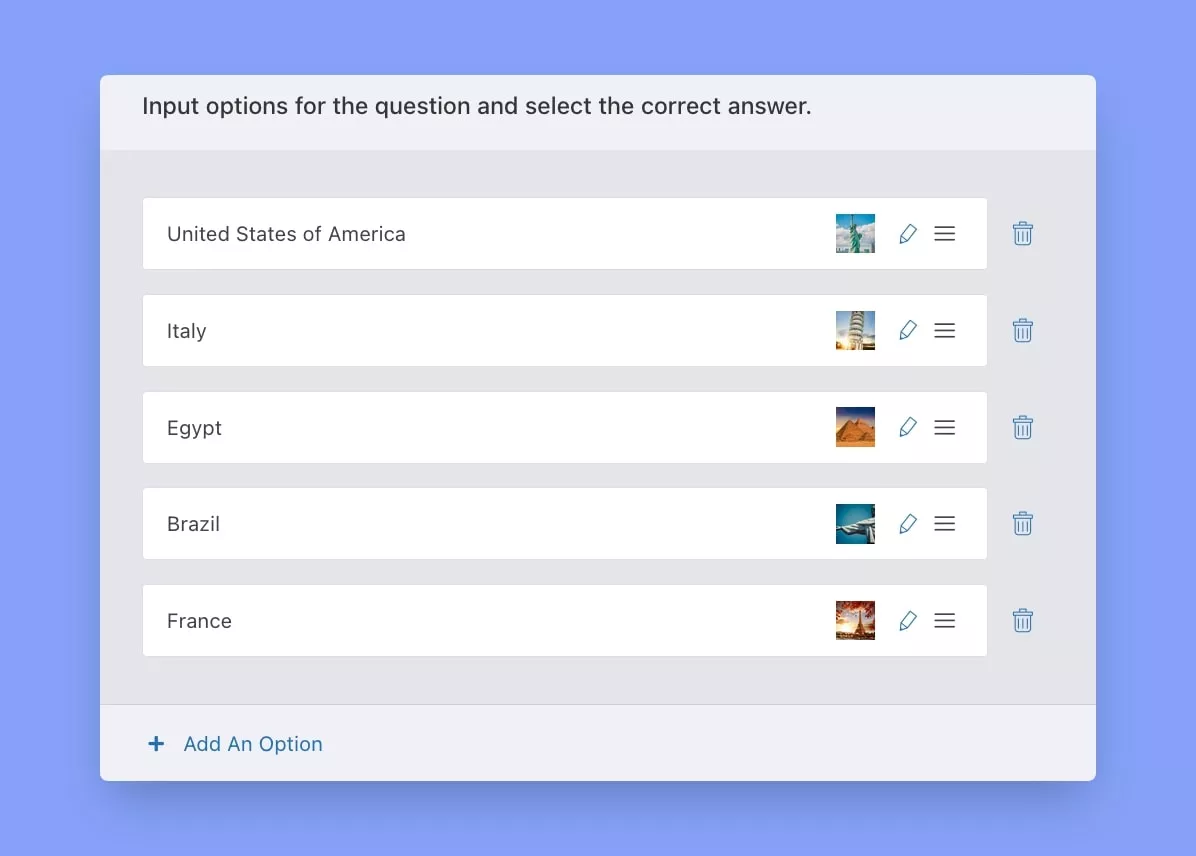
- Step 1: Enter your question text as you would for other question types and select “Matching” from the options.
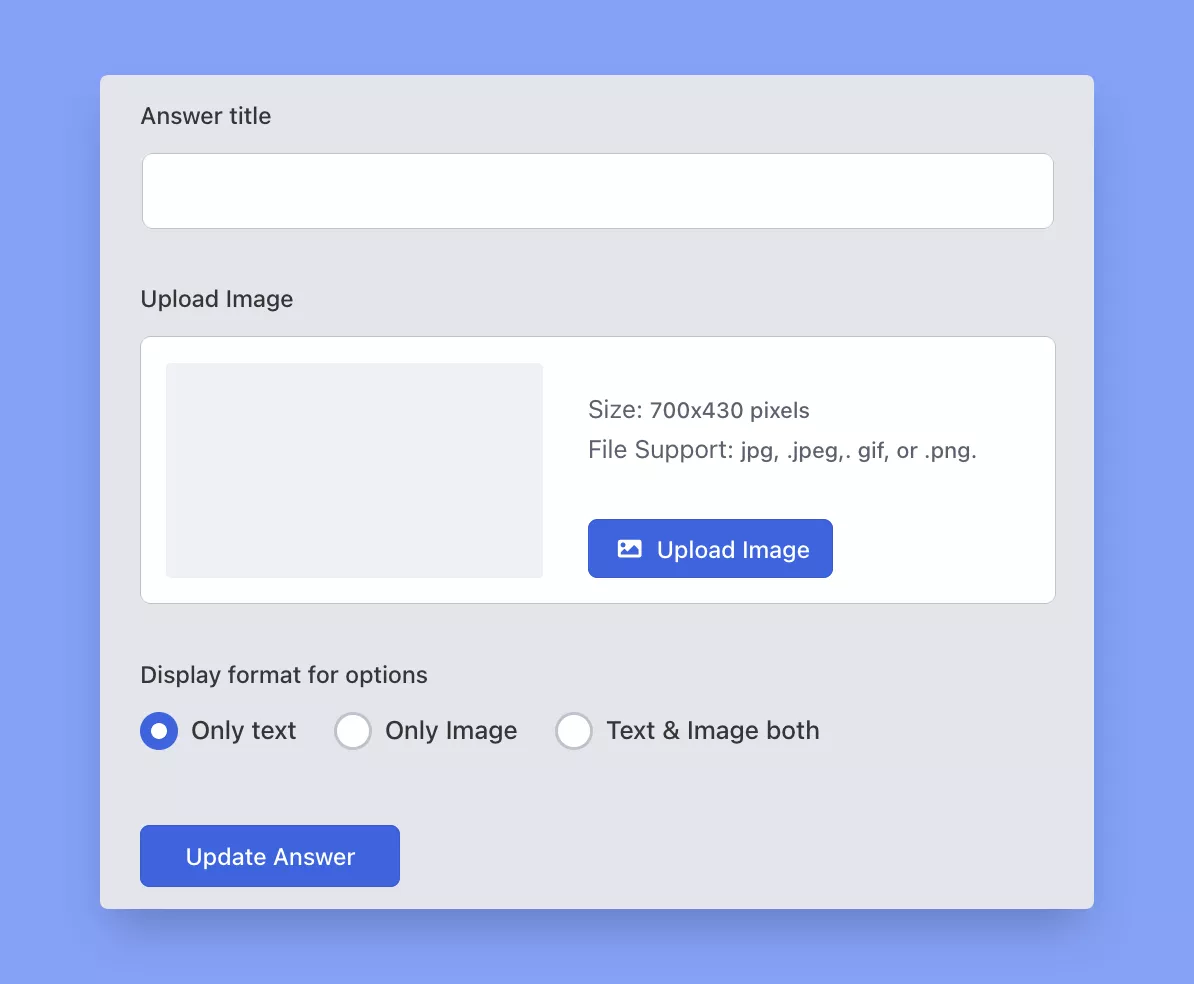
- Step 2: Scroll down and click “+ Add An Option.” Text entered in the “Answer Title” will appear as an option in one list, while the text in the “Matched Answer Title” will be the correct answer displayed on the second list for students to match. Each matching pair must be added individually.
- Step 3 (Optional): You can also opt for images instead of text by selecting the “only image” option or combine both text and images.
- Step 4: Click “Update Answer” to save your option, and you’ll return to the previous menu. Once all choices are finalized, select the correct answer/answers, and any unchecked alternatives will be considered incorrect.
The following image depicts how Fill in the Blanks questions will appear in the actual quiz.
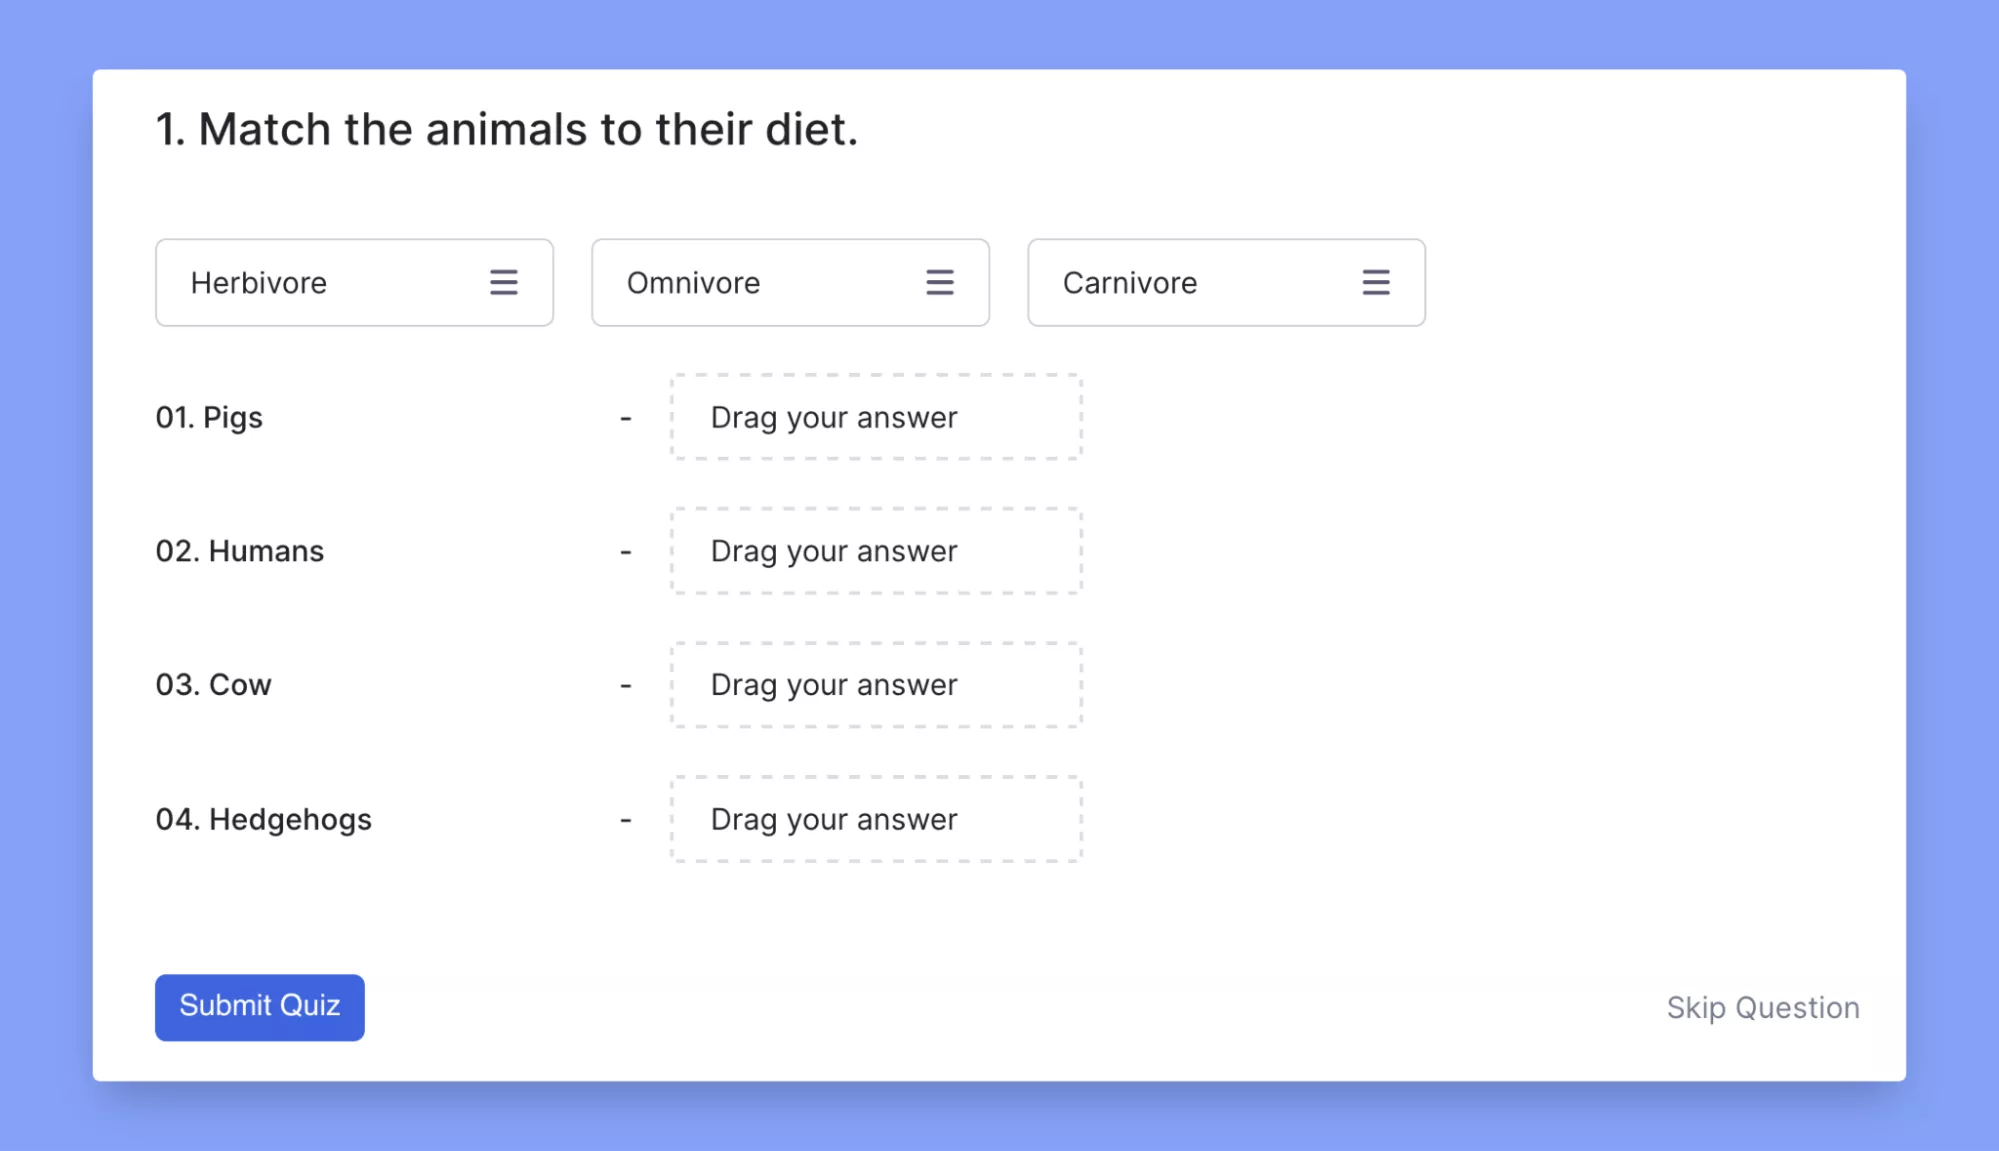
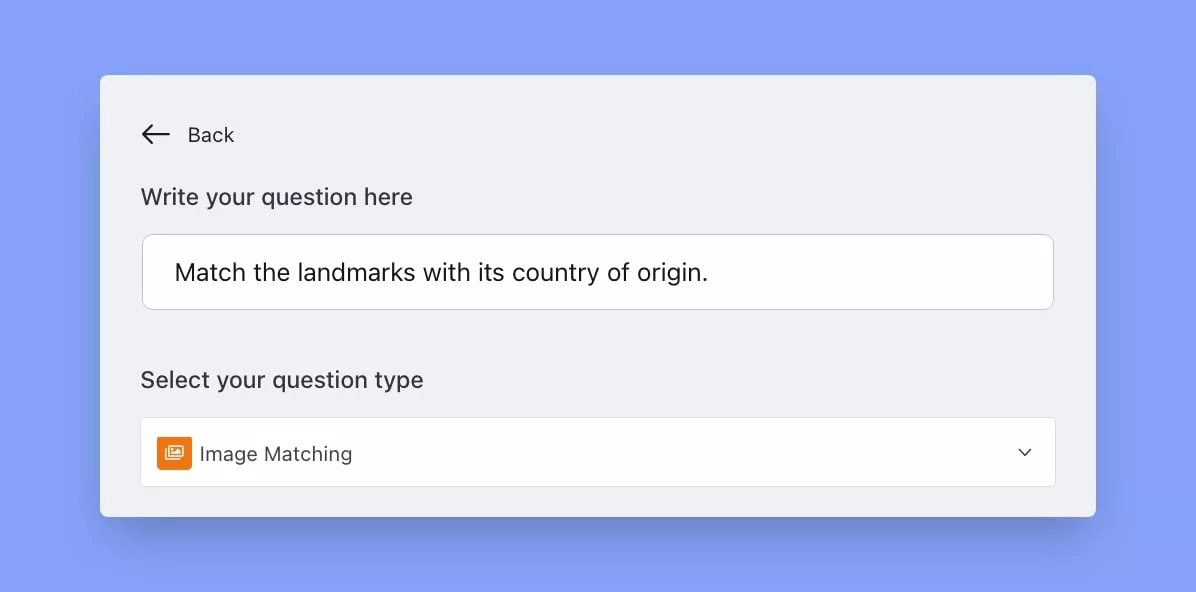
Image Matching
Similar to matching questions, Image Matching allows students to match two images for the correct answer. Quiet similar to matching questions but with images, enhancing visual learning and recognition. Here’s how to get started:
- Step 1: Enter your question text and select “Image Matching” from the options.
- Step 2: In the “+ Add An Option” menu, upload the image and enter the associated text in the “Image matched text” box.
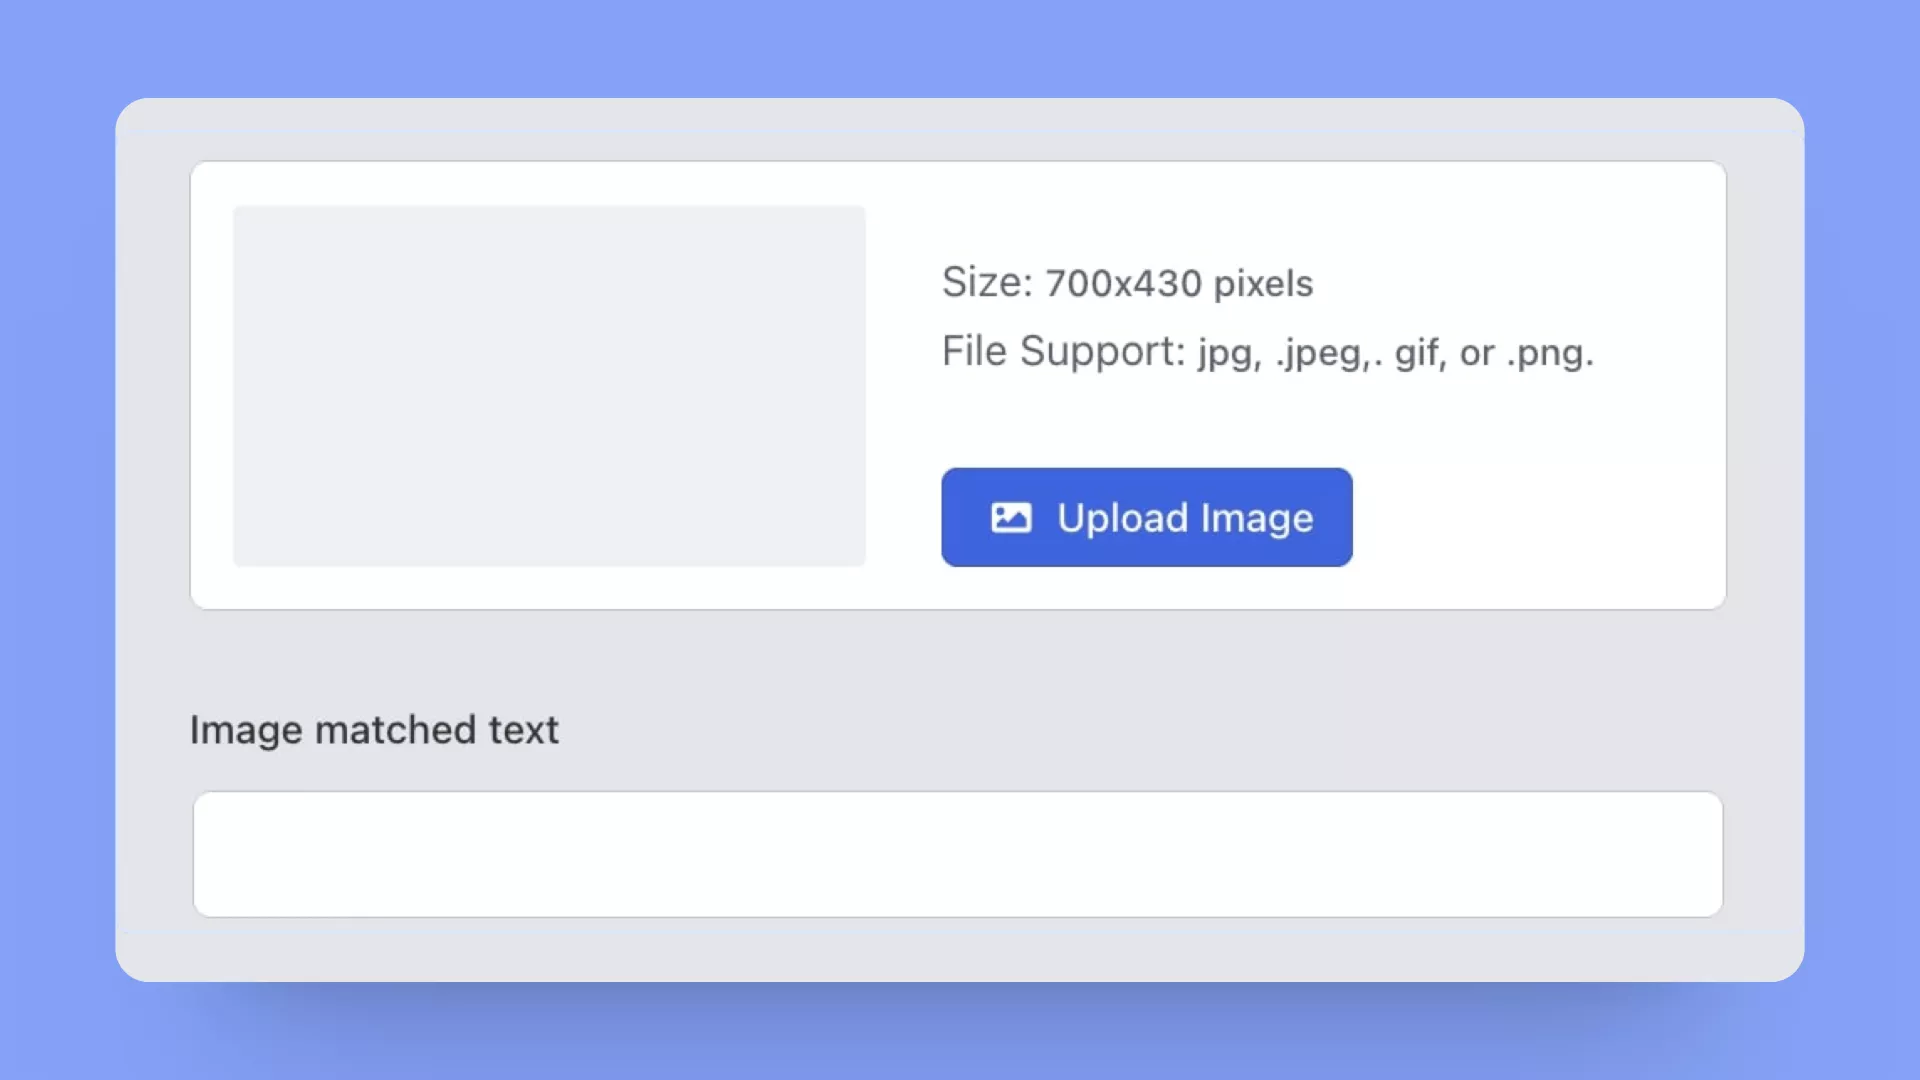
- Step 3: Create each matching pair individually and click “Update Answer” to save your question.
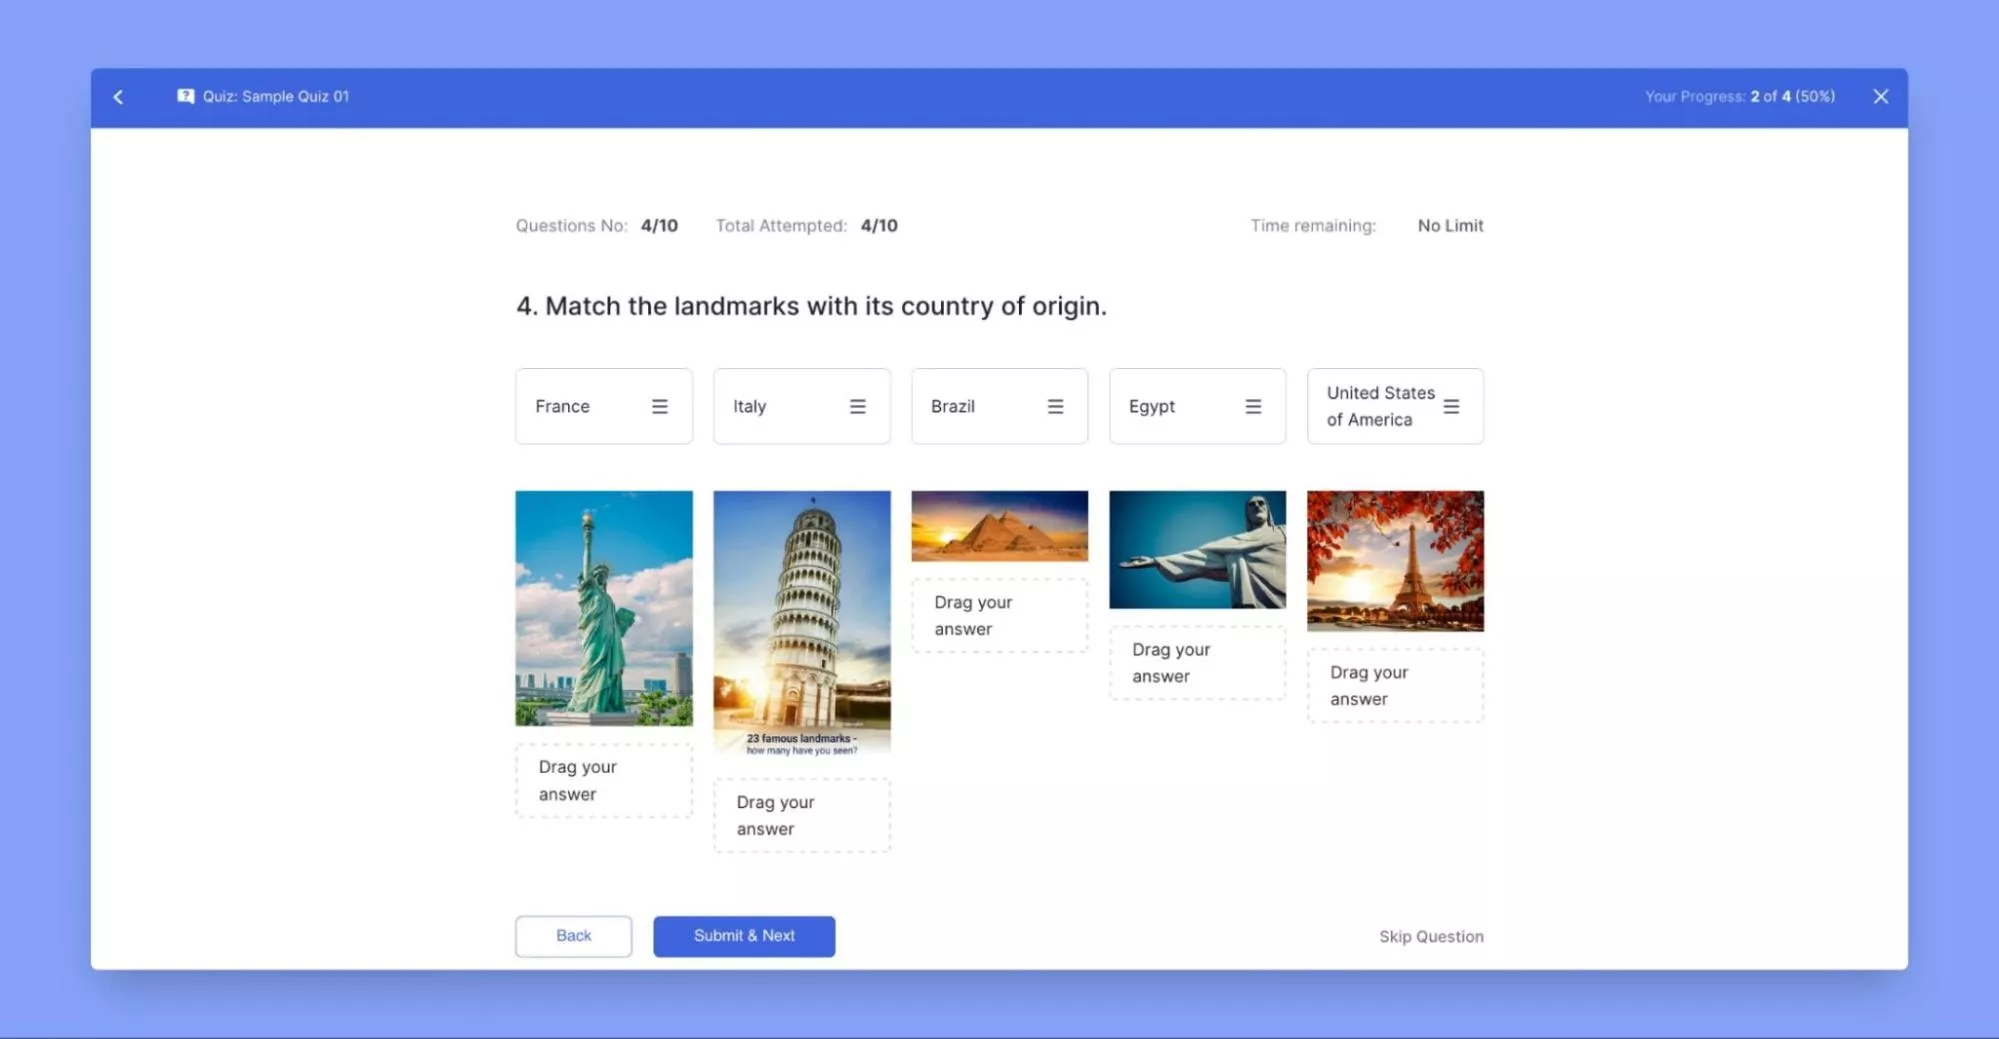
The following image depicts how Image Matching questions will appear in the actual quiz.
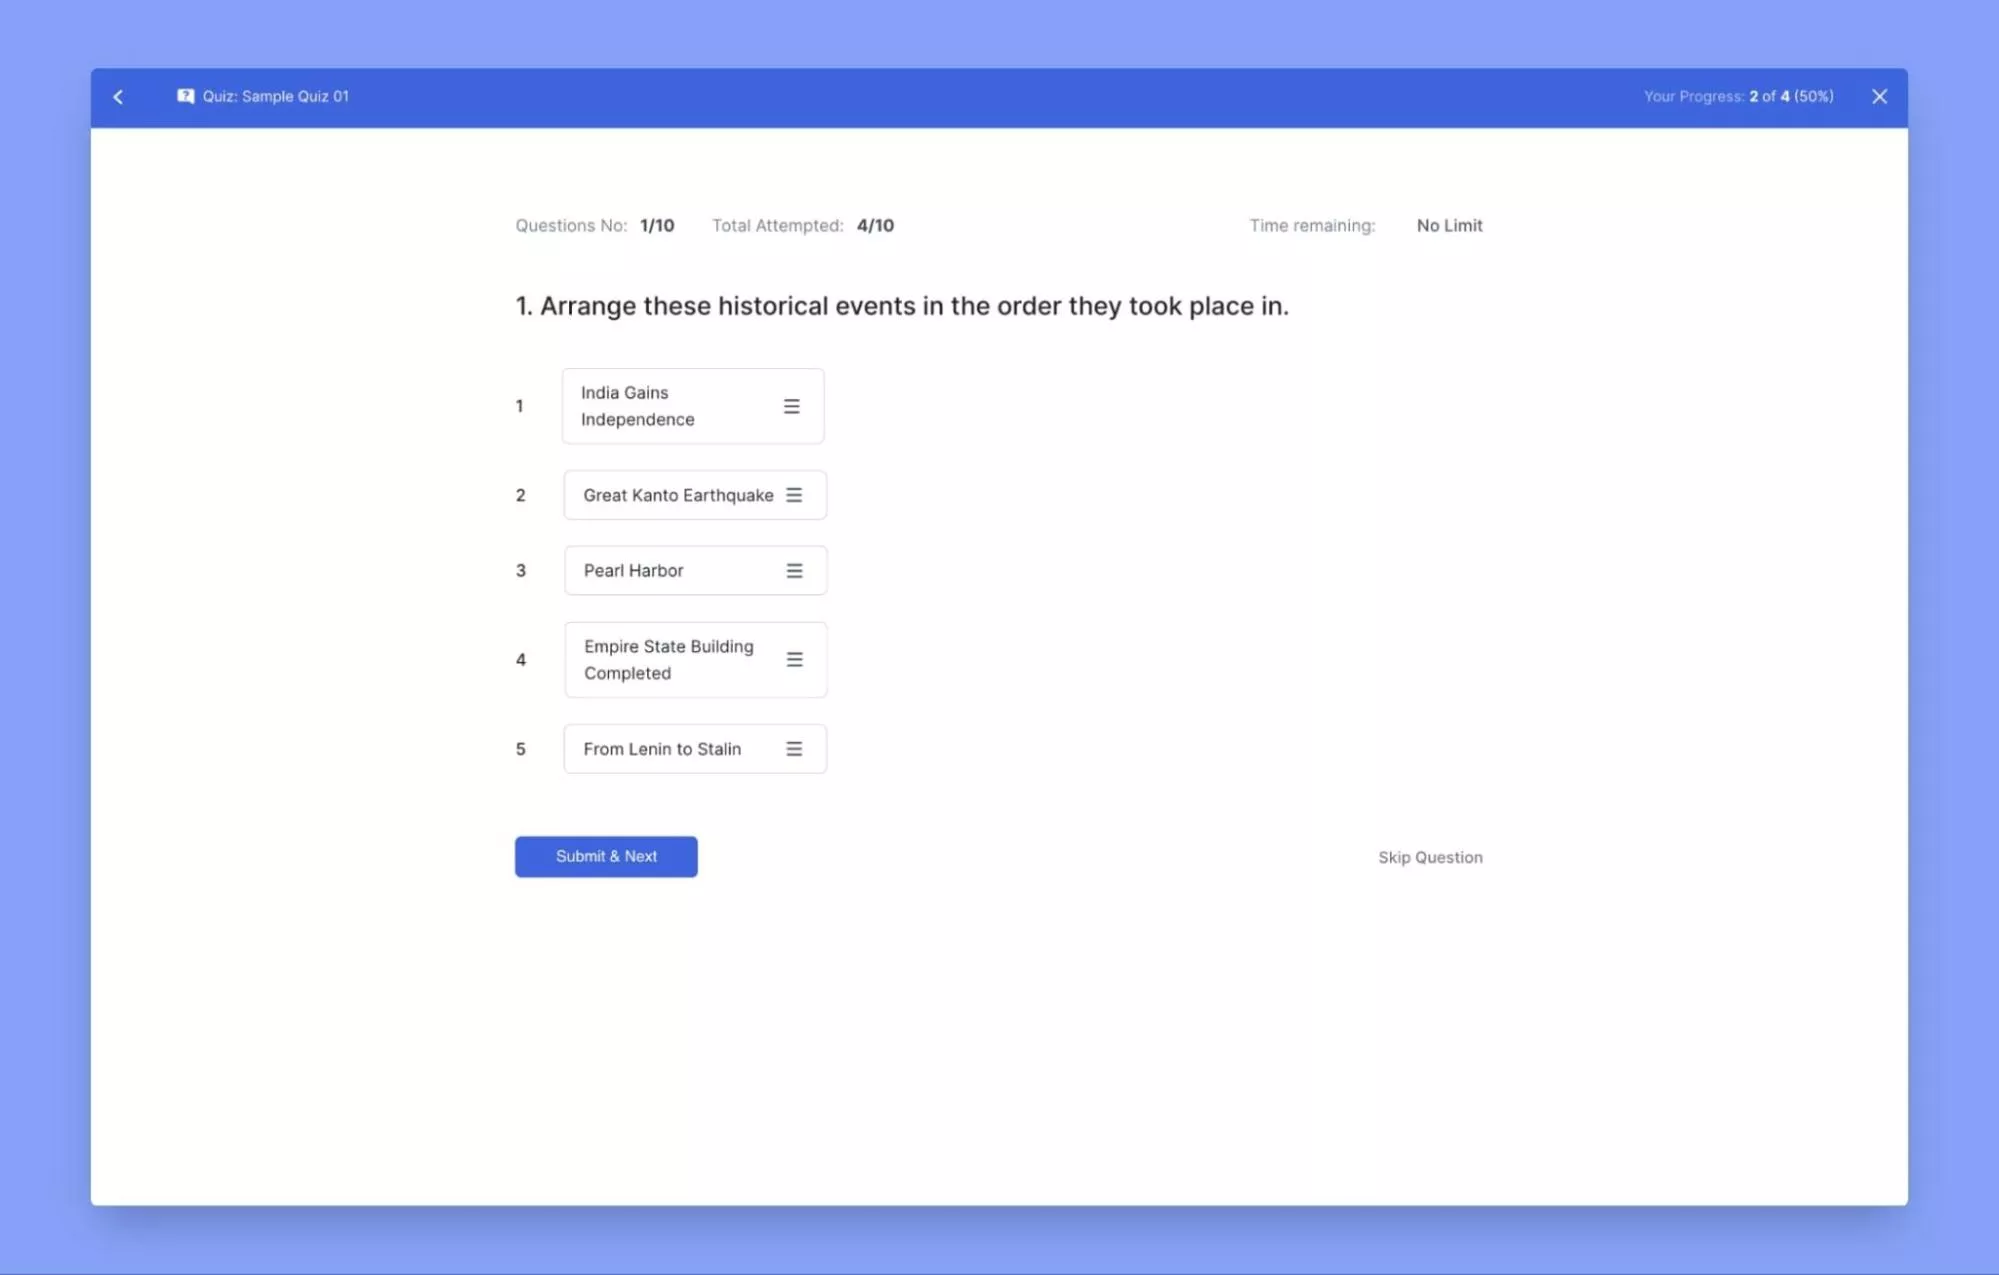
- Ordering Question Type
Ordering questions require students to arrange items in a specific order. Follow these steps:
- Step 1: Select “Ordering” from the options.
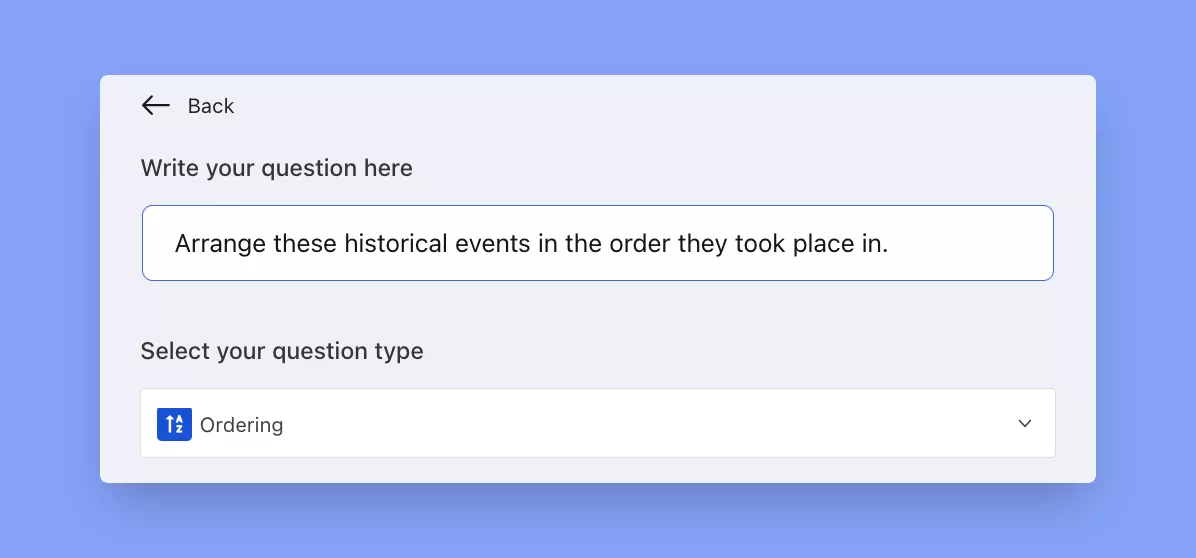
- Step 2: Click “+ Add An Option,” enter your text question, and select “Ordering.”
- Step 3: You can create ordering-type questions with both text and images combined or individually.
Each entry needs to be created individually. Users must keep in mind to make entries in the correct order sequence. Tutor LMS will then automatically randomize the order during an actual quiz.
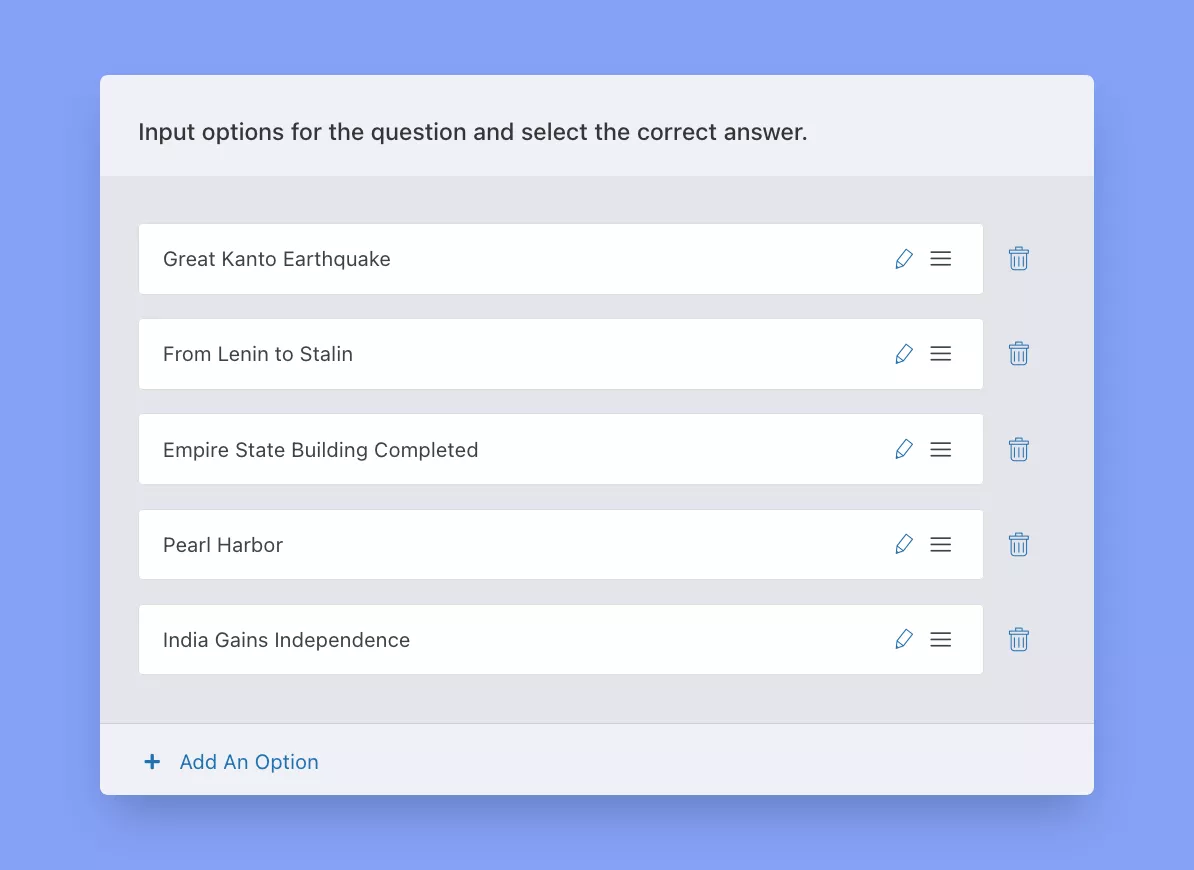
The following image depicts how Ordering Type questions will appear in the actual quiz.
Mastering Quiz Settings in Tutor LMS Pro
Tutor LMS Pro equips you with an array of Quiz Settings that allow you to fine-tune your quizzes, creating a personalized learning journey for your students. Let’s dive into the details of these settings to unlock the full potential of Tutor LMS Pro.
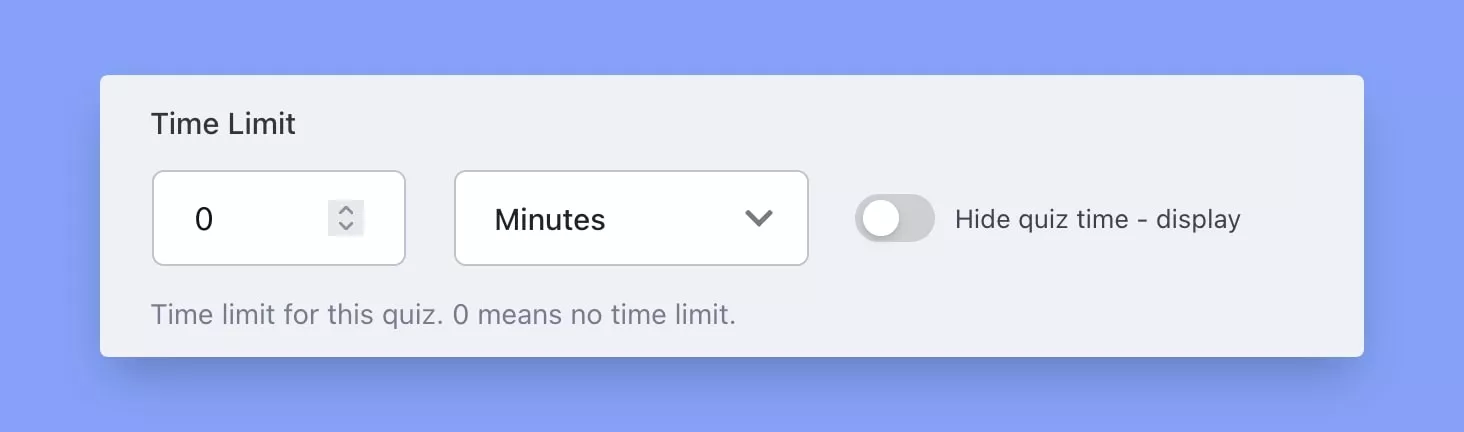
Setting the Pace with Time Limits
Time is of the essence, and Tutor LMS Pro recognizes that. In the “Time Limit” section, you have the power to determine how much time your learners have to complete a quiz. The time limit setting allows specifying a duration for the quiz in seconds, minutes, hours, days, or weeks. This is located under Quiz > Settings > Time Limit. And for those cases where time constraints aren’t necessary, simply toggle the “Hide Quiz Time” button to let your students focus solely on the questions.
Feedback that Matters
Quiz feedback is essential for learning. In Tutor LMS Pro, you have three distinct modes to choose from:
1. Default: This mode displays answers only after the entire quiz is completed, providing learners with a comprehensive review.
2. Reveal Mode: Answers are revealed immediately after each question attempt, promoting real-time learning.
3. Retry Mode: Empower your students to learn through repetition. You can specify the number of quiz attempts allowed. If they don’t pass on the first try, they can keep trying until they succeed.
Limiting Attempts
To prevent repeated retakes, instructors can restrict the number of attempts each student gets under Quiz > Settings > Attempts Allowed. This ensures comprehension rather than memorization.

Passing with Flying Colors
The “Passing Grade” setting allows establishing the minimum percentage score students need to pass. This useful benchmark is set under Quiz > Settings > Passing Grade. Instant pass/fail feedback aids assessment.
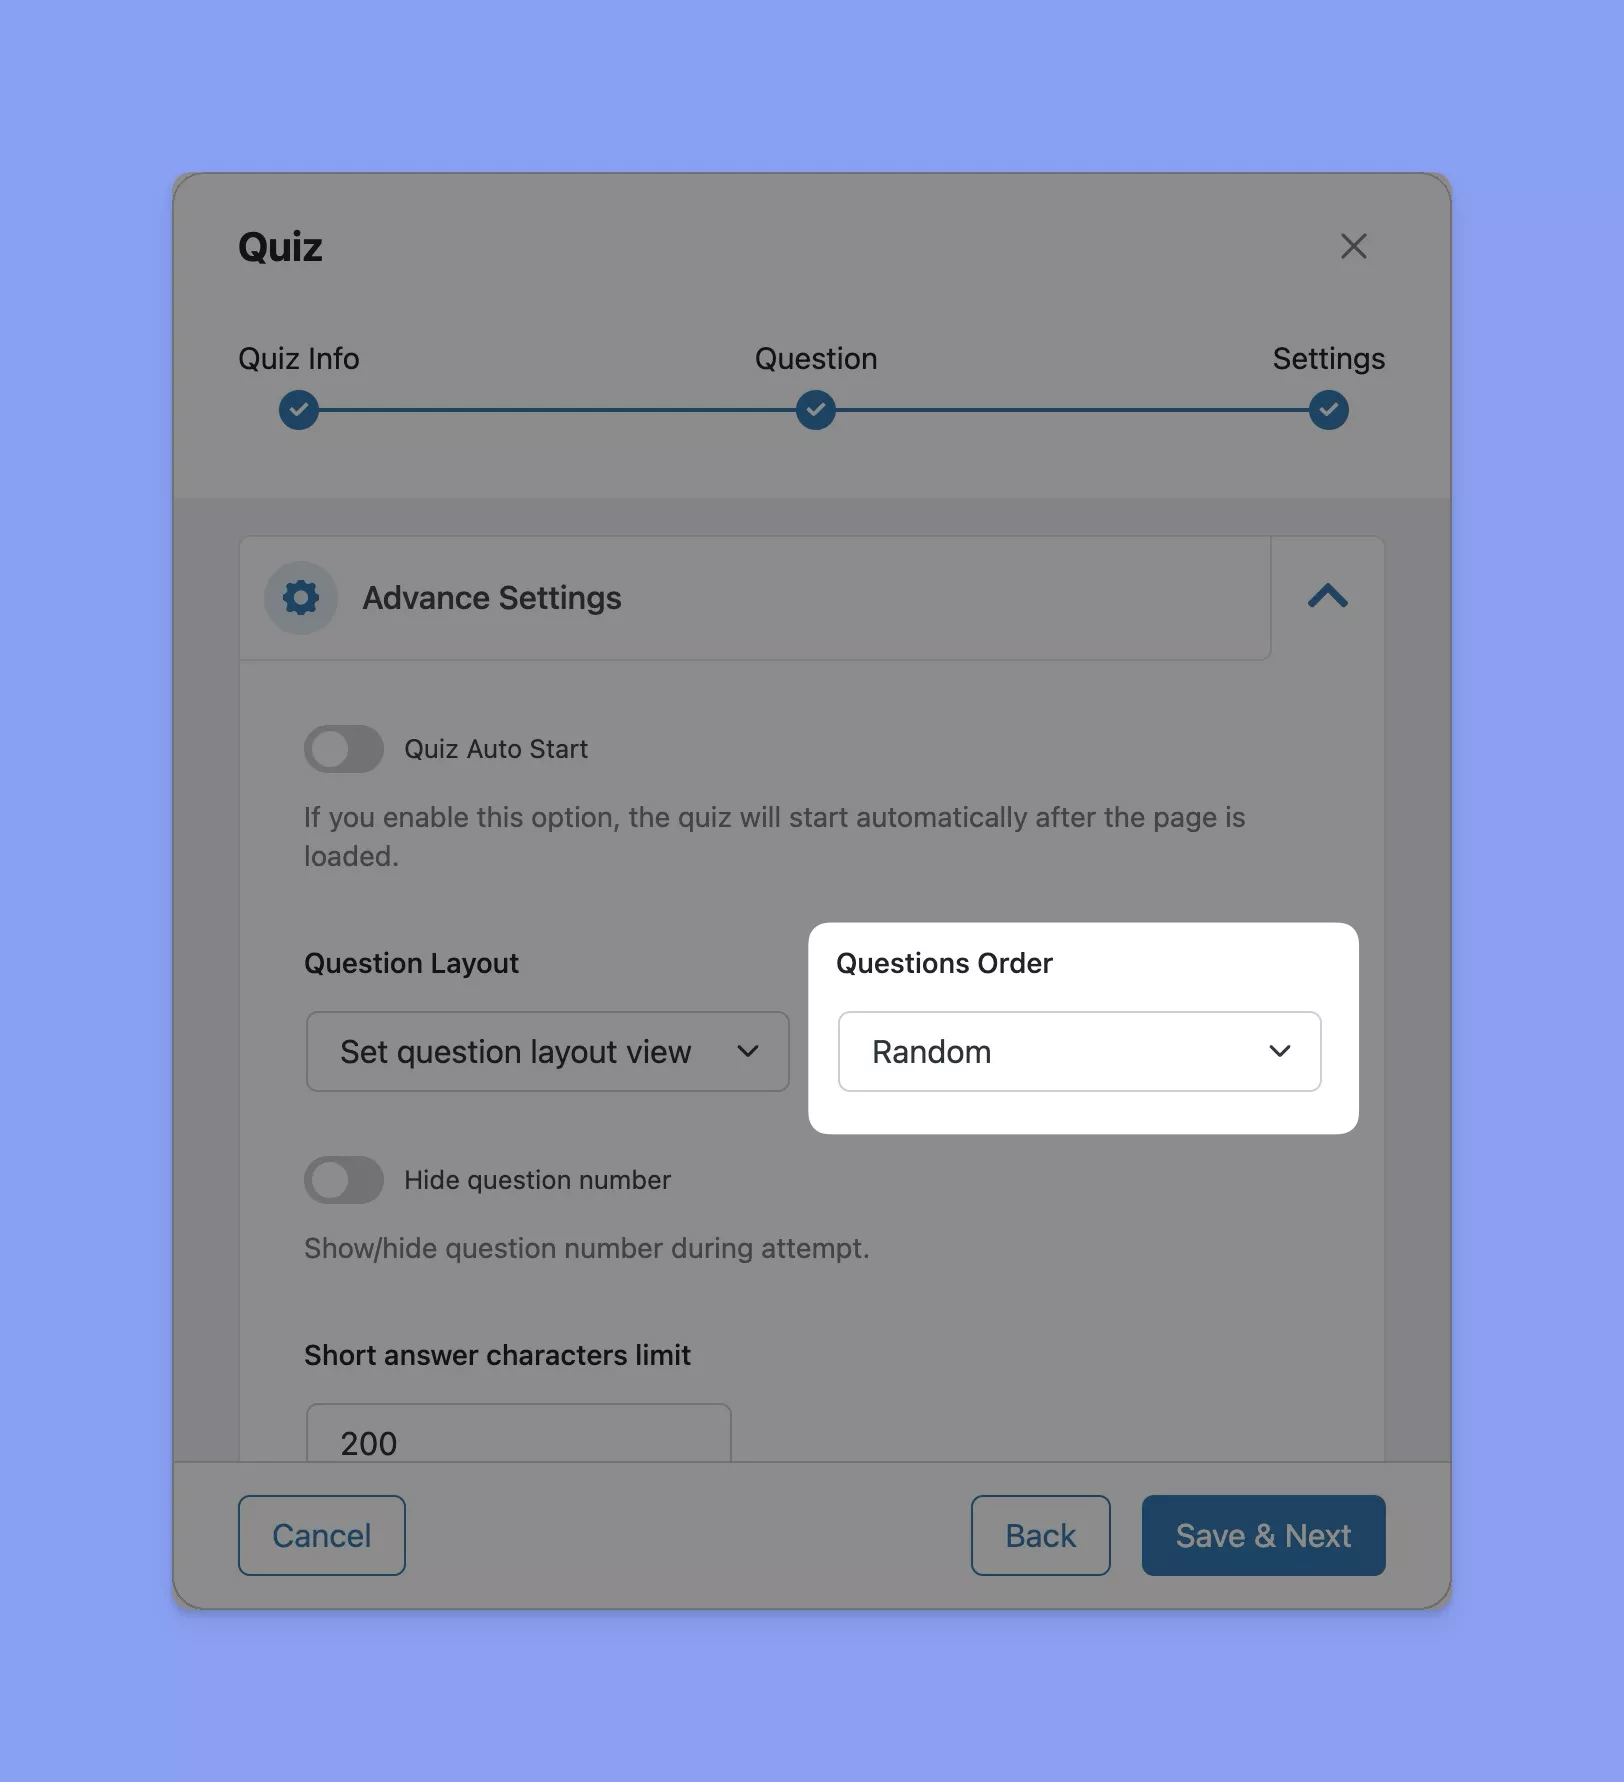
Randomizing Questions
Enabling the “Randomize Question Order” setting shuffles the question sequence for each quiz attempt. Located under Quiz > Settings, this thwarts cheating and verifies well-rounded knowledge rather than selectivity.
Mastering Randomization with “Max Question Allowed to Answer”
The “Max Question Allowed to Answer” setting adds a layer of intrigue to your quizzes. Imagine you have 50 questions in a quiz; if you set it to 50, students must answer all questions in a specific order. However, if you set it to 10, they’ll answer 10 random questions out of the 50, ensuring a varied experience for each learner.

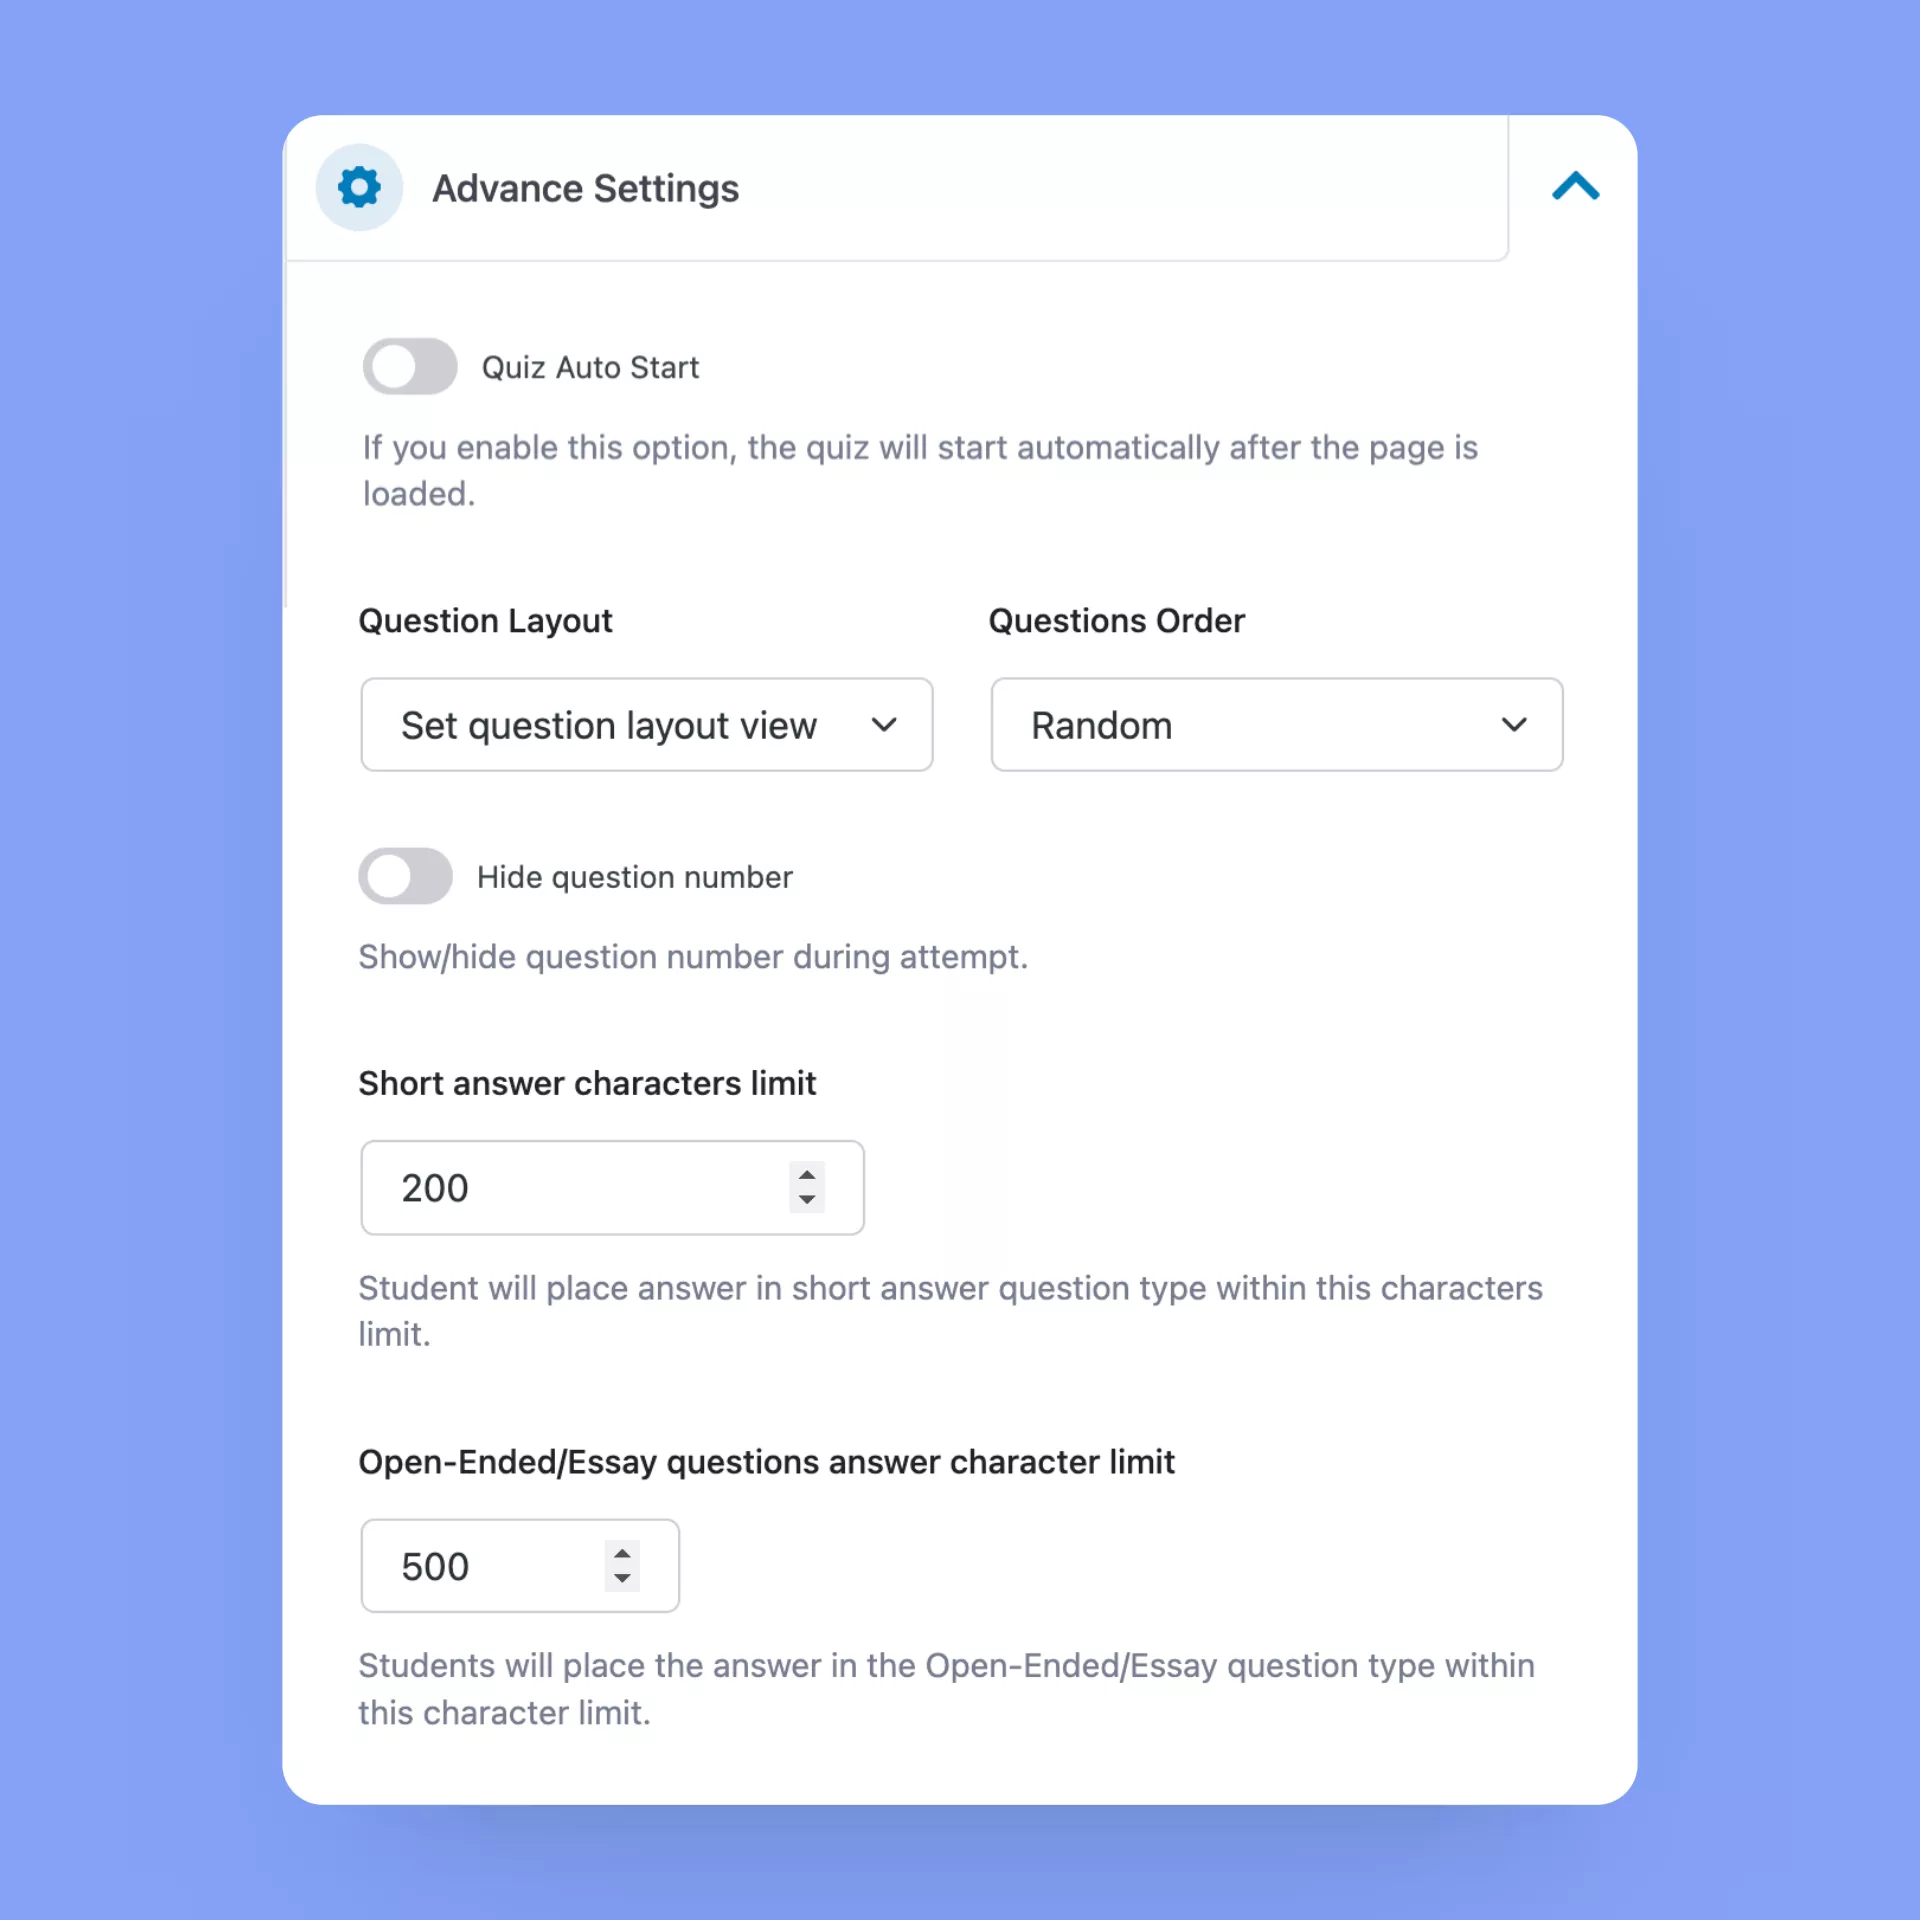
Fine-Tuning with Advanced Settings
Additional advanced settings allow fine-tuning options like auto-starting quizzes, setting question layout, character limits for responses, and more.
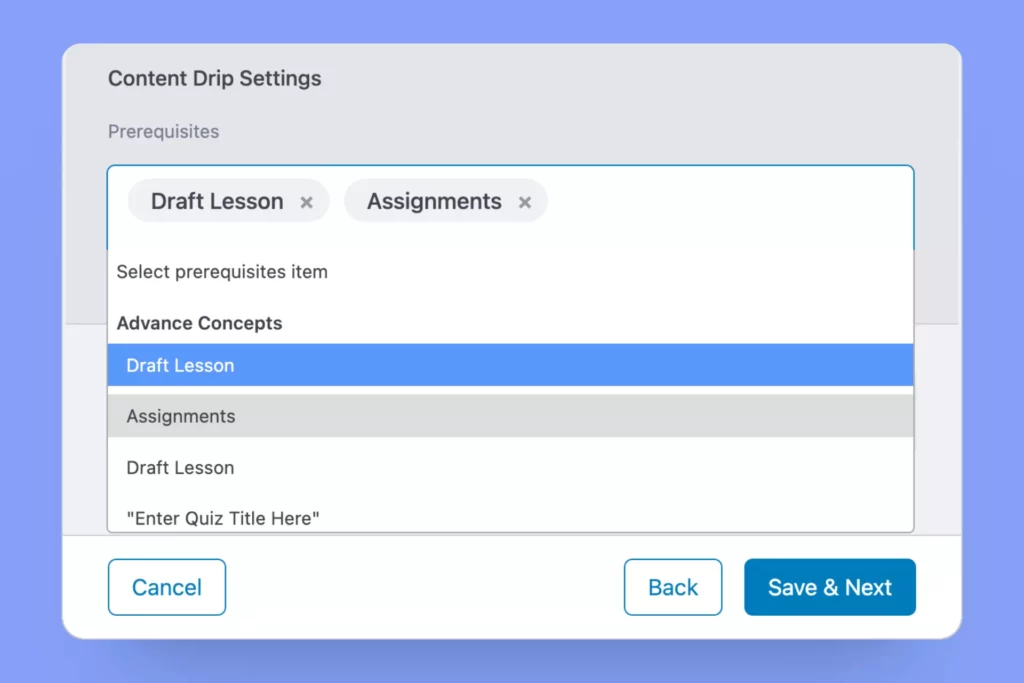
Prerequisites
Using the Content Drip addon, passing quizzes can be made mandatory before unlocking subsequent lessons, preventing skipping ahead.
With its robust settings capabilities, Tutor LMS Pro enables dialing in quizzes precisely for the needs of any course and student group. Educators can implement focused, polished assessments tuned for optimum learning.
Bonus Quiz Enhancements
When it comes to creating engaging and effective online quizzes, Tutor LMS Pro takes the learning experience to the next level. With a host of enhancements, including LaTeX support and WP Editor support, this eLearning platform empowers educators and learners alike.
Adding Mathematical Equations with LaTeX
LaTeX is renowned for its precision in handling mathematical notation. It’s a valuable tool for students, researchers, educators, and professionals in fields related to mathematics. Tutor LMS Pro recognizes the significance of LaTeX and has integrated built-in LaTeX support in both the lesson and quiz editors.
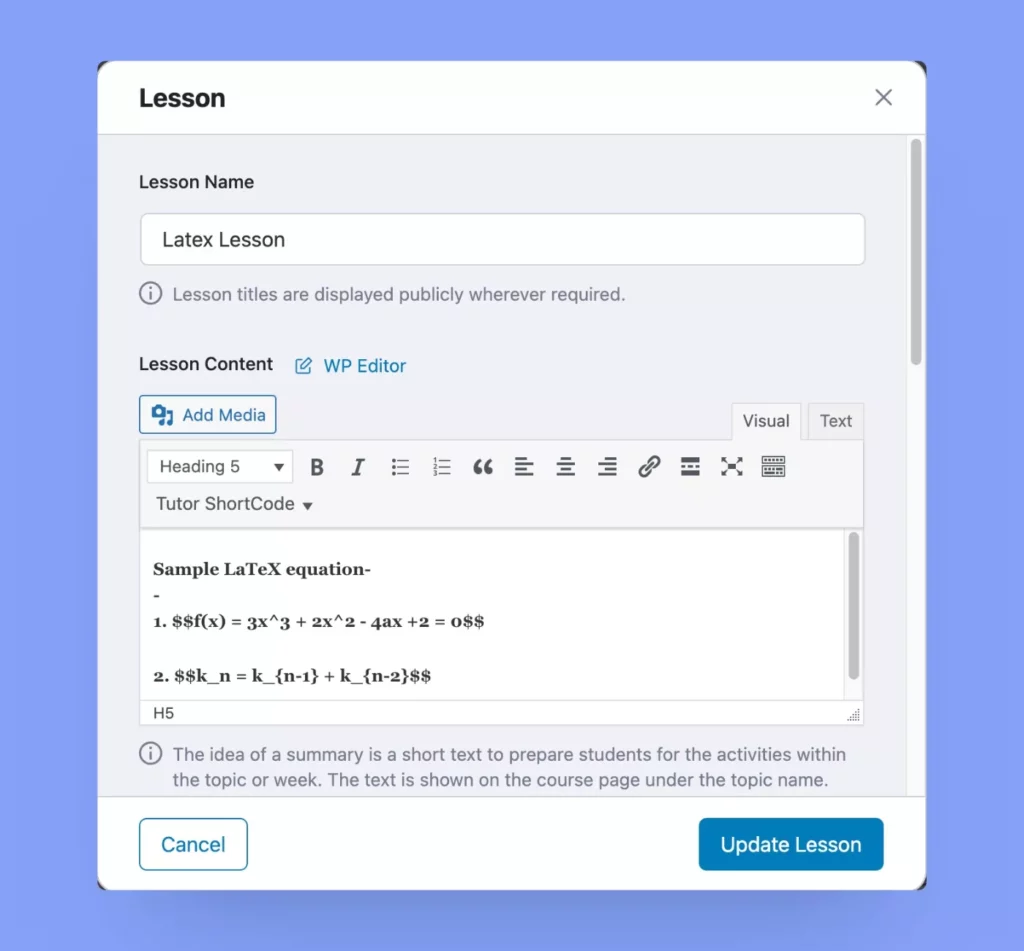
Here’s how it works:
- To add math, you encase your equation’s LaTeX source code between dollar signs. Simple stuff, right? For example, $$ax^2+bx+c=0$$ will show up like this: ax² + bx + c = 0.
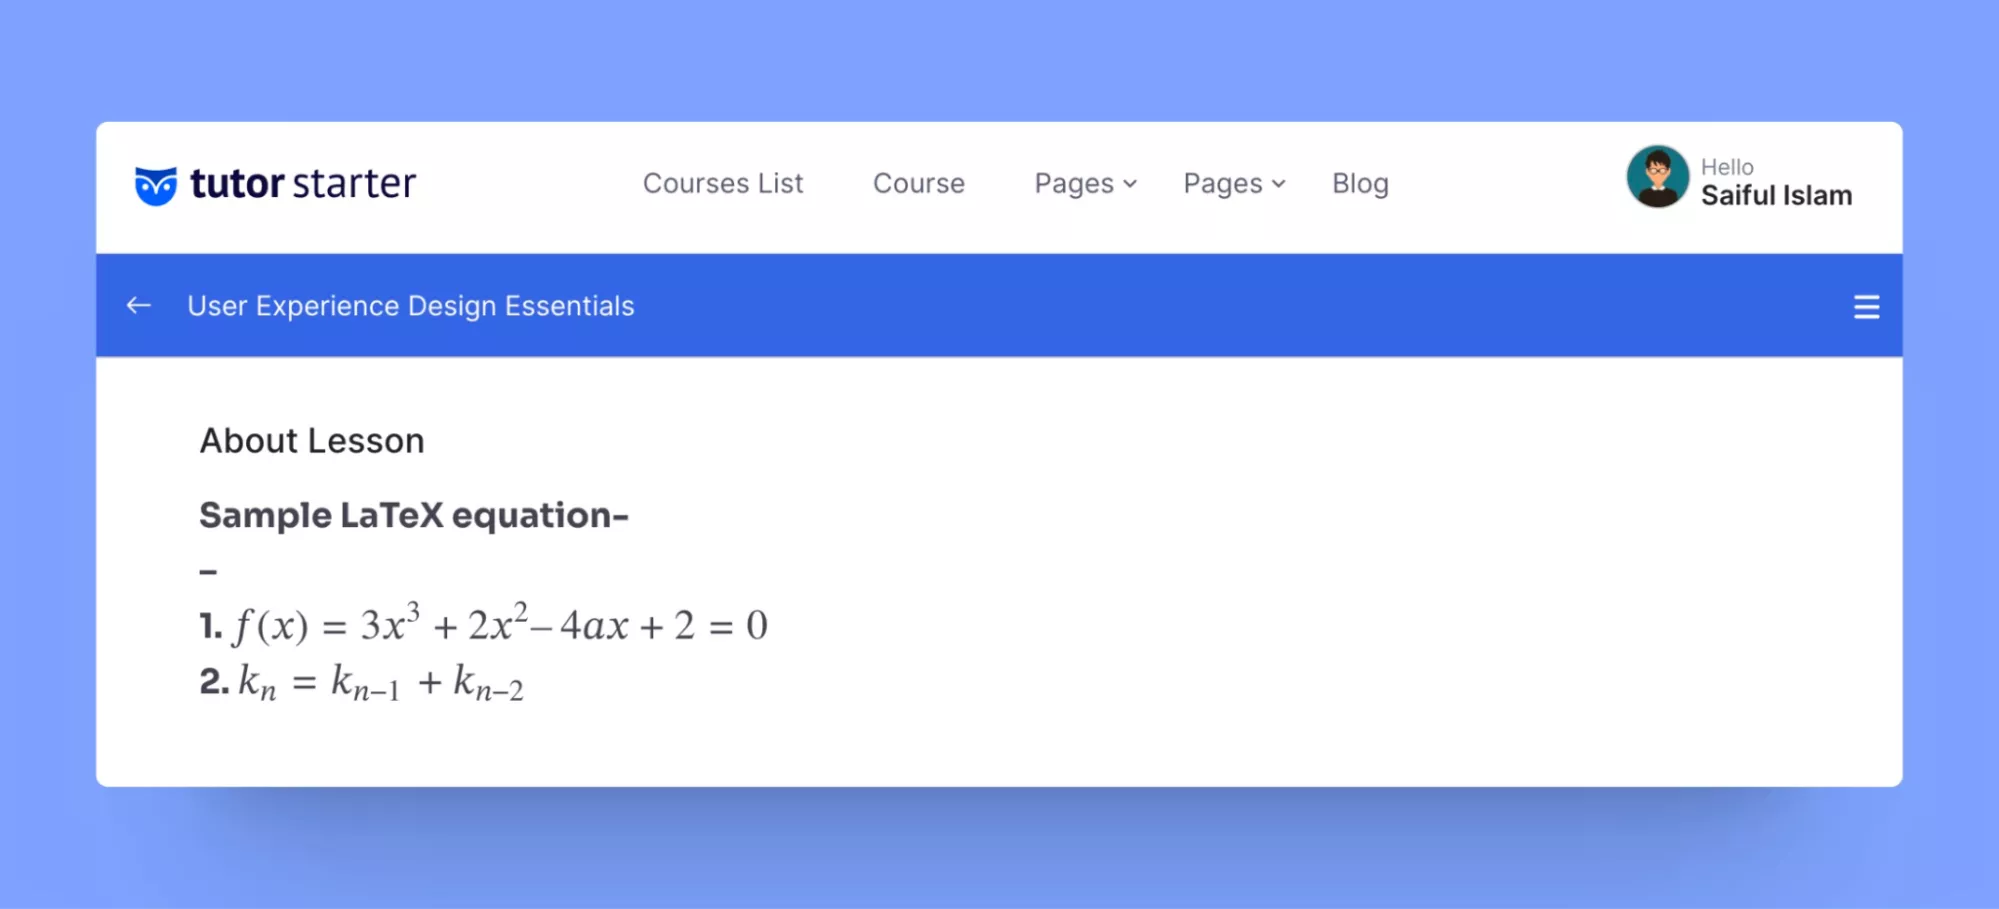
- But, if you want your math to stand tall on its own, use double dollar signs, the math will be displayed in inline by itself. This is what is called “displayed math.” For example, $$ax^2+bx+c=0$$ will be typeset as depicted in the image below:

Now, students will be able to view crisp, clean math formulas, making quizzes easier to comprehend.
For more details on how to utilize LaTex integration with Tutor LMS Pro, please visit our documentation page.
WP Editor Support: Enhancing Quiz Descriptions
In addition to LaTeX support, Tutor LMS Pro offers WP Editor support for the “Quiz Question Description” field. This opens up a world of possibilities for quiz creators, allowing them to make quiz question descriptions more engaging and informative.
What You Can Do with WP Editor Support?
With the WP Editor, quiz creators can:
- Style text with bold, italics, underlines, and text colors.
- Create bullet points and numbered lists for clear formatting.
- Add hyperlinks to provide additional resources or references.
- Embed images and videos seamlessly using embed codes or URL links.
- Incorporate audio files like podcasts via embed codes, enhancing the multimedia experience.

Assignments, Create and Assess
Tutor LMS understands the importance of varied assessments. Assignments alongside quizzes empower educators to design a rich learning environment. Unlike quizzes, assignments enable students to demonstrate their understanding in more diverse ways. From essays to projects, it’s a canvas for creative assessment.
The “Assignments” add-on in Tutor LMS Pro lets you create coursework for students to complete within set time limits. You can reorder assignments between lessons and quizzes, or put them at the end of topics.
Although a traditional teaching method, assignments provide tutors valuable insight into their students’ learning progress.
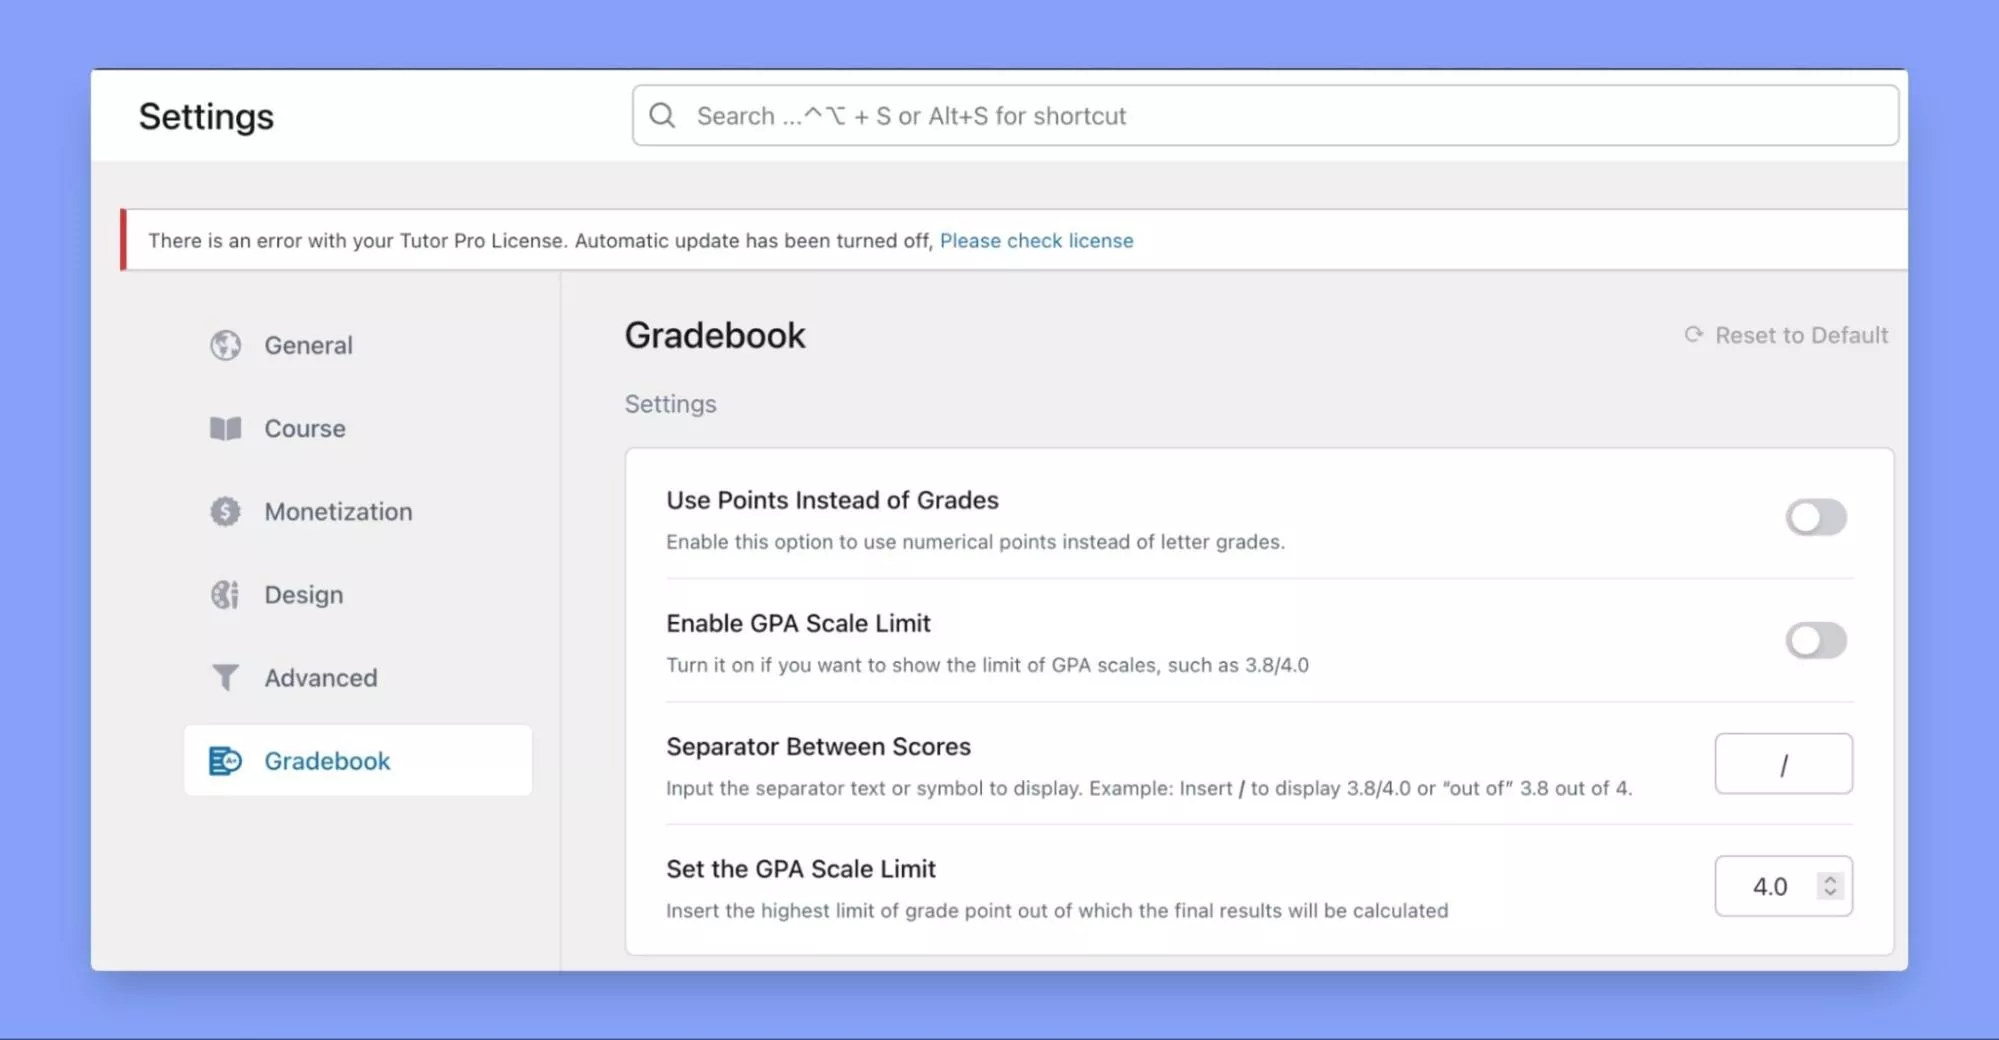
Using and Understanding Gradebook Addon
The Gradebook Addon is another exciting feature in Tutor LMS. It serves as a centralized hub for educators and administrators to track and manage students’ performance. This tool allows instructors to assign grades, record scores, and monitor student progress efficiently.
To have the Grade Book functionality added to your platform, you need to activate the Gradebook addon. Once activated, you’ll see a new tab on the Settings page. You can easily find it by navigating to Dashboard > Tutor LMS > Settings > Gradebook (tab).
By default, Tutor LMS shows pass/fail based on a minimum passing points threshold set by instructors. The Gradebook add-on replaces the default pass/fail system with letter grades like A, B, C. With the Gradebook, instructors can define letter grades like:
- A+ = 93-100%
- A = 89-92%
- B+ = 85-88%
Similarly, you can define categories within a particular course, and the score weightage can vary between categories. For example:
- Assignments Score Weightage = 50% of total grade
- Quizzes Score Weightage = 50% of total grade
So If a student earns 100% in both categories above, their total grade would be A+. This system provides more detailed performance data than just pass or fail status.
To Conclude
With Tutor LMS Pro, you can create fun, modern quizzes that feel like games, not tests. This platform has everything educators need to build assessments with interactive question types, customization options, and instant grading, so you get feedback fast.
I hope with this guide, you have the tips and inspiration to develop assessments that motivate. Tutor LMS Pro opens up exciting possibilities to engage learners. Put these features and options into action, and watch your student’s progress and participation soar! Most importantly, align your quizzes to course objectives and student needs.

jmcstudyhub
Sir/Mam, I am also facing the same issue. I am not able to add the explanations to my questions in Quiz section of Tutor LMS. I am waiting to get resolved from this issue as early as possilble. Kindly resolve this issue because 99% plugins are giving the option.
Shah Asif
Can you please inform us of the theme you are currently using on your LMS site?
Michał Nowakowski
Fill in the blanks. The instruction above is not correct. It should be like that:
Write you question here:
it’s for instruction, eg. Fill the gaps with the correct word.
Question Title:
In the year {dash} the first {dash} landed on the moon.
Correct Answer(s):
1969 | Humans
Shah Asif
Hello Michał Nowakowski,
It’s up to the instructor how they want to arrange the blanks. Both works, but what you wrote is the actual textbook way of using the fill-in-the-blanks type questions and is more appropriate. Thanks for the comment, appreciate it!