Security is paramount in the world of the internet. It is so very easy for malicious parties to come and steal our data so we must employ robust methods to ensure the security of our data. Our Tutor site is the product of blood, sweat and tears put in over months to create something extraordinary. If this site were to fall prey to data thieves one day, little could be done to reverse that.
Jokes aside, we need to quickly secure our LMS site if we haven’t already. In this article, we are first going to understand what HTTPS and SSL are, followed by how we can add SSL certificates to our LMS site.
Is Your Site Secure?
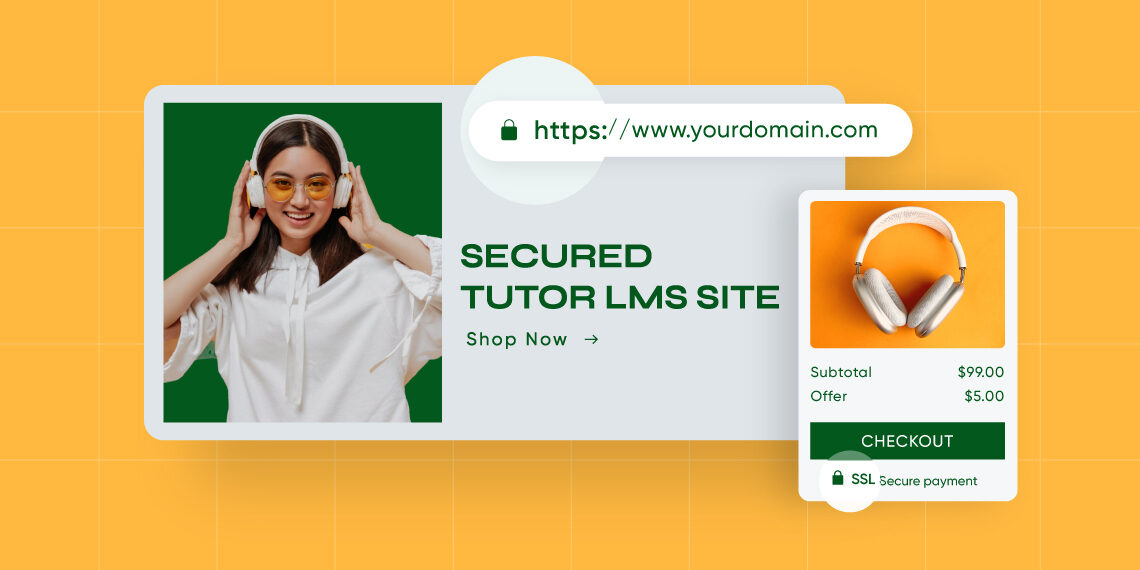
So how do we even know if our LMS site is vulnerable? The easiest way to go about it is to check the browser bar and there should be a lock icon beside the URL on most sites we visit on the internet.
If your site does not have this symbol then you are in trouble, meaning your site is not secure. When a website is secure, HTTPS appears in the ULR through an SSL certificate. This is what the lock symbol is. The lock shows us more information about our SSL certificate and more.
HTTP and HTTPS
HTTPS might be seen as the same as HTTP, but there is a big difference between the two. Let us take a small peak at the two concepts.
Difference Between HTTP and HTTPS
HTTP or Hypertext Transfer Protocol allows communication between say a browser and a web server. HTTP moves data in plain text but is unsecured so anyone could intercept and take a look at everything there is to see.
HTTPS or Hypertext Transfer Protocol Secure is just HTTP but with added security. HTTPS uses Security Socket Layer or SSL certificates to encrypt data travelling to and from your browser.
Ok, so now we have a basic understanding of what HTTPS is. But we need to understand how it works as well. Essentially, a “handshake” connection is established between a browser and a server. The server delivers the client an SSL certificate with an asymmetric public key and a private key that is saved at the webserver end during the handshake. This ensures that the entire data stream is encrypted. HTTPS uses end-to-end encryption to secure the data travelling.
What is SSL?
SSL or Secure Socket Layer is the standard tech used to keep an internet connection secure. SSL employs encryption algorithms to scramble data in transit preventing malicious individuals from intercepting the data.
The data is anything sensitive or personal, such as names and addresses, logins, emails, credit card numbers, and other financial information that falls under this category. FTP, web applications, cloud-based computers, hosting worlds (e.g., cPanel), VPNs, intranets, extranets, and database connections are all included.
How SSL Works
SSL encrypts data transfers between a user’s browser and a website, protecting information. When a person accesses an SSL/HTTPS website, their browser checks to see if the SSL certificate is genuine.
If everything checks out, the browser encrypts the data using the website’s public key. This information is then transferred back to the target server (website) and decrypted using the public key and a secret private key.
What Are SSL Certificates
SSL Certificates are little data files that bind a cryptographic key to an organization’s information digitally. When the HTTPS protocol (over port 443) is implemented on a web server, it allows secure connections from a web server to a browser.
SSL Certificates bind together:
- A domain/server or hostname
- A company name and location
To initiate secure sessions with browsers, a business must install the SSL Certificate on its web server. The organization will be examined at the appropriate level depending on the type of SSL Certificate requested.
All traffic and communication between the web server and the web browser will be encrypted and secure once HTTPS is implemented.
So we understand what SSL certificates are. Now we must take a peek at what types of certifications there are.
Types of SSL Certificates
SSL Certificates are used for encryption and validation. So they are labelled by the level of verification they provide. Certificates are processed by a Certificate Authority (CA), using software specifically designed for running and granting these certificates. To put simply there are 3 levels of SSL Certificates validation:
- Domain Validation (DV): Domain validation SSL Certificates are the lowest level of validation. Certificate authority just does the minimum check of making sure the domain used is controlled by the organization. This is the easiest one to obtain as it is mostly available for free.
- Organization Validation (OV): This is a mid-level of validation. The major goal of this certificate is to encrypt sensitive data during transactions and to verify corporate legitimacy with a high level of certainty. The cost of OV is in the mid-range.
- Extended Validation (EV): EV is the highest rank of validation. For EV the CA verifies the company’s ownership, information about the organization, physical location, and legal existence. Additionally, it checks if the organization is aware of the SSL request before approval. Goes without saying but EV is usually the most expensive option of the 3.
It may seem like the lower level validations are less secure but that is not the case. The encryption levels are the same for all the certificate types. The differences are in the screening and verification methods required to obtain them, the assurance value associated with them, and the type and number of domains involved.
How to Make LMS Site HTTPS
With that quick SSL lesson out of the way, we can get about learning how we can purchase or acquire an SSL certificate. Our hard-earned LMS community and meticulously designed LMS site won’t see a lot of traffic unless we have it SSL certified. There are basically two ways to do this; a free method and a paid method. Depending on the level of Validation and number of domains we can choose one.
In the next sections, we are taking a look at how we can get paid and free SSL certificates.
Free HTTPS With Cloudflare
You can enable SSL or HTTPS on your WordPress site in different methods. One of the easiest free methods is the Cloudflare Flexible SSL method. Let us see how to add HTTPS to a WordPress site using Cloudflare Flexible SSL service.
Note: If you’ve already connected your WordPress site to Cloudflare, then start directly from Step 3.
Step 1: Start the Process With Cloudflare
- Sign-up on Cloudflare
- Add your website (domain) to your Cloudflare account
- Fetch your site’s DNS records on Cloudflare
- Check your site’s DNS record to ensure it’s live
- Complete the set-up procedure (check this official tutorial in case of any difficulty)
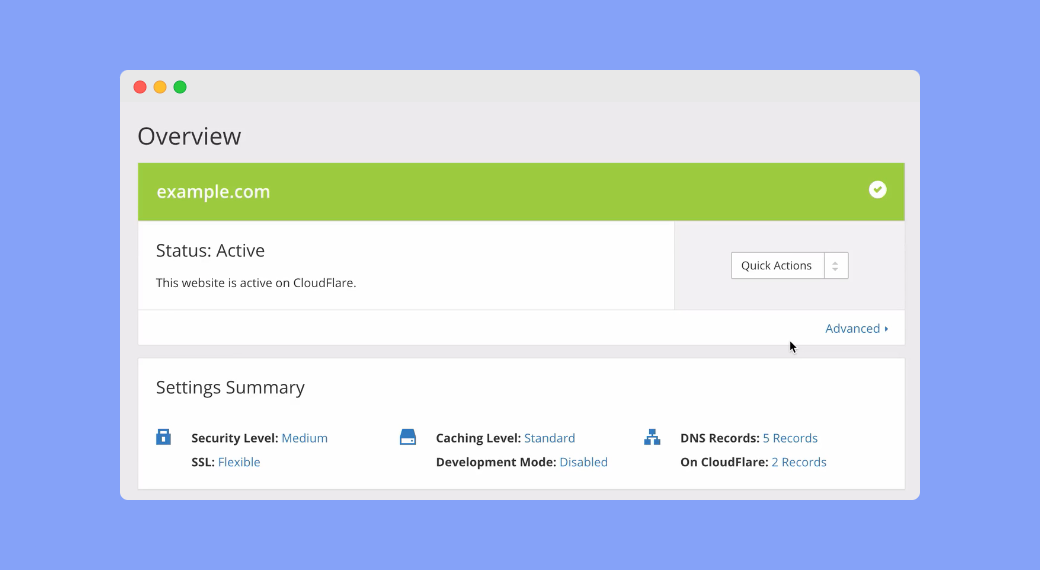
Once the setup is done, you’ll see your site is ‘Active’ on Cloudflare just like the example screenshot above.
Step 2: Update Your Site’s DNS Record
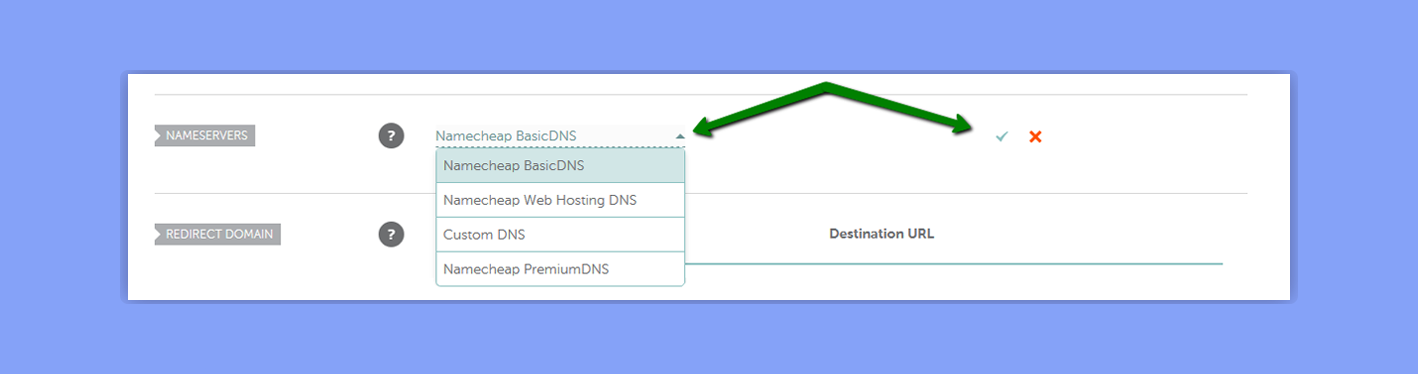
Login to your domain registrar and change your domain’s Name Servers as provided by Cloudflare (this can take a few hours)
Step 3: Create a Page Rule on Cloudflare
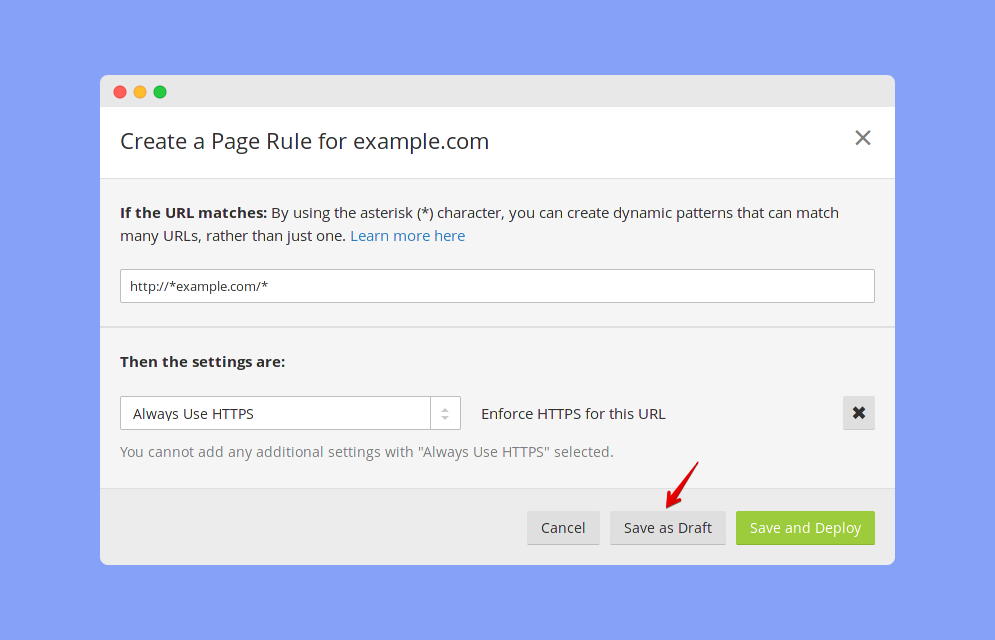
- Create an ‘Always HTTPS’ Page Rule on Cloudflare for your domain just like this: http://*yoursite.com/* (shown on the screenshot above, details on this official help article)
- Save the ‘Always HTTPS’ Page Rule as a draft (we’ll deploy/activate it later)
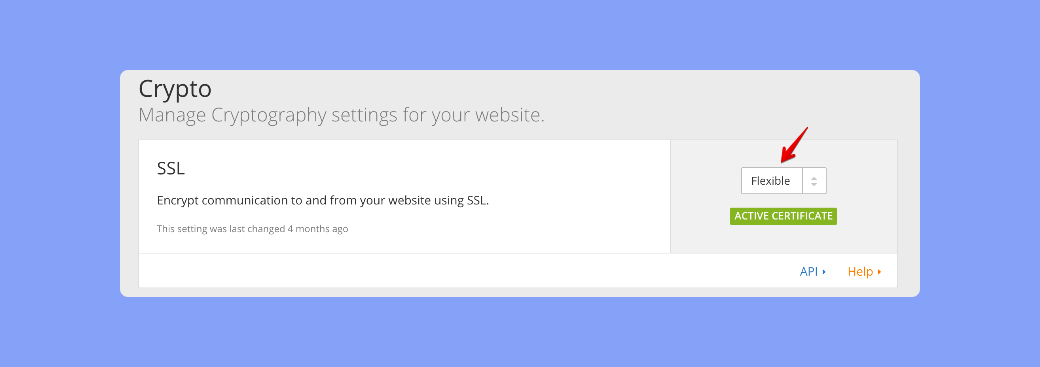
- Go to the Crypto section of Cloudflare and set the SSL option to Flexible (see the screenshot below).
Step 4: Install and Setup the Necessary Plugins on Your Site
- Log in to your site’s WordPress dashboard
- Install and Activate the Cloudflare plugin
- Connect the Cloudflare plugin to your Cloudflare account
- Install and Activate the Cloudflare Flexible SSL plugin
- Install Really Simple SSL plugin (we’ll activate it later)
Remember, all the 3 plugins are necessary. Follow the sequence described above, otherwise, your site may face downtime. If any unexpected issue occurs, you can deactivate these plugins via FTP by renaming the respective plugin folder to something else than the existing name.
Step 5: Activate HTTPS on Your Site
- Switch ON the ‘Always HTTPS’ Page Rule that you’ve created in the 3rd step
- Turn ON ‘Automatic HTTPS Rewrites’ option under the Crypto section in Cloudflare (for your site)
- Activate the Really Simple SSL plugin
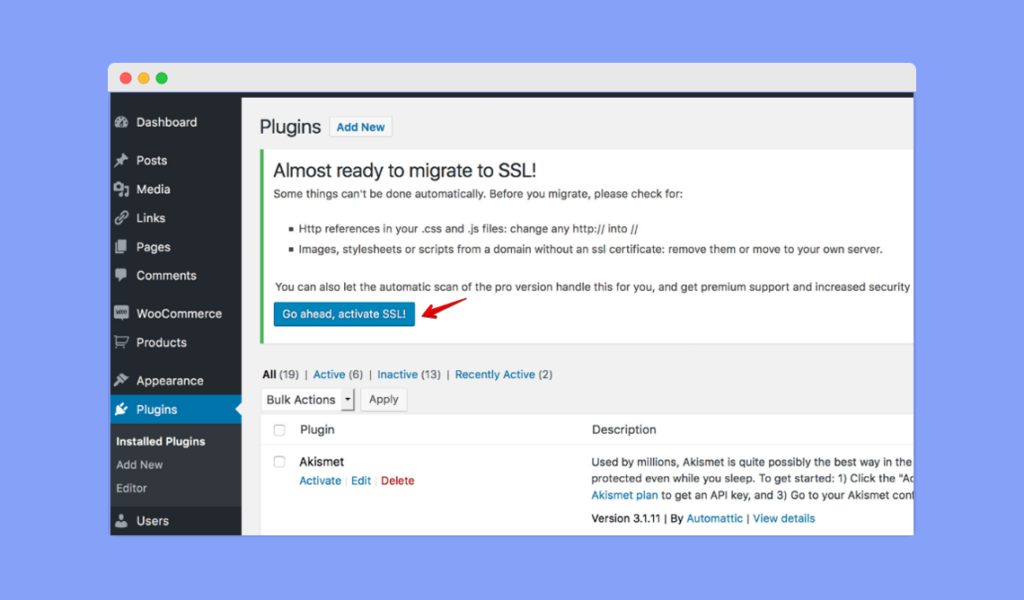
- NOW on the WordPress admin interface, you will see a button “Go Ahead, activate SSL!’ (displayed by the Really Simple SSL plugin)
- Click the “Go Ahead, activate SSL!’ button (see the screenshot below)
Clear cache on your browser and on the server (Cloudflare cache and WordPress caches that you might have created using caching plugins). You may need to sign in to your site again when HTTPS gets activated.
It’s done! Your LMS site is now live with HTTPS. Still, you may get some pages with mixed contents (menus, images etcetera) with old HTTP links. In the Really Simple SSL plugin settings, you’ll get an option to fix mixed content warnings automatically. Turn that ON if it’s not ON already. This should fix that issue. If not, try using the SSL Insecure Content Fixer plugin. You can also manually fix some of these URLs by adding new secure links.
Paid SSL Certificate Activation
While the prices of SSL certifications vary from one CA to the other, the prices are generally $50-300 per year. Additional plugins and add-ons offered by some services may bump this price up a little more.
The benefits definitely justify the price for a paid SSL certificate. With a free SSL certificate, you would be required to renew the certificate after every few days, or however long the free certificate lasts. Although there are tools that can automatically renew the certificate for you, the hassle still remains.
That’s why going for a paid solution makes life easier. And if you own are managing a multi-instructor LMS site going for a paid solution will ensure maximum overall security and less trouble. Paid SSL providers will help you with any issues you have and after purchase, you can ask your hosting provider to install the certificate for you.
Some good reliable options for SSL certificate purchase are:
- Namecheap.com – They have SSL solutions for all levels of validations with prices starting from $5.99 for a year. There is a great comparison tool on-site as well so you can see which suits your needs and prices the best.
- Domain.com – Offer simple SSL certificate plans that start at $35.99 per year and include a $10,000 security warranty as well as the TrustLogo site seal.
With that, you are all set to go. Your LMS site should now be one step closer to safety and security. HTTPS websites also get a boost at SEO since Google has disclosed that HTTPS websites are part of their site ranking system. All in all, this is a mandatory procedure for your LMS site.
Wrapping Up
Hopefully, you now have a good understanding of how SSL works and why it is important for your Tutor LMS site to have one. With the free and paid version both laid out for you, you can make a decision which to go for that meets your needs. Both paid and free options are of course viable. Let us know in the comments if you have any trouble with any of the steps and have a good one.