

The eLearning market is growing fast across the world. This sector has already proved its worth, and during this ongoing pandemic of COVID-19, there’s a remarkable blast on its demand curve. Seeing its widespread popularity, many leading platforms are now turning into eLearning platforms or forming a dedicated category for online learning.
Once you have the right technology in hand, turning your blog site into an eLearning hub is a piece of cake. For this, all you need is one of the readily available WordPress LMS solutions. And, as a quality LMS, you can try Tutor LMS. It is packed with some robust and versatile features to get streamlined with all the requirements to shift your blog site into an online learning hub.
Today, in this article, we’re going to guide you on transforming your existing blog into an eLearning center, along with some tips and tricks.
So, without further ado let’s get started.
Why You Should Integrate eLearning with Your Blog
Having a blog site generally means you have a considerable amount of traffic coming to your site to be educated on a particular niche. It will help if you think broadly about how you can help these people further. Having eLearning courses on your blog niche can be a game-changer. You can educate your audience more and help yourself earn a good sum out of it. So, it’s worth a try.
As a blog owner, surely you want to keep your audience engaged and coming back for more. For this, your website must have some influential factors to grab user attention. If you can get creative and useful with your blog, you can improve your chances of bringing in more qualified leads for your website. Said Kate Roth, a marketing specialist from Ivory Research.
Introducing eLearning here can establish a positive connection with your audience while creating a new scope for earning money. At the same time, it also builds your reputation and signifies you and your brand among your competitors and in front of your onlookers.
Things Required to Implement The Strategy
Surely, implementing an eLearning segment to your blog can create a powerful influence on your business. For this, your eLearning platform should have the impact of engaging your audience with an actionable outcome. Here, the main secret is knowing what your audience is interested in and offering them accordingly. This may seem very challenging, but not impossible if you stick with our guidelines.
We’ve shared some expert tips below to help your business get the rewards it deserves:
1. A Well and Executable Plan
Before you jump into the action, you must think up the right plan so you can find success in the long term. As planning is a crucial factor for any business, you should take every initiative carefully. From the framework set up, budget to resources, everything should be capable enough to deliver your audience’s right experience.
2. Research on Your Target Audience
One of the brilliant and shrewdest ways of successful marketing is finding the right audience. It is the modern-day top method that will help you bring and engage more students with the possibilities to keep coming back for more.
3. Design Your Course Interactively
The key to ensuring immersive and effective learning is to connect with the students in your online learning program. Create a scope for the learners to explore and interact with each other. Include a variety of different multimedia elements in your course to keep them interested. Also, allow your learners to connect with their curriculum using hands-on experience with various learning methods like case studies, different quizzes, video tutorials, etc.
4. Choose The Right LMS Solution
There are plenty of choices available for eLearning platforms to choose from. But while choosing a platform, what you need to consider is whether it’s going to meet your purpose or not. For example, if you’re not a master of code and you want to save the money of hiring a developer, then choosing a ready solution would be more appropriate for you.
In order to get all these features, your best choice would be Tutor LMS. Because, it comes with almost every necessary feature you may need from an LMS plugin. Here’s a glimpse of the top features of Tutor LMS.
- Unlimited single and bundle course creation
- Intuitive frontend and backend Course Builder
- Unlimited quizzes and assessments
- Student Progress Tracking
- Certificates after course completion
- Drip Content and Prerequisites
- Monetization Options
- Membership Integration
- Responsive Design
- Customization and Branding
- Gamification Elements
- Third-Party Integrations
By the way, not all of those features are available on the free version of Tutor LMS. Please check the Tutor LMS Free vs Pro comparison table for a better understanding.
Key Benefits of Turning a Blog Site Into an eLearning Hub
Blogs are a powerful channel for promotional activities. Transforming this to an eLearning platform can bring a multitude of benefits in the long run. However, all you need to do here is keep your platform updated with the latest eLearning trends, and content marketing techniques to improve your chances of bringing more qualified leads.
Here are some positive aspects of turning your blog site into an eLearning channel:
- Enhances your chances to gather more website traffic and leads.
- Brings newer business prospects for your existing blog site(s).
- Can be an excellent platform for cross-promotional activities.
- Builds online communities.
“Many users out there are searching for information and answers online. Turning your blog into an eLearning channel is a great way to attract a larger audience while monetizing your knowledge and content.”
– Donald Chan, head of content at MarTech Wise
Steps to Turn Your Blog Site Into an eLearning Hub
It’s a well-known fact that an online training platform holds immense potential. It has the power to turn your blog site into a goldmine at a meagre cost. But remember, developing an eLearning website like Udemy is not a child’s play. For this, you must know how to retain your audience, and show your expertise in every relevant aspect.
Here comes the play of Tutor LMS. The most interesting part is, you do not need to implement any hard-line code for this, and you can run the full operation online seating at your comfort in home. With its tons of elements and drag and drop options, implementing an eLearning website is really easy. Plus, regular updates according to the current market trend are another noteworthy feature of this plugin that will always keep you updated.
Now, let’s dive in to see how to get set go with Tutor LMS on your existing blog site.
Step 1: Install Tutor LMS Plugin on Your Site
Tutor LMS is available in both free and Pro versions. The free version lets you create a fundamental online course platform; for priority customer support and many other advanced features, we would recommend getting the Pro version.
- Installing the Free Version
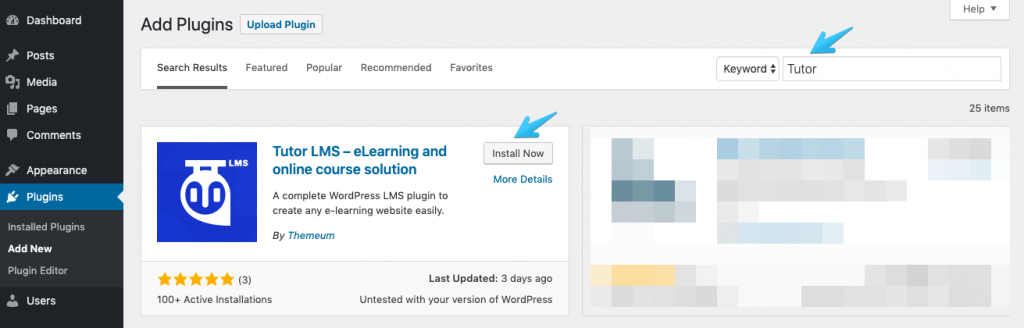
It is the first step, to start the procedure of getting Tutor LMS installed. For this, Go to your dashboard of the WordPress site. Now, navigate to Plugins > Add New. Write Tutor LMS on the search field. Once you see it in the search result, click on the Install and Activate button subsequently. For a detailed guideline on how to install Tutor LMS, your may check our Tutor LMS installation documentation.
- Installing the Pro Version
Visit themeum.com and get Tutor LMS Pro. Once you have downloaded the plugin, do the following steps to install Tutor LMS Pro successfully:
- Go to your WordPress site Dashboard
- Navigate to Plugins > Add New
- On the top, right beside the “Add Plugins” you’ll see an “Upload Plugin” button, click on it.
Now you can see an upload form. Select the Zip file from your “Choose File” option, and click “Install Now”.
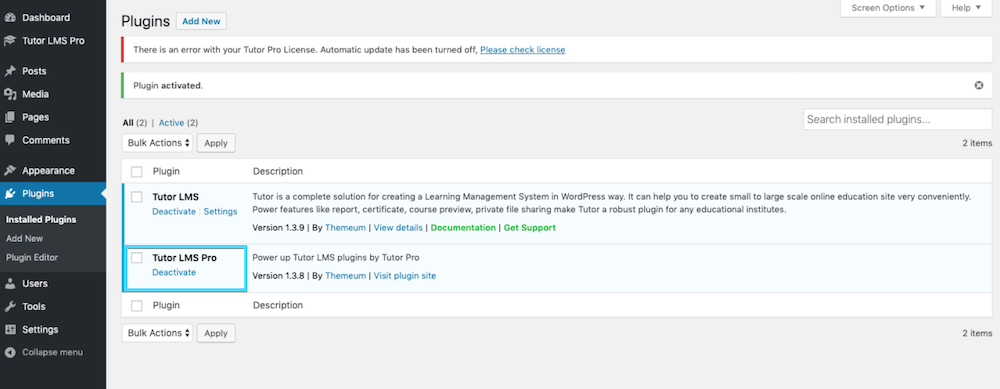
Finally, hit Activate, and confirm your license. You are now all set to use Tutor LMS Pro version.
Step 2: Create Your Online Courses & Add Lessons
Tutor LMS offers both frontend and backend course builder to create online courses. Follow this video to understand the course creation process:
To add courses, get back to your WordPress Dashboard and hit Tutor LMS > Courses > Add New. It will redirect you to the course creation page. Now add a title to your course, enter course description, tags, and a featured image. You can add a course excerpt, required course attachments, and set prerequisites for the courses.
In addition to it, you’ll also get to include course duration, course difficulty level, benefits of the course, video trailer, and instructors’ information in the course to increase its appeal.
Now that you’re done with creating your first course, it’s time to add lessons. For this, move to the course builder and click on “Add New Topic” Write the topic title and include a topic summary. Next, jump to the “Add New Lesson” option. You’ll be now redirected to a new page. Upload your lessons (image, documents, audio, or video format), and you are done.
Step 3: You Can Include Quizzes
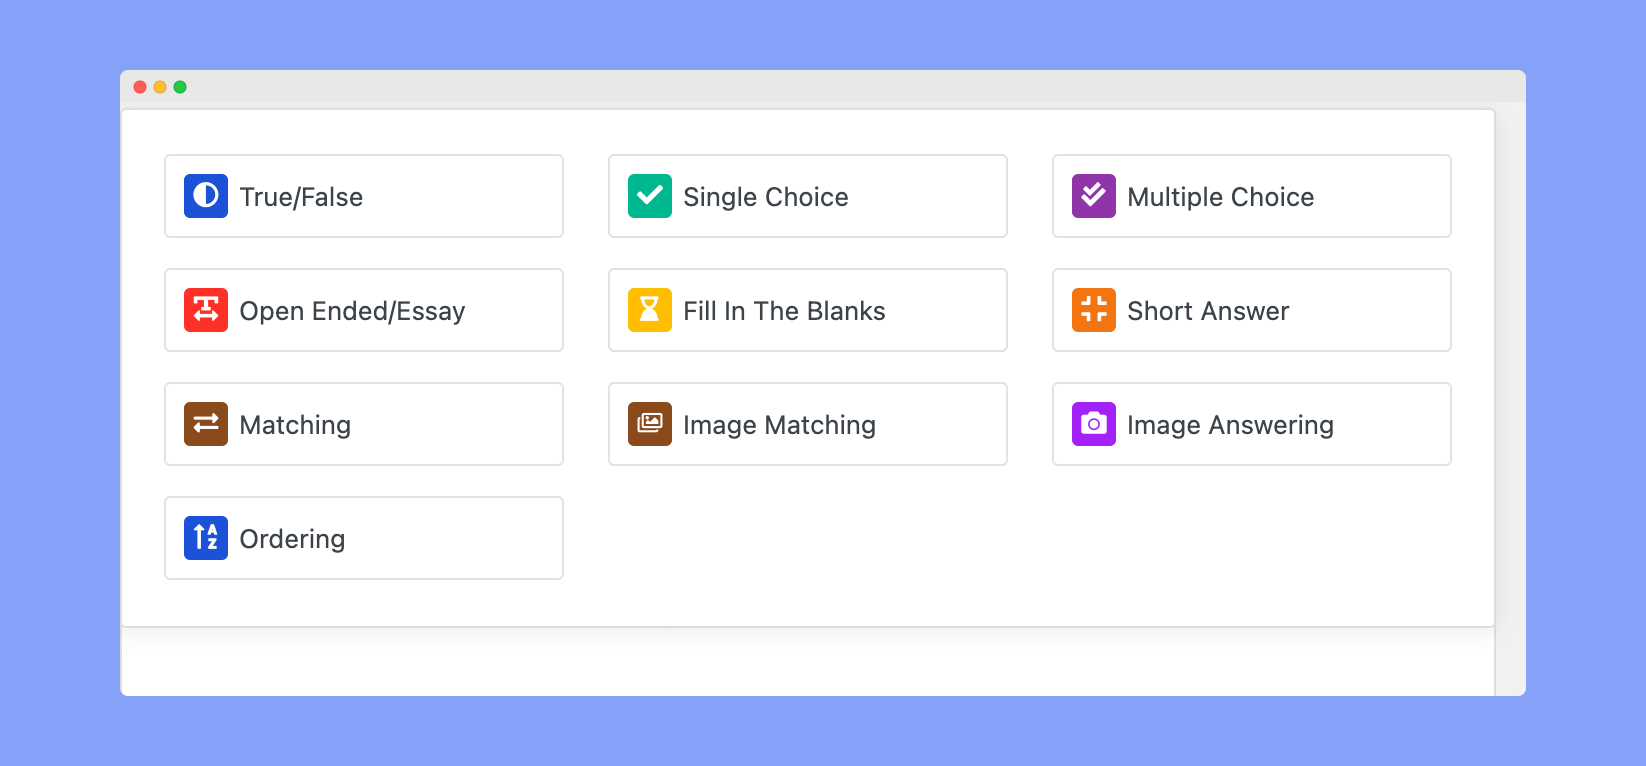
In order to ensure effective learning and let your learners assess their skills and progress, you can introduce quizzes along with your courses. Tutor LMS offers 10 varieties of quizzes that you can just choose and implement with your courses.
Step 4. You Can Monetize Your Courses
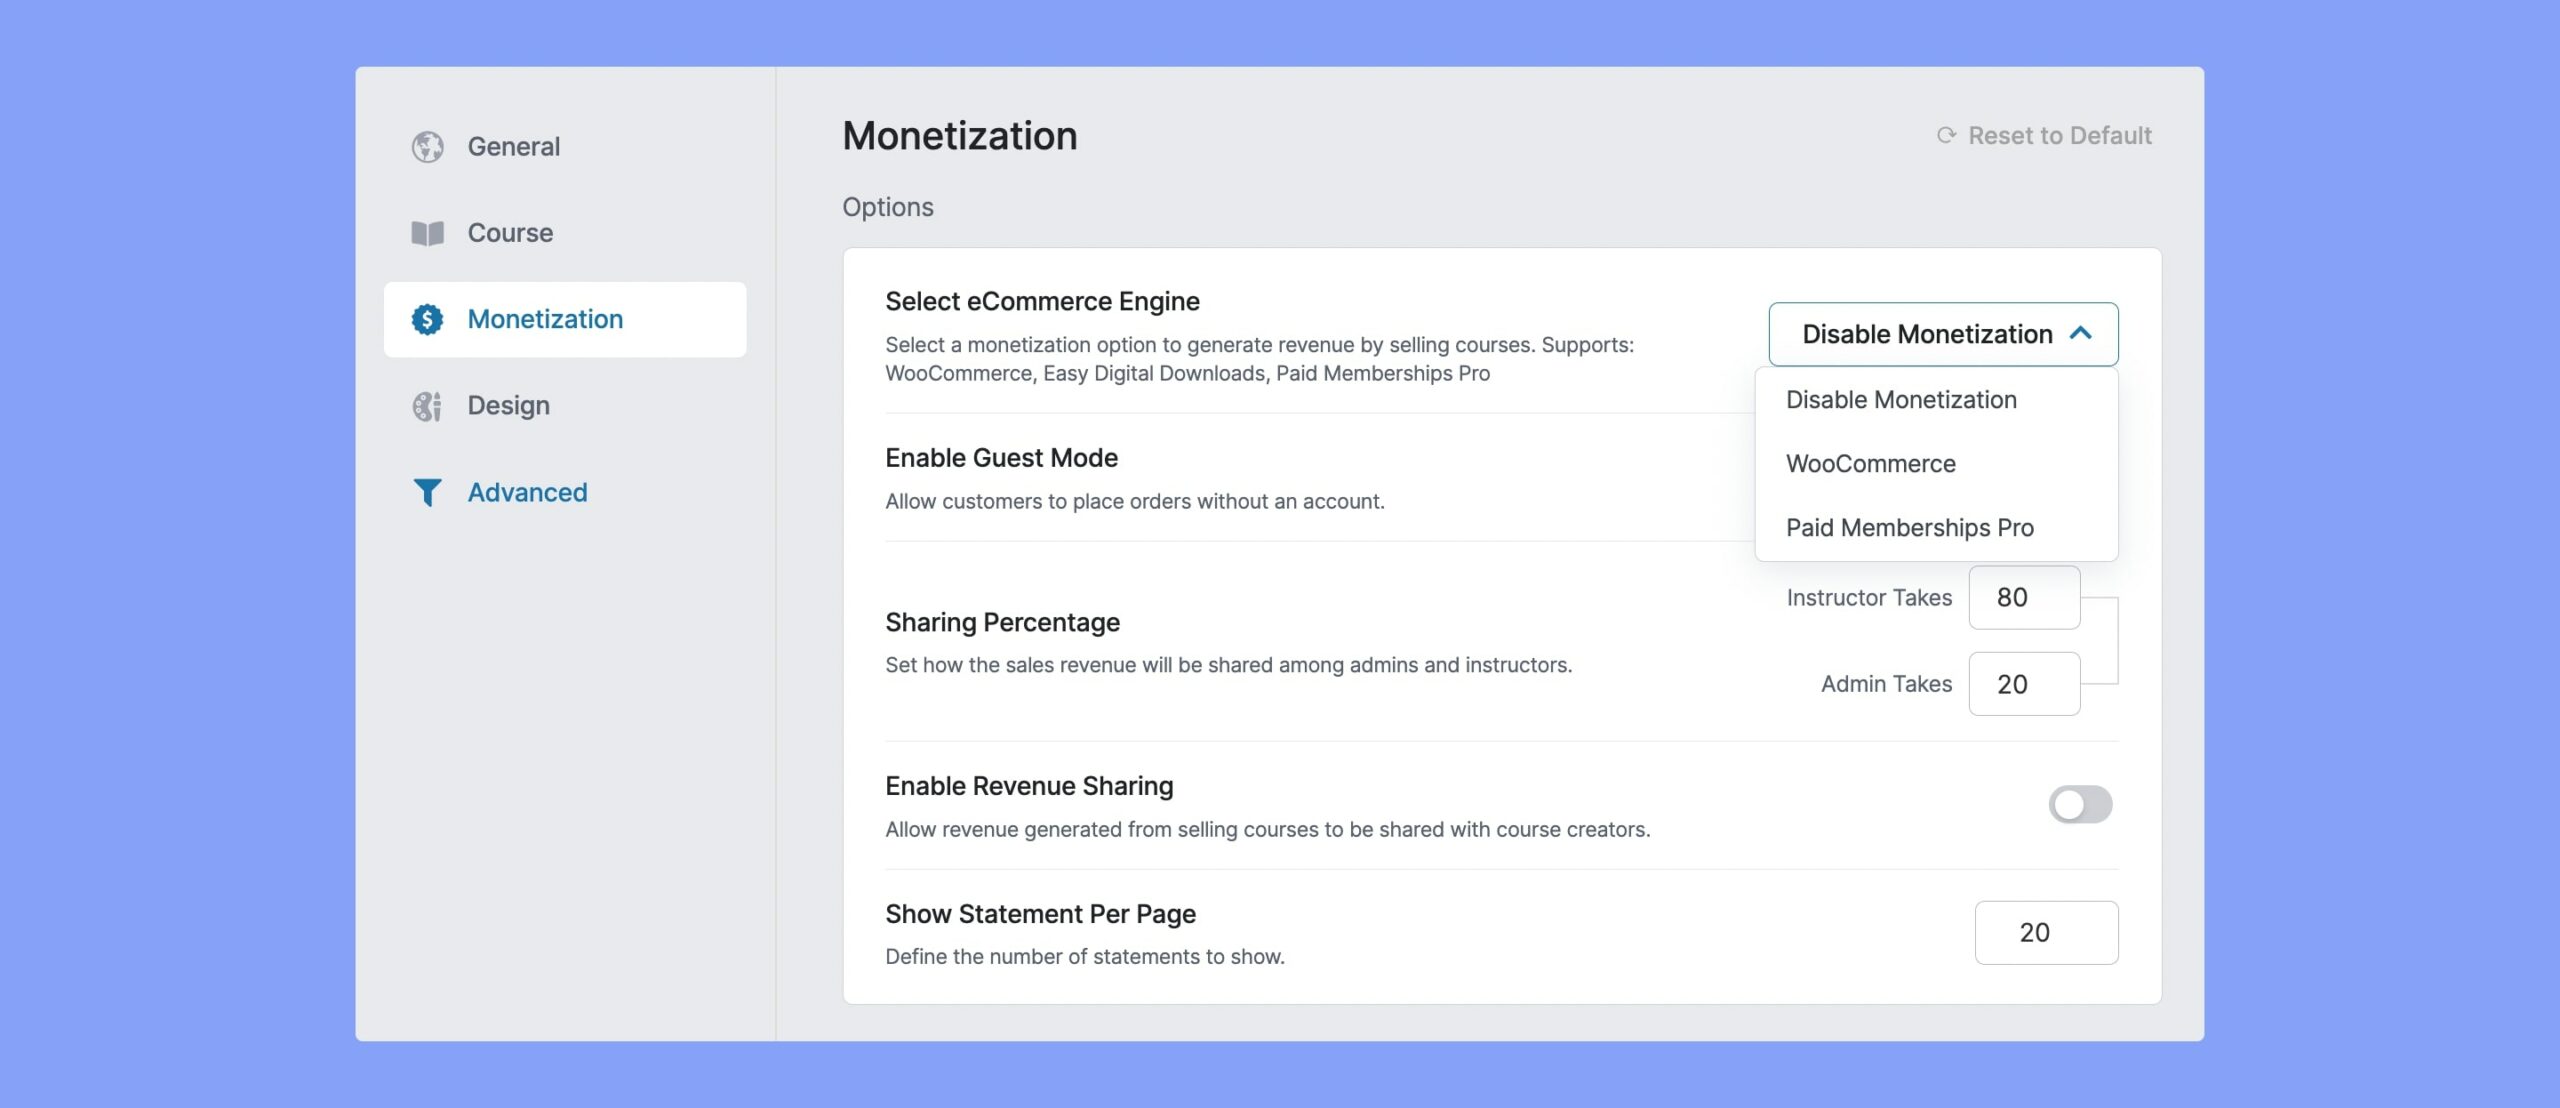
If you’ve decided to charge for your courses, then you can do it seamlessly with this option. Tutor LMS offers Easy Digital Downloads (EDD), Paid Membership Pro, Restrict Content Pro, WooCommerce, etc as monetization options. Depending on your preference, you can integrate any one of them. For in-depth understanding and setup procedures, you can visit the Monetization documentation.
NB: To enjoy this feature, you’ll be required to use the paid version of Tutor LMS.
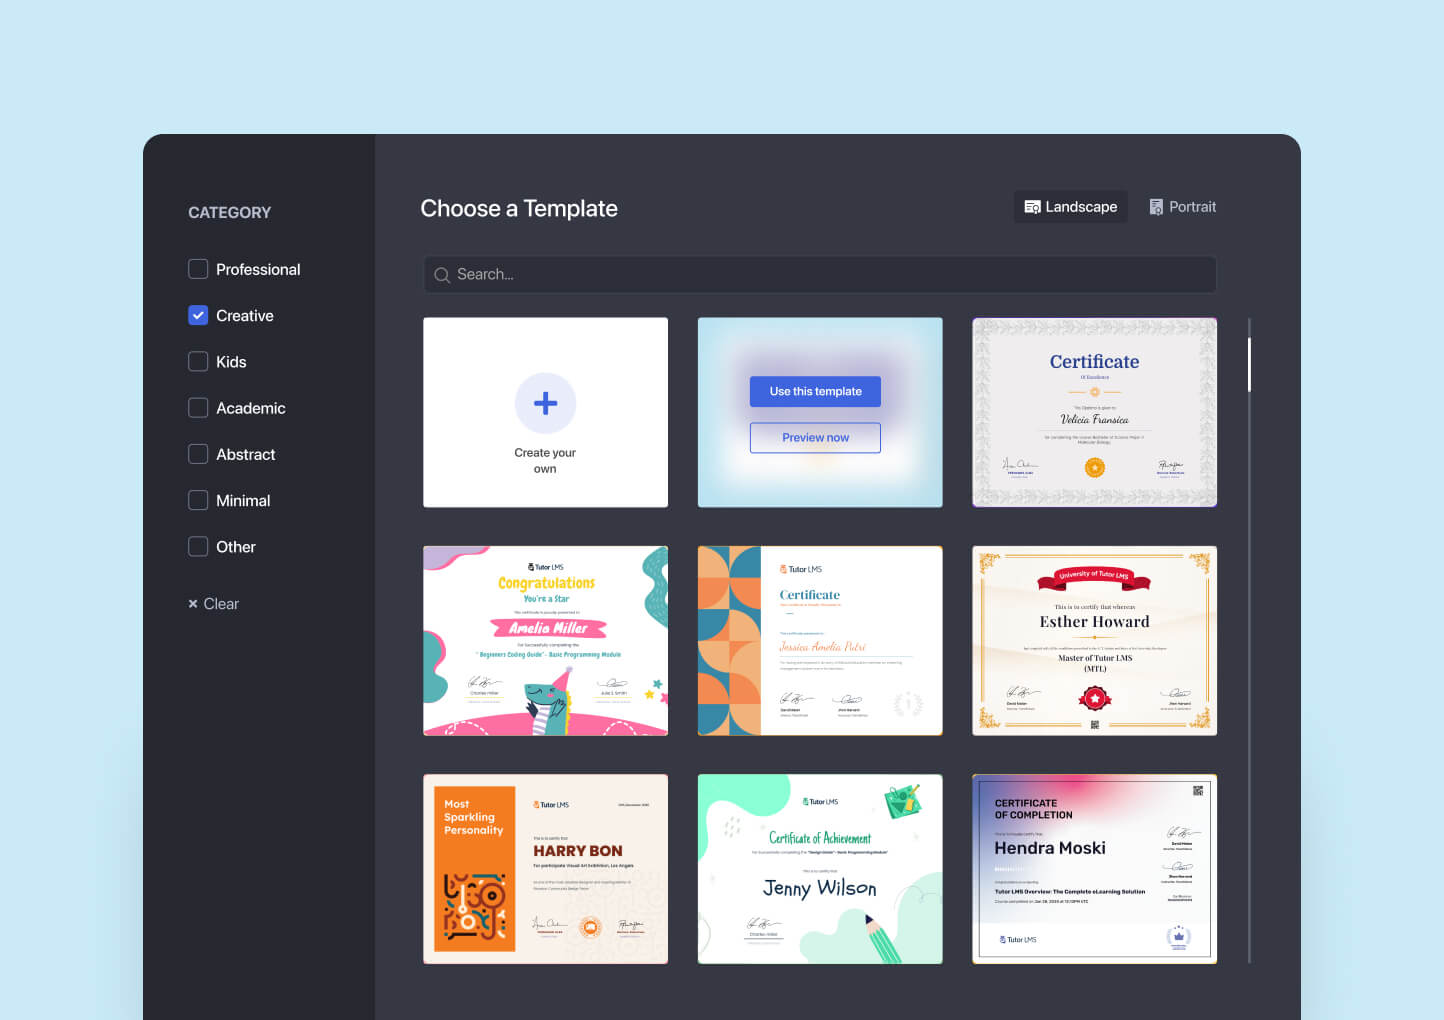
Step 5: Create Certificates for the Participants
Wrapping Up
Whether it is your personal or a business blog, switching to an eLearning platform can be considered as a timely decision. Surely, it could be a silver lining for your blog that can bring you more number of students if you know how to run it in the right direction. A professional LMS solution like Tutor LMS would be another step nearer here, that can lead you to hold that catbird seat you dreamt for. In today’s article, we also tried to get you introduced to the possibilities of Tutor LMS for your blog site.
What’s your take on this? Have you experimented with Tutor LMS yet? Do let us know in the comments.

jerry086
Extremely interesting. Thank you for giving such an informative blog.