Everybody loves a fast website. It’s much smoother to navigate. Heck, even Google loves a website fast and smooth! It indexes your site higher in the search result ranking. But how can you make your site faster?
It’s an annoying task to clean up your site. Especially after a long development cycle. It can also introduce bugs while optimizing.
So let’s take a look at some things you can do to speed up WordPress from the get-go while working on your new project. This article will give you an in-depth look into Gutenberg optimization and how you can leverage tools to make the most out of WordPress in 2024.
The State of Gutenberg in 2024
Gutenberg has come a long way since its initial release, both in terms of performance and design flexibility. Each update to it is constantly making it more lightweight while cutting down on file sizes.
We’ve noticed that Gutenberg is biased towards function over form. So, it has an innate advantage over the Page Builder plugins like Elementor, Divi, and Oxygen; the likes of which focus more on the looks rather than keeping the generated pages lighter.
In a time of automation and online tools, it’s quite simple to clean up your pages from unnecessary bloat. Let’s have a look at a few tools below on how to speed up WordPress in 2024.
How to Maintain Quick Load Times on Gutenberg
Qubely is a full-fledged toolkit aimed to be the best Gutenberg page-building tool for modern WordPress pages. It has 35+ highly customizable blocks that can be used to create a feature-packed WordPress website. Along with that, you have starter packs and ready sections to jump-start the project development time.
These come pre-optimized to create a Gutenberg website that’s super snappy. However, there are still ways to make it even faster. And we’ll explore them today.
In a time of automation and online tools, it’s really quite simple to clean up your pages from unnecessary bloat. Let’s have a look at a few tools below.
How to Improve Load Times
Below you will find a list of improvements that can be easily done to speed up your existing WordPress website.
Using a Caching Server
WordPress caching is a very simple yet effective way to create a faster pathway between your website and visitors. In computer science, caching is when frequently accessed data is stored in a more accessible layer of memory. So that when users access it, it can be served much faster than if it was stored normally. In WordPress, caching works in 3 different ways:
Server Level Caching: This is when techniques like Redis, page caching, and Memcached are used on the host servers which allows the serving of data. Server-level caching usually deals with the back-end database, dynamic data, and query optimization. This largely depends on the hosting provider. But more often than not, they offer these tools to any managed WordPress hosting.
Note: We recommend these hosting providers for fast and reliable WordPress services.
CDN: A CDN is essentially using a bunch of cache servers for heavy content such as images, videos, and other media. They use a distributed network of servers around the world where all of this content is stored and depending on the user’s geographical location, it’s served from the nearest location.
This reduces loading time as latency largely depends on geographical location. They also serve the bonus of keeping a “Snapshot” of your website. For when your website is offline. Some reliable yet cheap CDNs are:
- Cloudflare
- Cloudfront by Amazon
- Cloud CDN by Google
- KeyCDN, and more
CMS Caching: This relies on CMS level caching, and can be configured using several plugins, both free and premium. Just like server-level caching works with back-end and dynamic data, CMS caching works with front-end and static data such as style sheets and HTML files. It also relies on compressing CSS and JS files.
Most use techniques such as gzip compression, page caching, and enabling lazy-loaded images to reduce load times. These practically need no manual action as they’ve been built to perform all tasks automatically; the only thing you need to do is to activate their features. A few of the best plugins to speed up WordPress are:
- WP Rocket
- WP Super Cache
- W3 Total Cache
- Autoptimize
Out of all these options, we found WP Rocket to be the easiest and most powerful caching plugin to enable all the optimizations listed above –from caching to CSS and JS optimization, lazy loading, and more– and speed up your WordPress website in a few clicks.
Use Gutenberg-Optimised Themes
A new trend of optimizing themes for Gutenberg has been going on for the last few iterations of WordPress. Most themes and theme builders nowadays place a ton of emphasis on Gutenberg. So finding a good, light theme with Gutenberg support is the obvious first step towards speeding up your WordPress website, especially if you’re planning to use a lot of Gutenberg blocks and block plugins.
Optimize Your Images
You should always make sure you’re using the right size of the image on every webpage you build. Using an oversized image for no reason will only result in slow load time. To optimize WordPress images, we highly recommend resizing each image to exactly the size needed for your webpage.
A question that many people may have is: what happens when we load that image on a high-resolution display? Won’t it look pixelated? Well, Qubely circumvents this by adding separate high-res images that are only served to devices running high-resolution displays.
Another step to improve image load times is to use compressed images. For this, we give our vote of confidence to “Compress JPEG & PNG images”, a plugin by TinyPNG, a very popular online image compression service. Their website is completely free and you can compress 20 images at a time. However, their plugin allows you to bulk compress around 100 images for free. You can also get their premium account and remove this limit.
Another plugin we recommend to optimize your images is Imagify, a simple tool to make photos lighter and your website faster. No need to choose any compression level: Imagify compresses images automatically, balancing quality and performance and helping you save time. You can optimize images for free up to 20MB/month or choose one of the paid plans.
As a rule of thumb, you should always use PNG images for digital graphic art, transparent images, and vector images. On the other hand, you should always use JPG for lifelike images.
Use a Faster Web Hosting Platform
Sometimes, it’s as simple as upgrading your hosting provider to a better plan. A better plan will not only allow faster speeds but also increase the reliability of your website.
Here’s a list of recommended hosting providers to optimize WordPress for all your needs!
Optimize Your Videos
Video compression is a huge subject on which one could spend hours explaining the nitty-gritty details of it, but we’re going to try to sum it up into a quick lesson. For today, we will use a free tool called HandBrake which is a video transcoding tool. It can be used to create incredibly efficient videos for an optimized WordPress website.
After installing it, you can simply drag and drop a video on it and start tweaking the settings. You can resize the images using the Dimensions tab. To compress the video, go to the video tab, and tweak these settings. Choose H.264, and set the Encoder Profile to High. For 720p videos, we recommend a Constant Quality value of 18-20 while for 1080p videos, we recommend using 22-24.
Remember: The lower the value, the higher the file size. You can also use presets from the right-side panel. After you’ve selected the settings, all that’s left is to hit “Start Encode” and your compressed video will be rendered.
Step By Step Guide Into Optimizing with Gutenberg and Qubely
Here you will find a guide on how you can optimize your WordPress site with Gutenberg & Qubely.
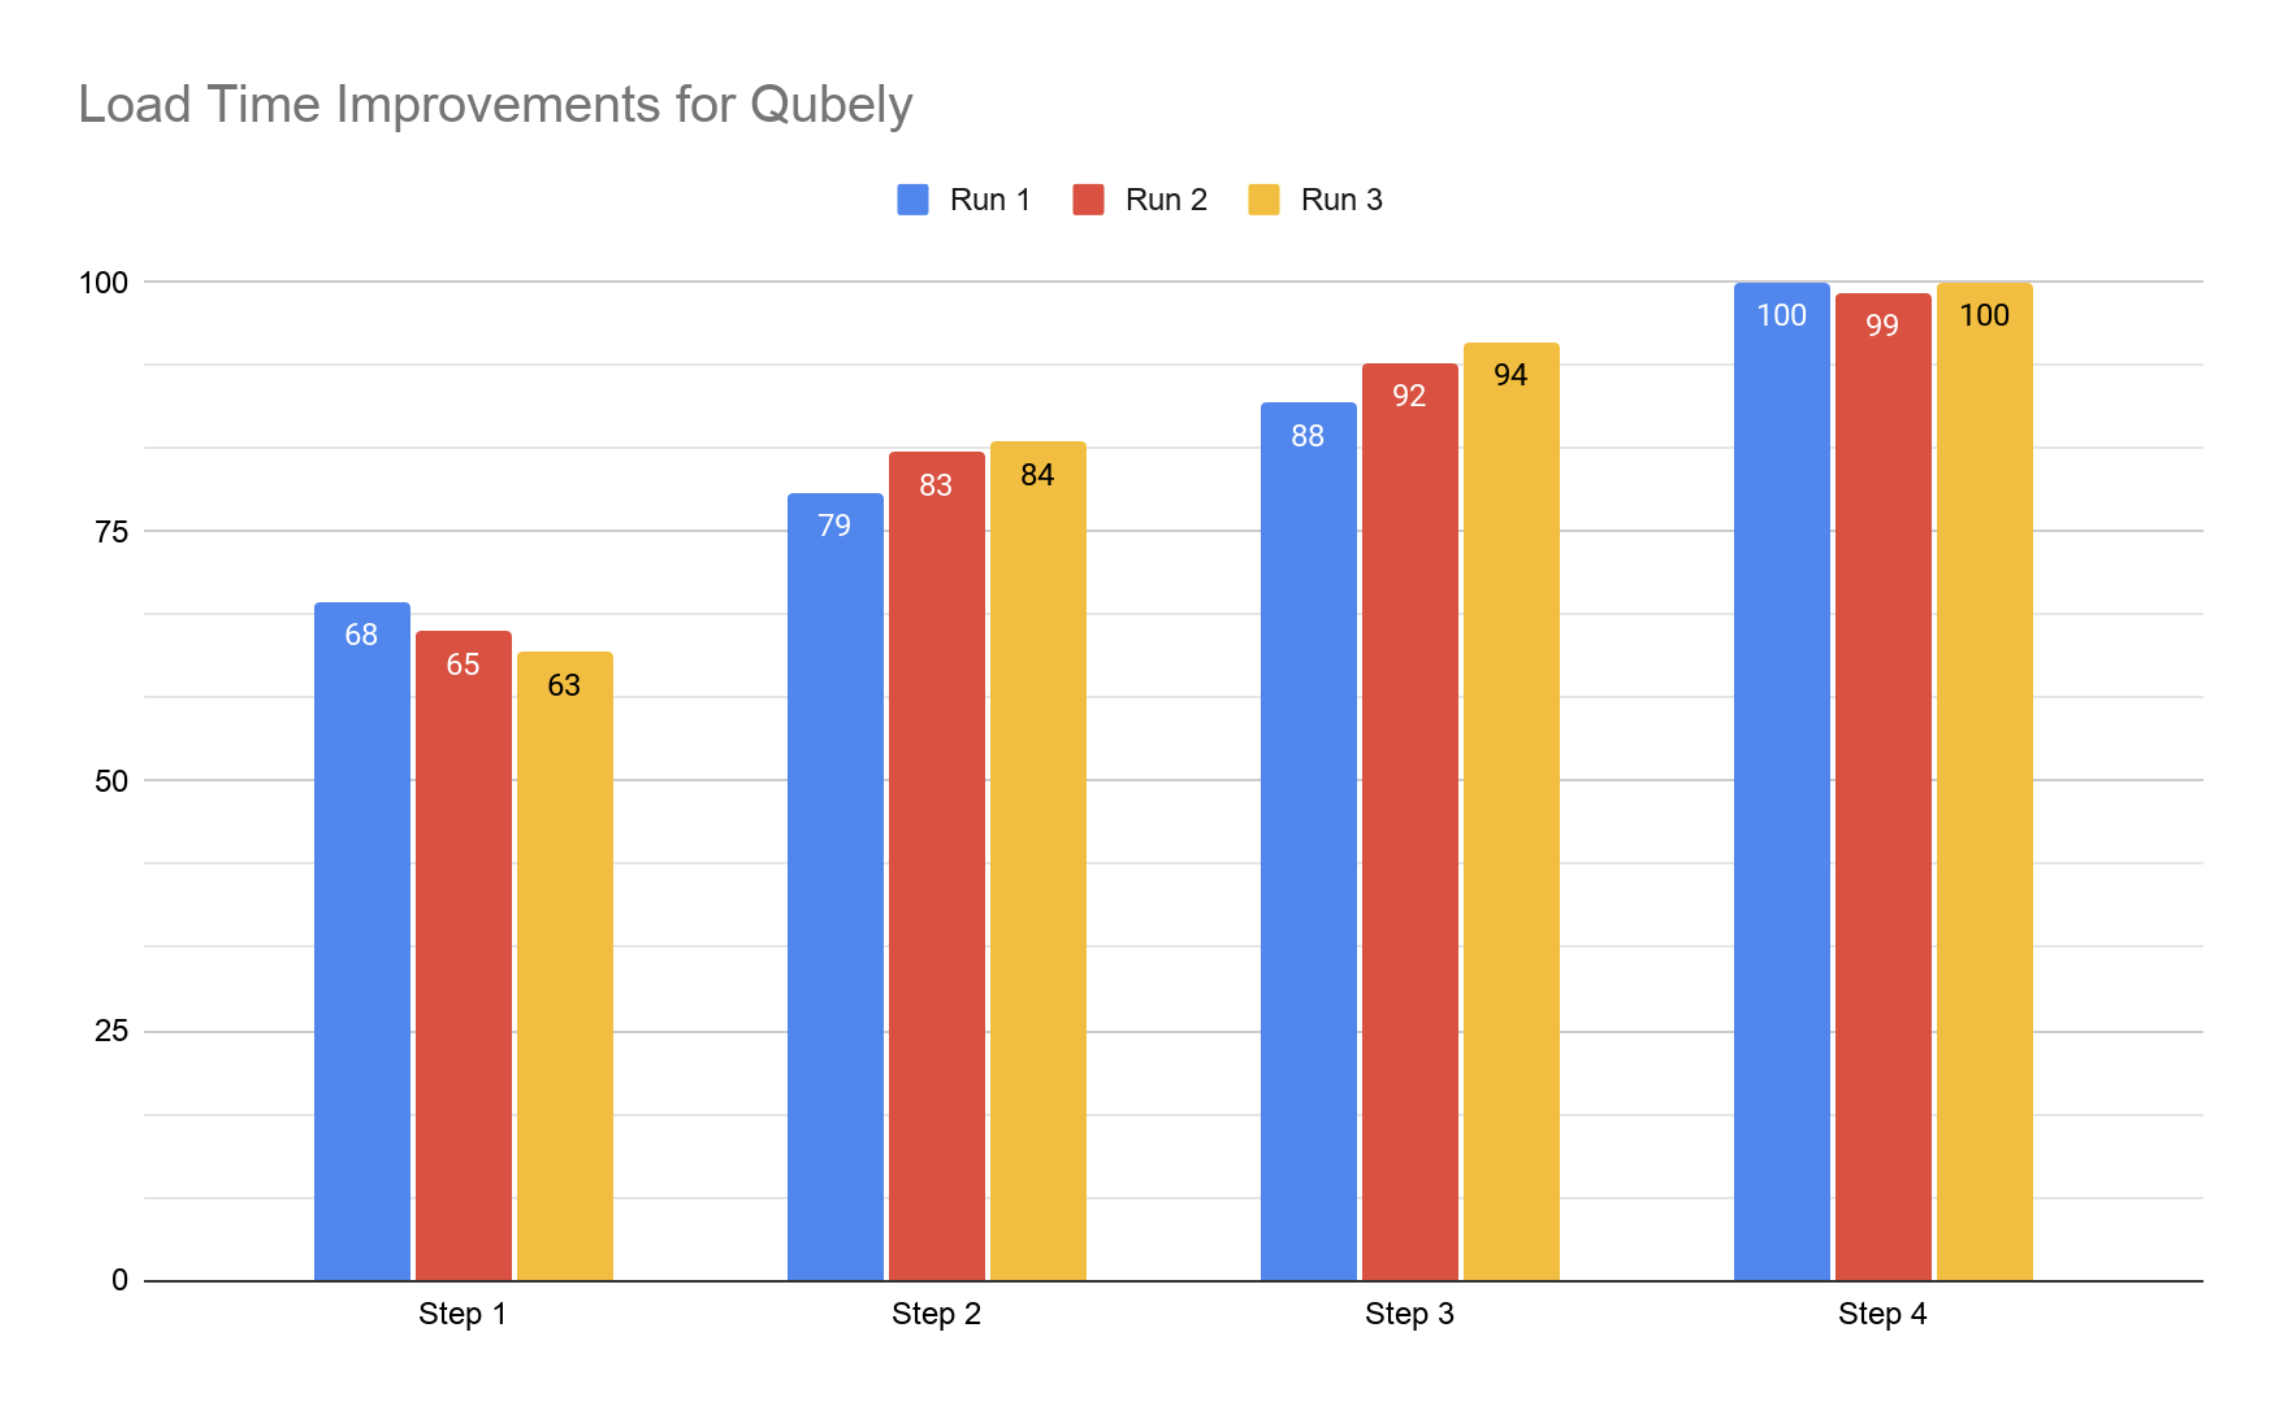
Testing Method That We Used
For this guide, we will use Google Chrome’s built-in tool, Lighthouse to measure performance. During each step of the process, we will take 3 reports using Lighthouse and measure the performance improvements.
To launch Lighthouse, simply load into any webpage, and go into the inspect element panel. On the rightmost tab, you should find Lighthouse. Since we are only working with Performance improvements, only “Performance” should be enabled. In each step, we will take a look at the report, analyze where improvements are possible, and make them on the fly.
Step 1: Configure The Environment and Reference Results
As for the test webpage, we will import a single page from one of Qubely’s starter packs which are built using modern Gutenberg blocks. Obviously, we will need Qubely installed for that, so go ahead and install it from the backend WordPress panel.
After Qubely is installed and activated, go to WP Admin > Pages > Add New and then click on the import layout button to explore all starter packs, ready sections, and more. From there, import any one page of a starter pack and then publish it to use as a test environment.
Now we can start taking 3 values by using “Generate Report” 3 times and noting down the values.
Step 2: Set Up WordPress Caching
We’ll start the optimization process by installing a caching plugin as discussed previously. To do that, go to WP Admin > Plugins > Add New and search for a preferred plugin.
We’ll use W3 Total Cache, which is a free plugin and can be found in the WordPress directory. After installing and enabling it, you can go into the settings and tweak all the settings.
We highly recommend spending time playing around with this, by enabling each setting one by one to check if it yields positive results. You’ll definitely learn a lot!
After you’re satisfied with it, let’s take our 3 measurements for this step and note them down again.
Step 3: Optimise Your Qubely Plugin
For the next step, we’ll be optimizing some of the features of Qubely that might cause slow-downs in load times even though it’s not in use. To do so, head to WP Admin > Qubely > Settings > Advanced and set both Load FontAwesome and CSS to “No”.
After that, we can reload the test page and note down another set of measurements.
Step 4: Resize and Compress Multimedia
As discussed in the video and image optimization segments, we will be optimizing all the multimedia on the test site. Usually, importing a starter pack also imports a ton of demo images and videos.
To optimize the images, we will download all of them, and then compress them using either TinyPNG or TinyJPG depending on the original image format. We can further optimize this by resizing the demo images if needed.
Lighthouse does an amazing job at finding scope for potential savings and you can find them by simply scrolling down on any of the generated reports. There you will find a report on how much potential savings you could be making. We will also take any raw video files and compress them using Handbrake if needed.
Finally, we will take the last set of reports for performance and also note them down.
| Run 1 | Run 2 | Run 3 | |
|---|---|---|---|
| Step 1 | 68 | 65 | 63 |
| Step 2 | 78 | 83 | 84 |
| Step 3 | 88 | 92 | 94 |
| Step 3 | 100 | 99 | 100 |
Wrapping Up
So, there you have it! A full-fledged guide to creating a Gutenberg-optimized WordPress website. And create a faster site using Gutenberg and Qubely. We realize that it might seem daunting to newcomers to WordPress, but rest assured, the time you put into learning how to optimize a page is worth the time! As usual, we’re keen to hear any feedback you may have. So do let us know if you’re confused or simply have an opinion you’d like to share.