System Requirements
In order to use the PayPal Adaptive for WooCommerce plugin, your site must meet the following system requirements.
- PHP version: minimum 5.4
- WordPress version: Minimum 4.0
- WooCommerce version: Minimum 2.5
- TLS version: Minimum 1.2
- HTTP version: Minimum 1.1
You also need to have the latest version of WooCommerce plugin installed on the site.
To check whether your instance meets the system requirements, login to your site and visit the Dashboard. There you will find a widget called “WPNEO PayPal Adaptive Payment System Status”.
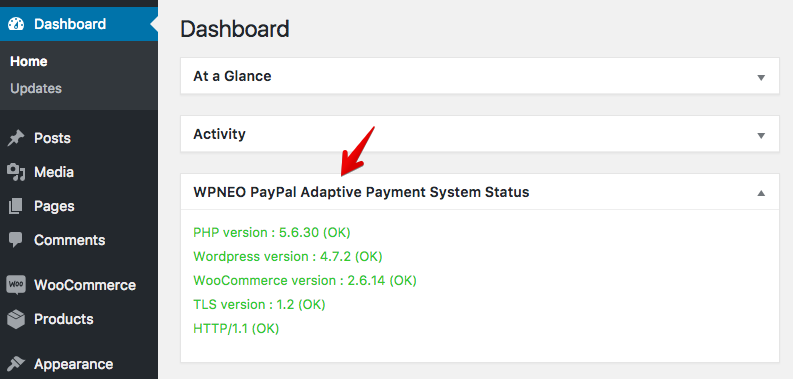
If your system has any problem, this widget will show that alert in red text.
How To Install
Go to Dashboard > Plugins > Add New > Upload Plugin > Choose File. Then locate the downloaded plugin file called ‘paypal-adaptive-for-woocommerce.zip‘. Click the Install Now button. Finally activate the PayPal Adaptive for WooCommerce plugin when it gets installed.
Alternatively, unzip paypal-adaptive-for-woocommerce.zip (the zipped package that you have downloaded after purchasing the plugin). Then you’ll get a folder called “paypal-adaptive-for-woocommerce”. Upload this folder (paypal-adaptive-for-woocommerce) to the /wp-content/plugins/ directory. Then activate the plugin by navigating to Dashboard > Plugins menu in WordPress.
Global Adaptive Settings
The PayPal Adaptive for WooCommerce plugin is based on WooCommerce. So you need to configure its functionalities directly from WooCommerce. Go to the WordPress Dashboard and open the WooCommerce settings (simply navigate to Dashboard > WooCommerce > Settings).
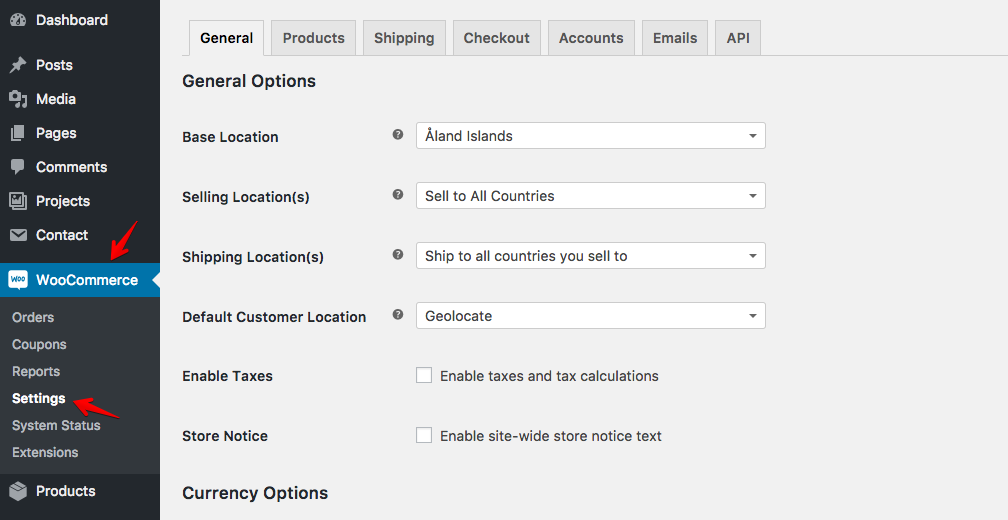
Click the Checkout tab. Then open the ‘PayPal Adaptive Payment’ option. PayPal Adaptive Settings page will open. Here you can define the plugin’s global settings for your site. Check the following screenshot.
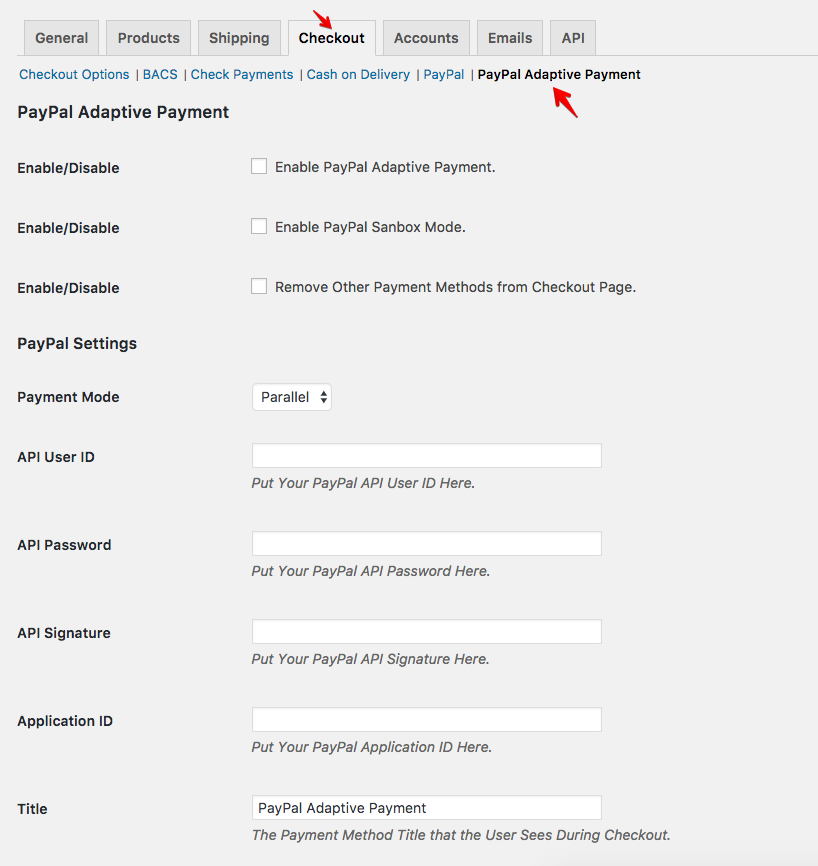
Here you will get basically 3 categories of settings, such as PayPal Adaptive Payment, PayPal Settings, and Receiver Settings. Each of these sections is explained below.
PayPal Adaptive Payment
To turn on the PayPal Adaptive Payment feature for the entire live site, select the ‘Enable PayPal Adaptive Payment’ option. If you want to test the feature as a developer, choose the ‘Enable PayPal Sandbox Mode’ option.
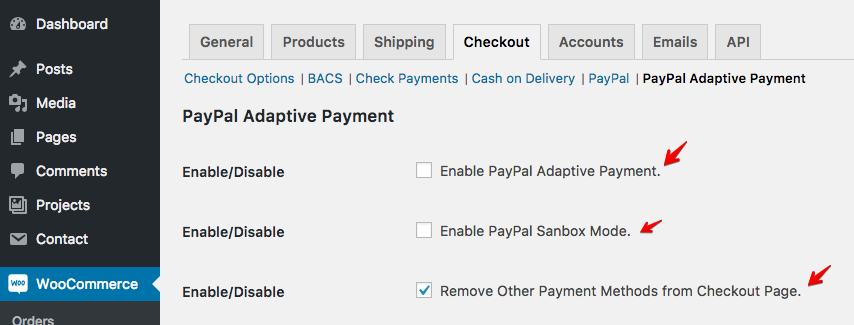
When the adaptive PayPal payment method is active on your site, you can turn off other payment methods to make the payment and receiving procedure seamless and easy. To do this, check the ‘Remove Other Payment Methods from Checkout Page’ option.
Don’t forget to save these settings to make them effective.
PayPal Settings
Here you will find all the PayPal specific settings. These settings are common for all of your products on the site.
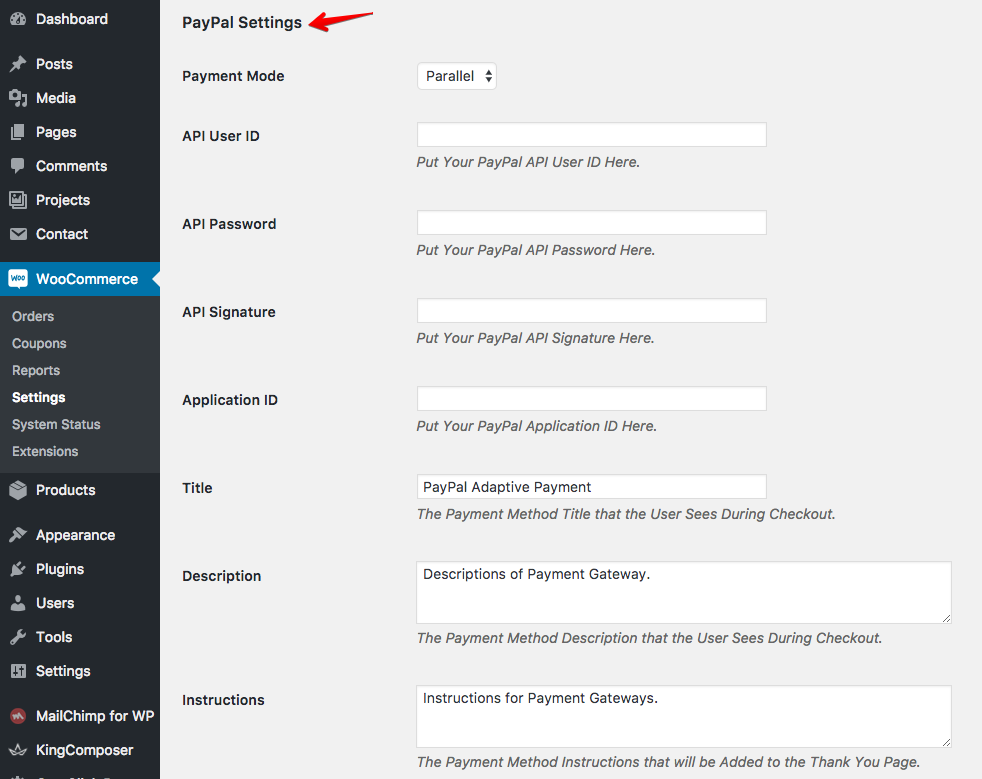
You can still customize it for individual products from that product’s editing page.
Payment Mode: In this section, at first you need to decide whether the adaptive payment system to follow a parallel or chained path. If you choose the Parallel option, the money will be sent to all of the receivers at the same time directly from the buyer’s PayPal account.
If you choose the Chained payment system, each time the total transaction amount will go to the first receiver’s PayPal account. Then the fund will get segmented according to the predefined percentage distribution of Adaptive payment model defined by the site admin.
The receivers and the segmentation amounts are defined in the ‘Receiver Settings’ section found in the (same) PayPal Adaptive Payment page.
API Information: Enter your API username/ID, API password and API signature in the respective fields. You can get these information by visiting your PayPal profile. Create a new PayPal Application and provide that application ID in the appropriate field. Visit this official link to learn how to get these credentials.
Title, Description, and Instructions: The Title field defines the payment method name that will be displayed on the checkout page. Then the Description is shown. The Instructions field contains the payment related information that is displayed after the checkout (on the Thank You page).
Receiver Settings
Here you need to define the payment receivers. By default, we provide 3 receiver options. That means you can assign up to 3 PayPal recipients for adaptive payments. Please be informed, PayPal has some rules regarding the number of Adaptive Payment recipients, so you can set only a limited number of receivers.
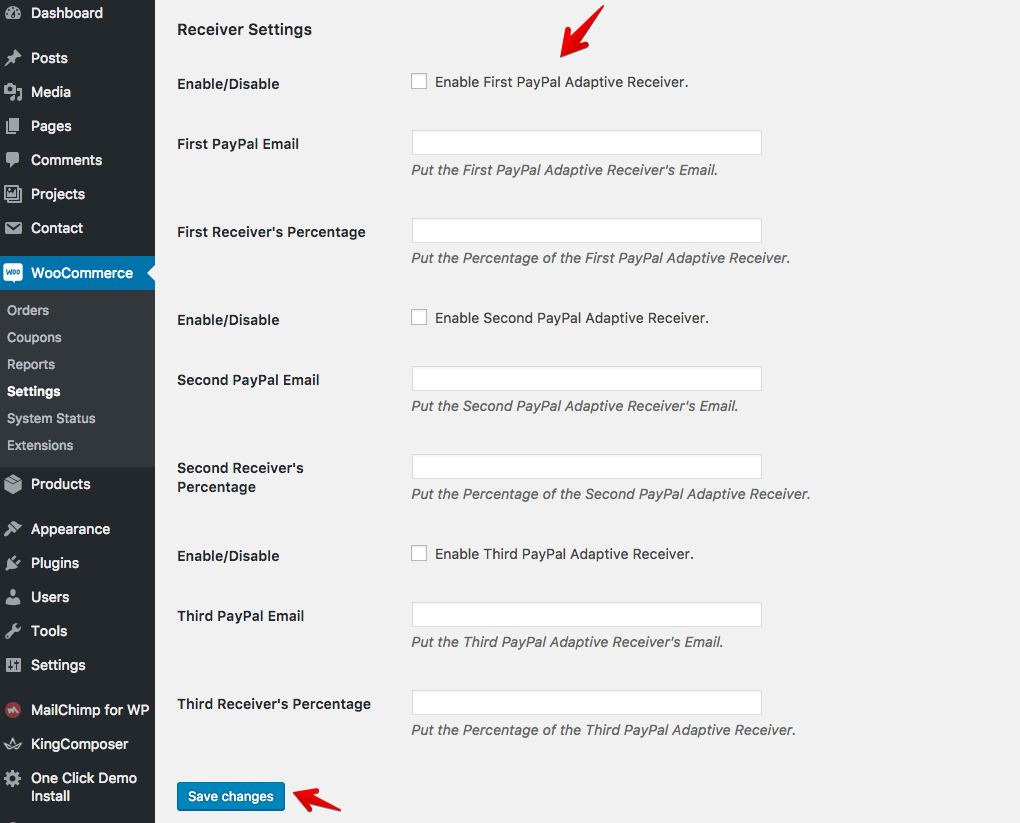
To be on the safe side, we’ve provided 3 receiver options in this plugin. If you need more, please contact us.
Here you have to enable more than one receivers. Enter the receivers’ PayPal email addresses and the commission percentage amounts. Always make sure that the sum of all commission percentages is 100.
Again, if you use the Chained payment mode, initially the first receiver will get the entire transaction amount. Then the other receivers will get according to their commission percentages from the first receiver’s PayPal account.
Single Page Adaptive Settings
If you want to use custom payment options for any specific product, you can do it from that product’s edit page. If you open that WooCommerce product item in editing mode, you will find the payment options at the bottom.

In the screenshot above, we can see initial two controls for PayPal Adaptive Payment. If you check the ‘Adaptive’ option, it will enable custom PayPal Adaptive Payments for this specific product. You can also force turn off PayPal Adaptive Payment for this product using the checkbox to the bottom. If you do it, the specific product will no more have a PayPal Adaptive payment option (regardless the global configuration in WooCommerce > Settings > Checkout > PayPal Adaptive Payments).
Now, if you want to set custom percentages/receivers for an individual product (overriding the global settings), you can do that from the single product page’s edit mode. Simply check the ‘Adaptive’ option found below the product’s text editor box. See the screenshot below.
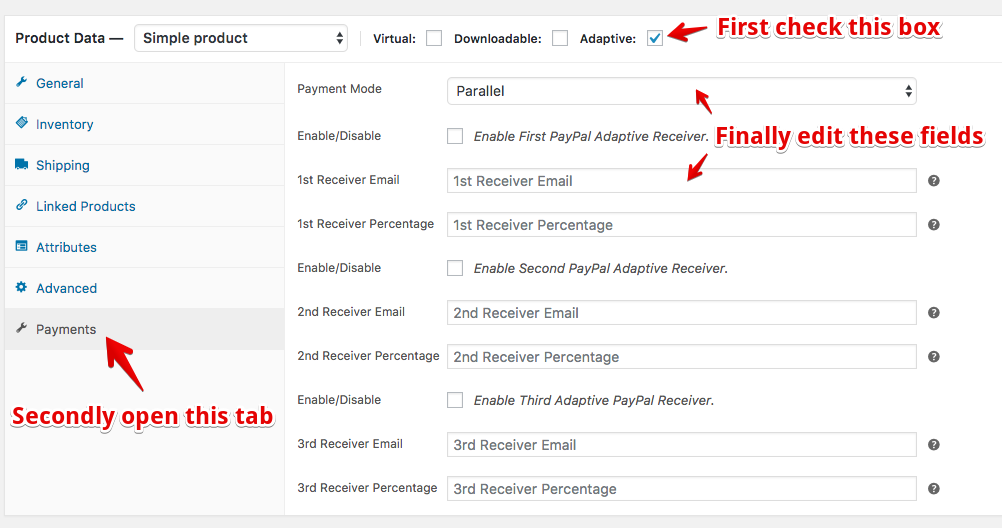
As soon as you click the Adaptive checkbox, a new menu item called Payments appear to the bottom left. Open that tab and you will get fields to enter receiver details and commissions. You can also choose whether the Parallel or Chained payment system for this product.
We hope you will find this doc helpful while using PayPal Adaptive for WooCommerce. Finally, you are welcome to share your thoughts, ideas, and queries via comments below.



vallowens
so does this work for the new paypal payouts solution?
Arafat Bin Sultan
Since PayPal has discontinued support for this adaptive payment system, so we’ve deprecated this plugin.
Thanks for your comment.
cvaj864
anyway for this to work for paypal standard. like can we just charge them a platform fee since paypal adaptive doesnt work anymore paypal said. and where do we go to charge them a platform fee? plus will the campaign owner recieve their portion of the donations minus our fees automatically without us having to manually transfer the donations to their paypal manually. regards to wp crowdfunding paid version.
Arafat Bin Sultan
Please note, PayPal has discontinued support for this adaptive payment system. So we’ve deprecated this plugin. You may be still able to use the adaptive payment system, but some development from your end might be needed. Thanks.