It is now really easy to create a countdown timer for WordPress with the correct tool. The popular video game “Fortnite” received a huge amount of attention after introducing mysterious, in-game counters. It made the fans fascinated as to what they were counting down to.
If you want to do the same in your WordPress site, then you are in the right place. In this tutorial, we will show how to add a countdown timer for your WordPress site using Gutenberg.
Before diving into details, let’s see some of the core use cases for a countdown timer.
- You can use it for counting product launch dates
- Let your visitors know about holiday sales
- Focus on any time-related offers & events
- Announce the time or duration of a flash sale
- Promote online sharing using mystery
- Create a sense of FOMO in your users
You may find several tools or plugins to add a countdown timer to your WordPress website. But in today’s tutorial, we will show you the Gutenberg way- because it’s the future of WordPress publishing and page building. Since there is no default Gutenberg block for adding a Countdown timer so far, we will use Qubely in this tutorial.
As you might already know, Qubely offers 34+ advanced Gutenberg blocks to build amazing WordPress sites in no time. You will find other helpful Qubely tutorials on our blog. For now, no more chit-chat, let’s start the tutorial right away!
Getting Started
There are some prerequisites that you need for using the Countdown timer for your WordPress site. One of them is making sure you are running the latest version of both the Qubely free & Qubely Pro. You can find them at the Themeum site. Once you make sure you have the required plugins, then it’s time to go to the next step.
Step 1 – Add Qubely Countdown Block to the Target Page
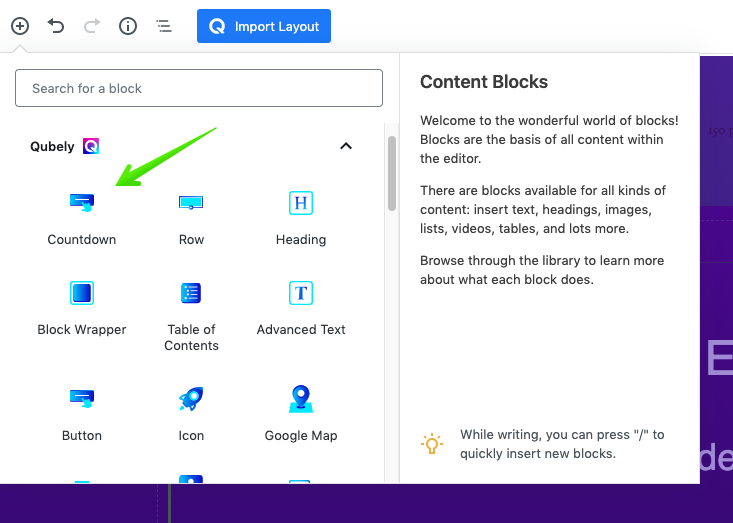
To get started, go to the Qubely block section (in Gutenberg editing interface) on any WordPress page/post. Explore the blocks. You will find the Countdown block. Click on it and add it to the current page/post.
After you add it to your target page, you have the full configuration options available at your disposal. You will be able to customize almost every aspect of the countdown clock and make it look just the way you want it to be.
Step 2 – Choose the Countdown Timer Settings
From the right side settings menu, you can configure the layout of the countdown clock, choose the event date (the starting and ending date option available for circular layout). And last but not least, choose the exact time remaining. This makes sure that all your visitors see the same deadline regardless of their geographic location.
Bonus Step – Choose a Pre-designed Template
To make your design process simpler there is also a separate template section that has beautiful countdown timer designs to suit your needs. Just hover over the design that you like and select “Apply”. All the templates are completely customizable. So you can match them to your exact needs.
Step 3 – Define How the Container/Circle Looks
The container is the countdown clock area. And from these settings, you can change the countdown background. You will be able to choose a solid color or a gradient background. You can even choose an image as the background.
After you have chosen the background type, now you can set the specific padding, space between the separators, border & radius attributes, box-shadow properties and more.
Step 4 – Set the Label Text Properties
Labels are important to let your visitors know what displays what part of the countdown clock. And with the Qubely Countdown block, you can set each and every label text property separately. Select if the labels will be viewed inside or outside the box. Also, you can set which side the labels will be shown.
After you have determined the position, now you can choose what parts of the countdown you want to display. You can enable/disable the days, hours, minutes and seconds and even change the text labels if you want. You can also change the spacing between each, change the color of the label texts, and apply advanced typography.
Step 5 – Change the Number Text Attributes
Along with the label texts, you can also change the numbers’ attributes that show up in the Countdown block. You can change the spacing between the label text and the numbers, and apply advanced typography.
Step 6 – Define How You Want the Separator to Look
The separators are the symbols that set the time duration apart from each other. And with the separator that you get with the Countdown block, you can configure it to how you want it to look. Choose from three different separator icons, set the color, define the size along with the offset of the separator icons.
Step 7: Animation, Interaction, Advanced
Every Qubely block comes with these advanced settings. Animation, Interaction, and Advanced which lets you set your blocks look apart from the rest.
Choose advanced animation options such as fade, slide, bounce, zoom, flip etc. Define how the block will act when a user interacts with it, enable mouse interactions movement with customizations, enable custom positions, add extra block row CSS and more with these settings.
Final Output of Your Qubely Countdown Timer
Once you are all set with your design and ready to bring it to the frontend hit publish. The frontend of your page/post that you added the countdown timer to, should look something similar to the following image. You can see, how easy it is to create an engaging countdown timer with the new “Countdown” block.
Create Your Own Countdown Timer For WordPress
As you can see, it is extremely easy to get started with the Qubely Countdown block and make it look like your own. And there are many advanced options that you get unique with Qubely such as applying animation & interactions to your block.
To get started, all you need is Qubely. You can always check out the documentation to find out more details about each setting. Tell us what you think about the Countdown block, we will be waiting for your comments.