Modern-day learning is no longer limited to classrooms. In this digital age, especially in this unprecedented time, eLearning is the hot thing! With eLearning, anyone can learn anything from the comfort of their home, on their schedule, and pace. Can learning get any better than this?
If you are an instructor or someone who’s thinking of creating your eLearning platform, this is the best time to do so. We can ensure you’ll know how to have an eLearning website up and running without any coding or technical skills by the end of this tutorial, Without further ado, let’s jump right in!
How to Create an eLearning Course Website
If you are someone who has the potential to teach or create your own eLearning platform but shying away because of the technical difficulties, then this is for you. In fact, we’ve compiled a list of just 9 steps to show you how easily you can set up an online learning platform.
Step 1: Choose Your CMS Platform
WordPress is great for blogs but is it the best platform to create eLearning websites too? Absolutely yes! Talk about scalability and customization – there are not many options better than a WordPress website. It is also the most affordable option when it comes to other platforms.
This tried and tested, SEO optimized platform has infinite customization options and has little to no monthly maintenance cost. Furthermore, WordPress is easy to work with and requires no coding skills to use. A perfect choice for elementary users who are just starting to create their own eLearning platform! You can also turn your blog site into an eLearning hub if you already own a WordPress blog site.
Step 2: Create Your Online Presence
The first step to create eLearning websites is to get a domain name. Simply put, it is the name of your website, this could also be your brand’s name. If you are just landing into the eLearning world, brainstorm your name ideas to reflect your niche. You can register your domain name from registrars such as GoDaddy, Namecheap, etc. Or, you can claim a free one from your web hosting package.
Talking about hosting packages, choosing the right hosting for your WordPress website is important! Some of the popular hosting companies are Cloudways, DigitalOcean, SiteGround, and HostGator. Whichever host you choose, keep in mind to never compromise on the speed, uptime, and customer support of the hosting provider. Your website’s health is dependent on them!
Also, we’ve partnered with Cloudways to make hosting eLearning sites more interesting. You can now host your eLearning site on Cloudways on 1-click.
Step 3: Choose the Right LMS Plugin
Choosing the right LMS plugin can be a daunting task to create eLearning websites on WordPress. After all, it is the core of your eLearning website. Let’s have a look at some of the basic features you should be eyeing when it comes to choosing your LMS:
- Course building
- Student enrollment and management
- Quizzes and tests
- Automated emails
- Multiple payment gateway support
- Analytics to monitor course performance
- Certification
- Content dripping
- And many more
And guess what? Tutor LMS ticks all the right boxes and has even more advanced functionalities! It is a complete UI based plugin to create and sell your online courses – which means it is the easiest solution for non-techies. eLearning web development can not get any easier than this!
Is Tutor LMS Free?
It has both – a free and a paid version.
This plugin is an essential tool not only for its convenient features and user-friendly interface but the fact that you can get started with all the basics to run online courses for free is insane!
Of course, you will get more premium features like front-end course builder, course preview, etc. in the paid version. A great investment to level up your LMS website game!
How to Install Tutor LMS Pro?
Start with the free version of Tutor LMS. Go to WordPress admin panel > Plugins > Add New. On the search plugins field, type “Tutor LMS” and install and activate the plugin.
Then go to the landing page of Tutor LMS, and select the pricing plan as you see fit for your site. Once you are done with the purchase, you’ll find the plugin file on your Themeum Downloads page.
Download the “.zip” file, and navigate to your WP admin > Plugins > Add New, then click on Upload Plugin and select the file you just downloaded. Install and activate it.
Step 4: Choose Your Theme
Now, this step is not mandatory but you’ll need a theme to beautify the look of your eLearning website. Even though there are tons of options available based around LMS, let us narrow it down to one for this tutorial that is the most compatible with Tutor LMS.
Edumax: This theme utilizes the features of Tutor LMS fully to allow you to build an online course marketplace very similar to Udemy. It supports features like a frontend student dashboard, course review, rating system, course completion certificates, and all unique features that Tutor LMS has.
To get Edumax, visit HERE and complete the purchase the same way you did with Tutor LMS Pro. You will be prompted to download a .zip file. After that go to your WordPress admin panel and navigate to WP Dashboard > Appearance > Themes > Add New > Upload Theme. Then upload the .zip file you just downloaded, install and activate the theme.
Apart from Edumax, you can also opt for Skillate – an eLearning theme based on Gutenberg that has all the necessary features to set the tone for an intuitive learning environment. Or Docent Pro, if you’re looking for a theme for a single instructor. Focused on solo instructors, you can do anything from creating courses to selling them on the site with Tutor LMS and Docent Pro. Check out our pick on the best WordPress LMS themes to use with Tutor LMS to explore more theme options.
Step 5: Create eLearning Courses with Tutor LMS
Now that we have our plugin and theme ready, it’s time to start creating content for our LMS website! With Tutor LMS Pro, you can create courses both on the front-end and the backend. Don’t worry if you are using the free version, we will demonstrate the process for both ways.
Frontend Course Builder
This unique feature of Tutor LMS Pro gives you the freedom to create courses from frontend without having to go to the back-end admin panel every time. If you are very new to WordPress, this is going to make your life so much easier!
Create Courses:
From the front-end course Dashboard, you will see an option to add a new course. Click on it and this will take you to the course creation page.
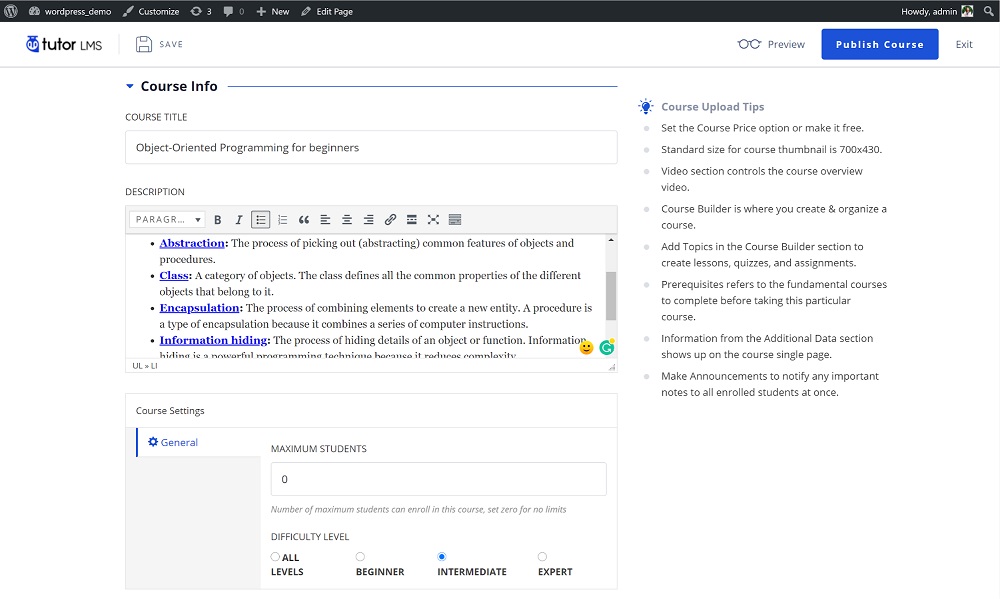
Enter your course title, a detailed course description, maximum students, course difficulty level, and the featured image for your course. Your featured image will show up as your course thumbnail.
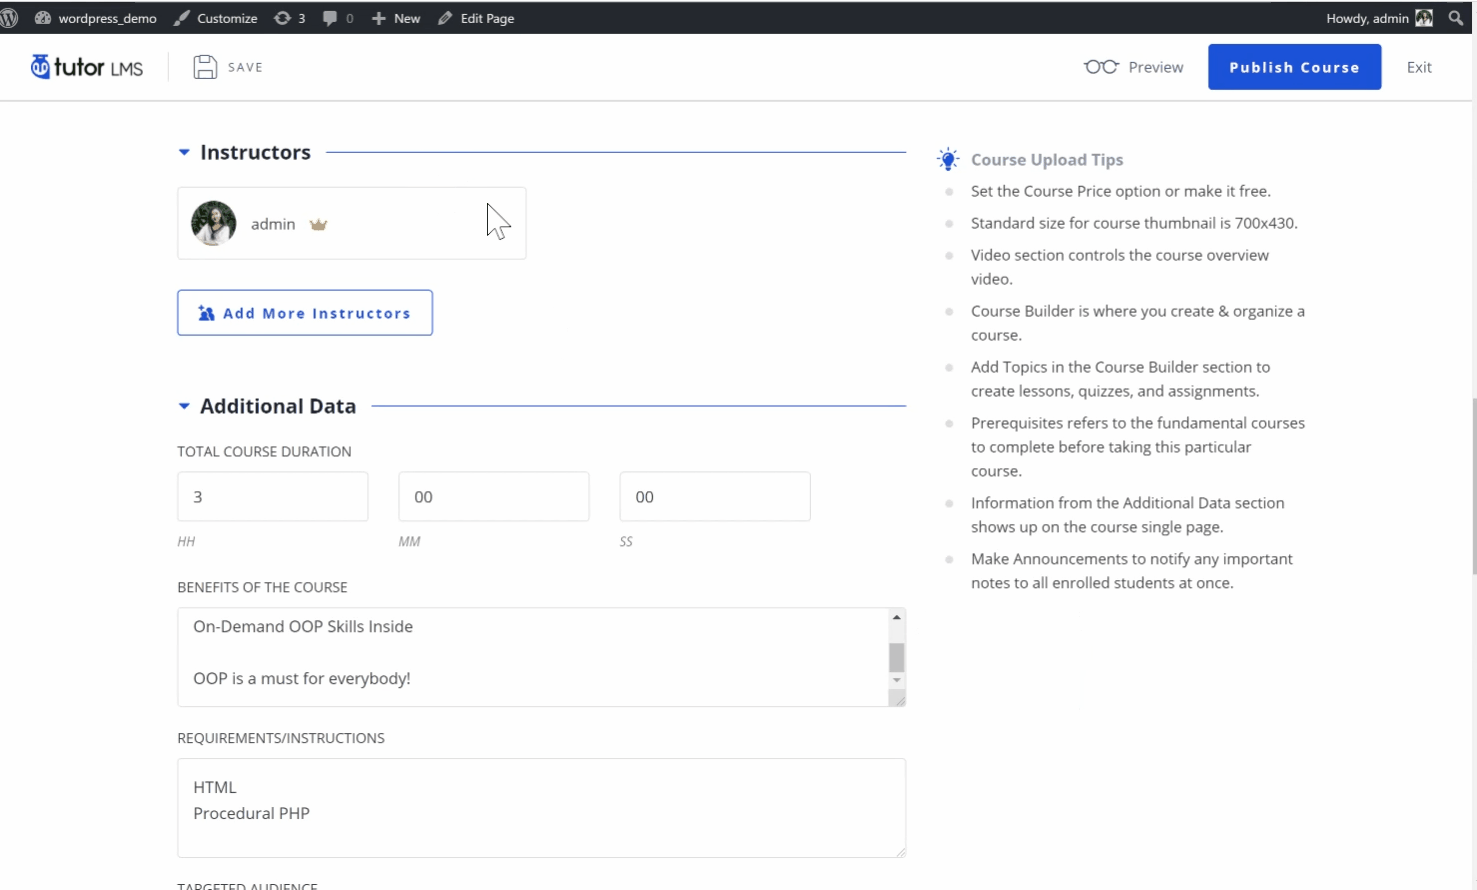
You can also include additional information like course duration, benefits of the course, target audience, requirements, course materials, and also set announcements.
Include Lessons:
Now that you have created your course, it’s time to add the lesson. To do that scroll down to Course Builder > Add New Topic.
Add your topic name, summary, and hit Add Topic. Then, you can start adding lessons for that specific topic.
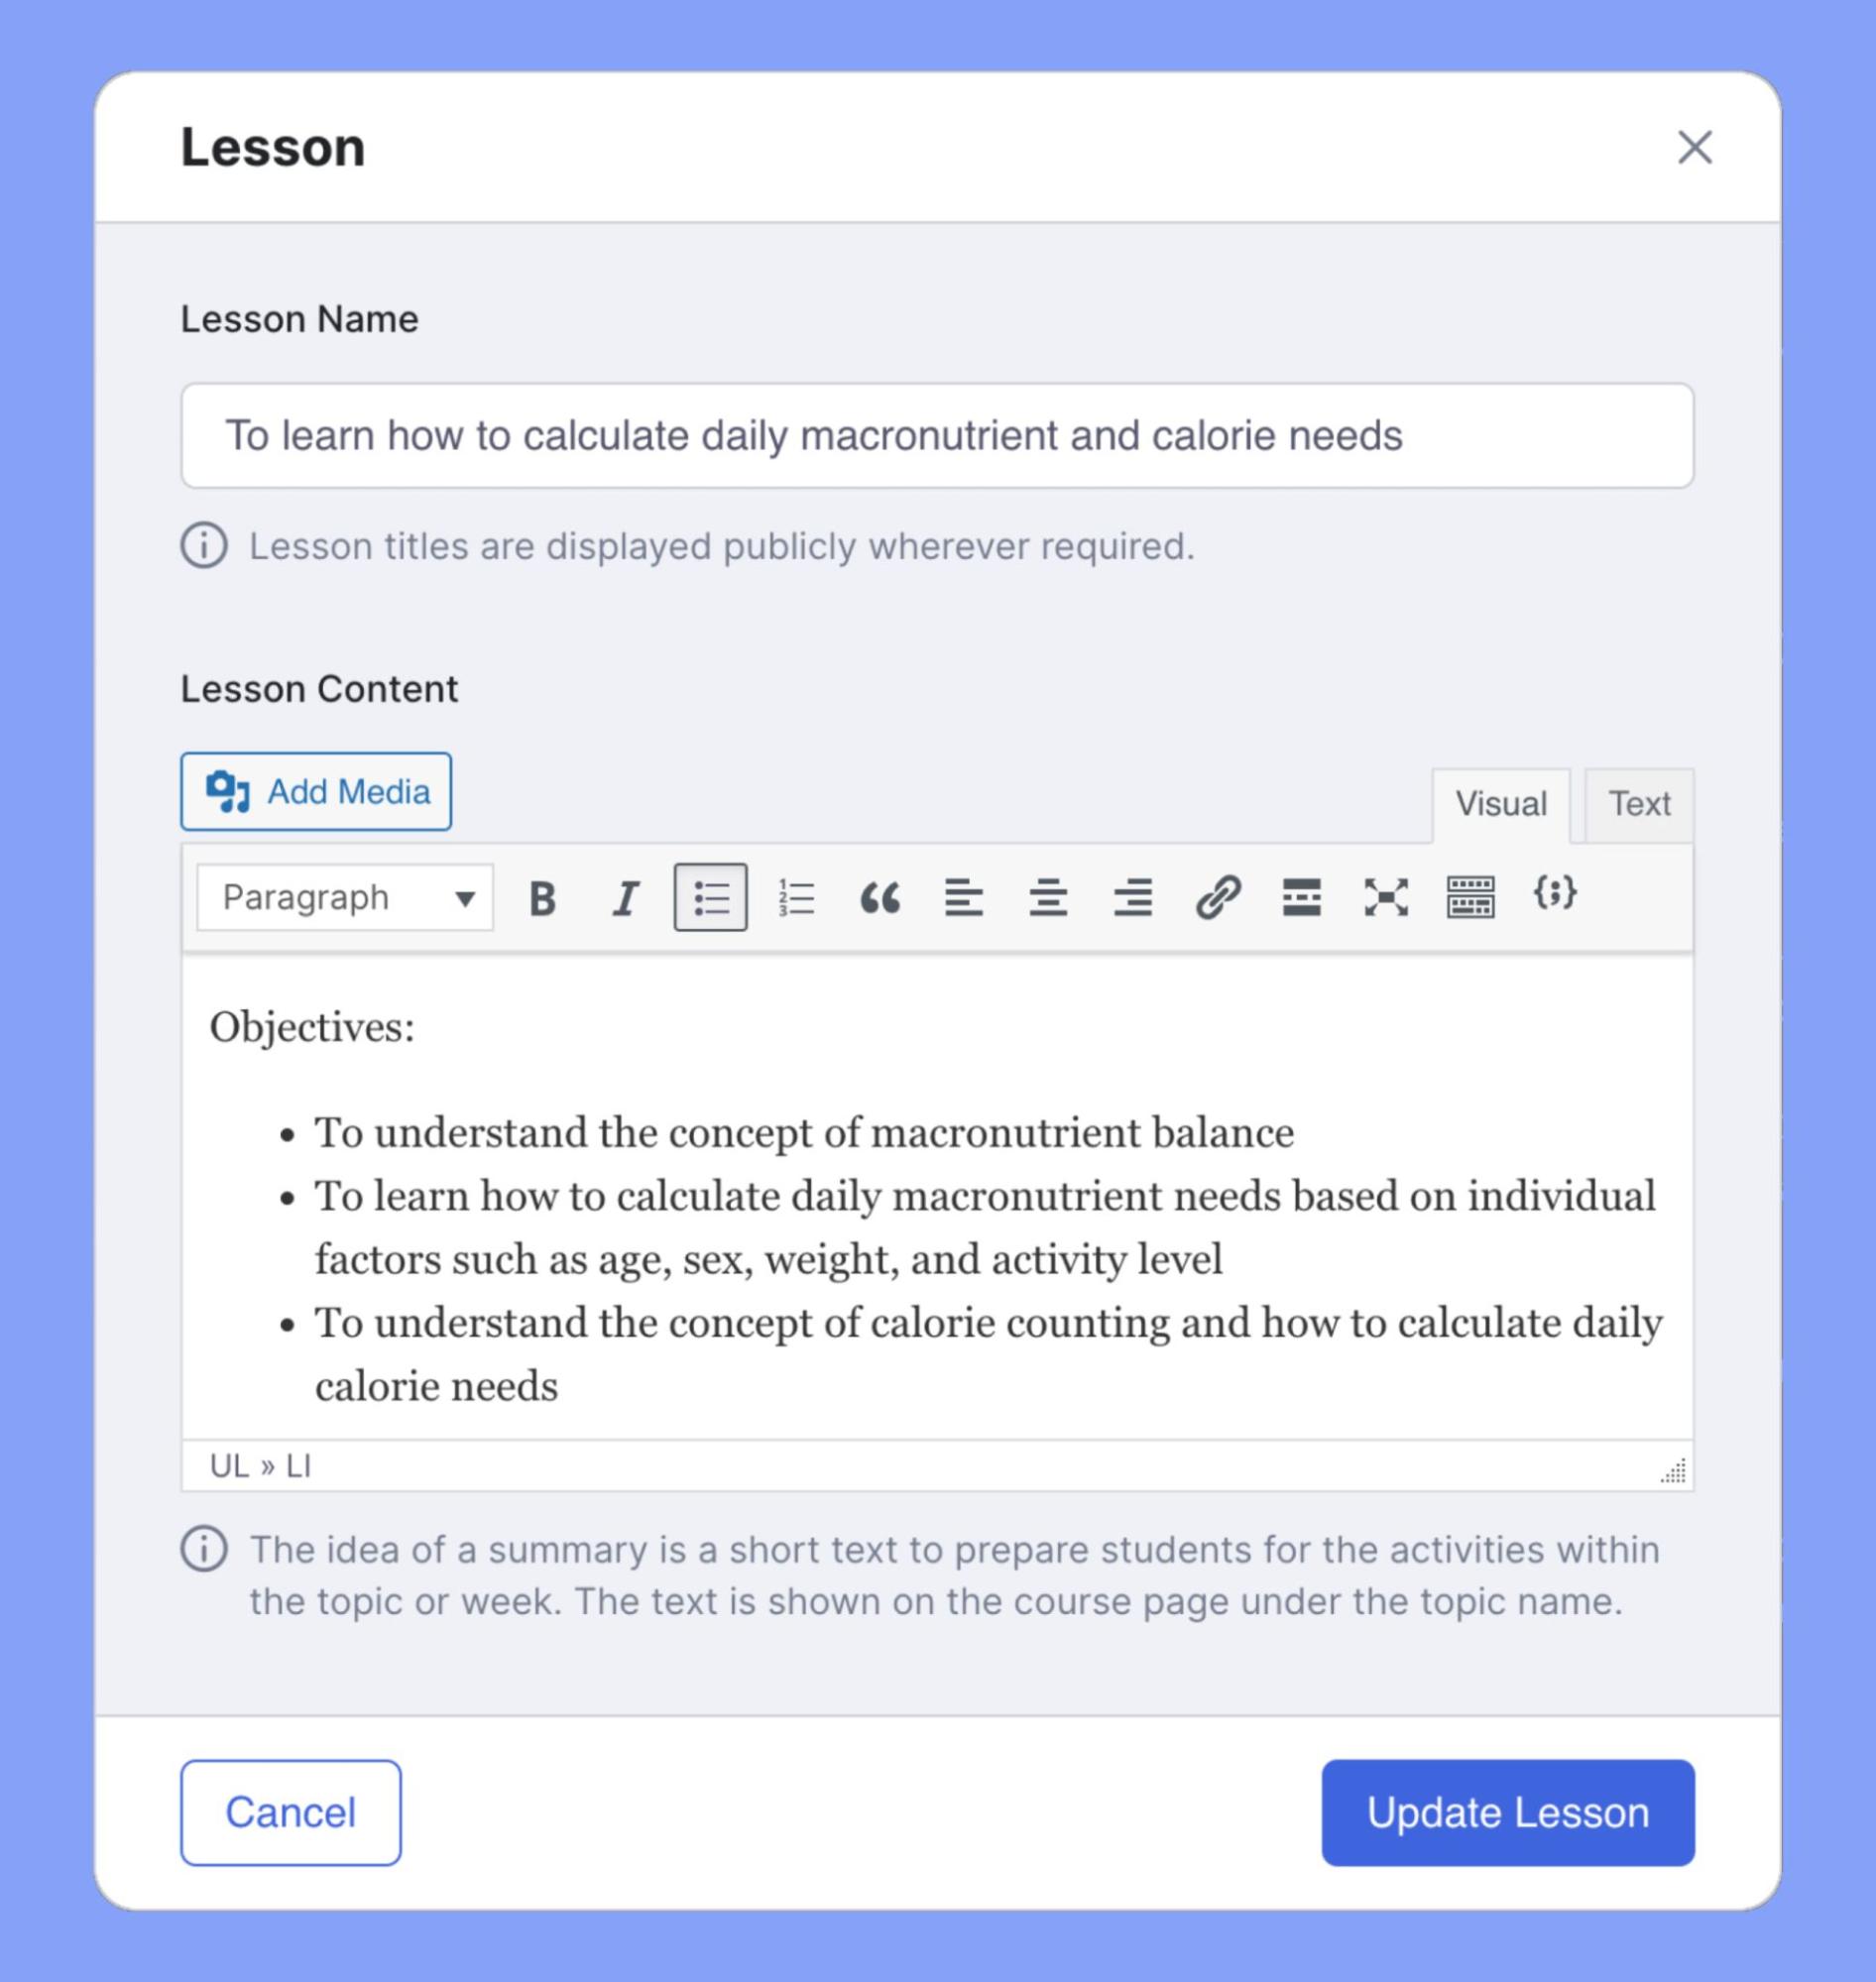
Enter your lesson title, description, featured image, lesson video, and attachments. Tutor LMS Pro comes with the course preview addon that lets you keep certain lessons unlocked for free. Tick “Enable Course Preview” for the lessons you want to use as your course previews.
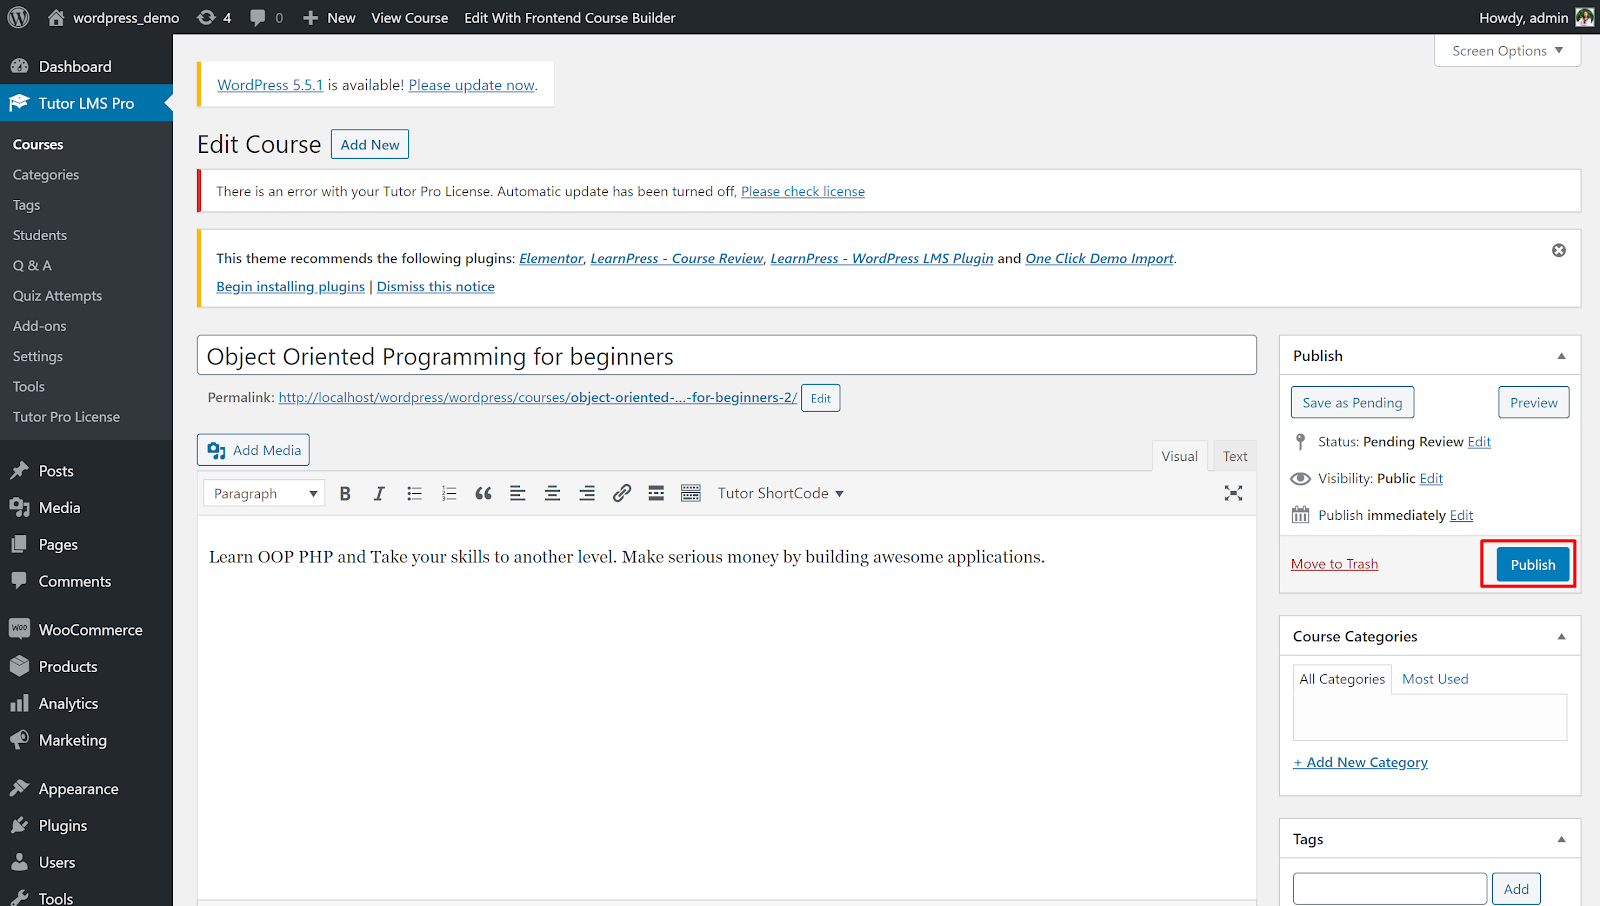
Publish the Course:
If you add courses from the front-end course builder, the status of the course will be automatically set to pending. To publish the course we need to approve it for publishing from the back-end admin panel.
Backend Course Builder
To add new courses with the backend course builder, simply navigate to WordPress admin panel > Tutor LMS > Courses > Add New and this will take you to the course builder page.
Every feature that you have seen on the front-end builder is available on the backend too. Once you are done creating the course and adding the lessons and quizzes, simply hit the publish button.
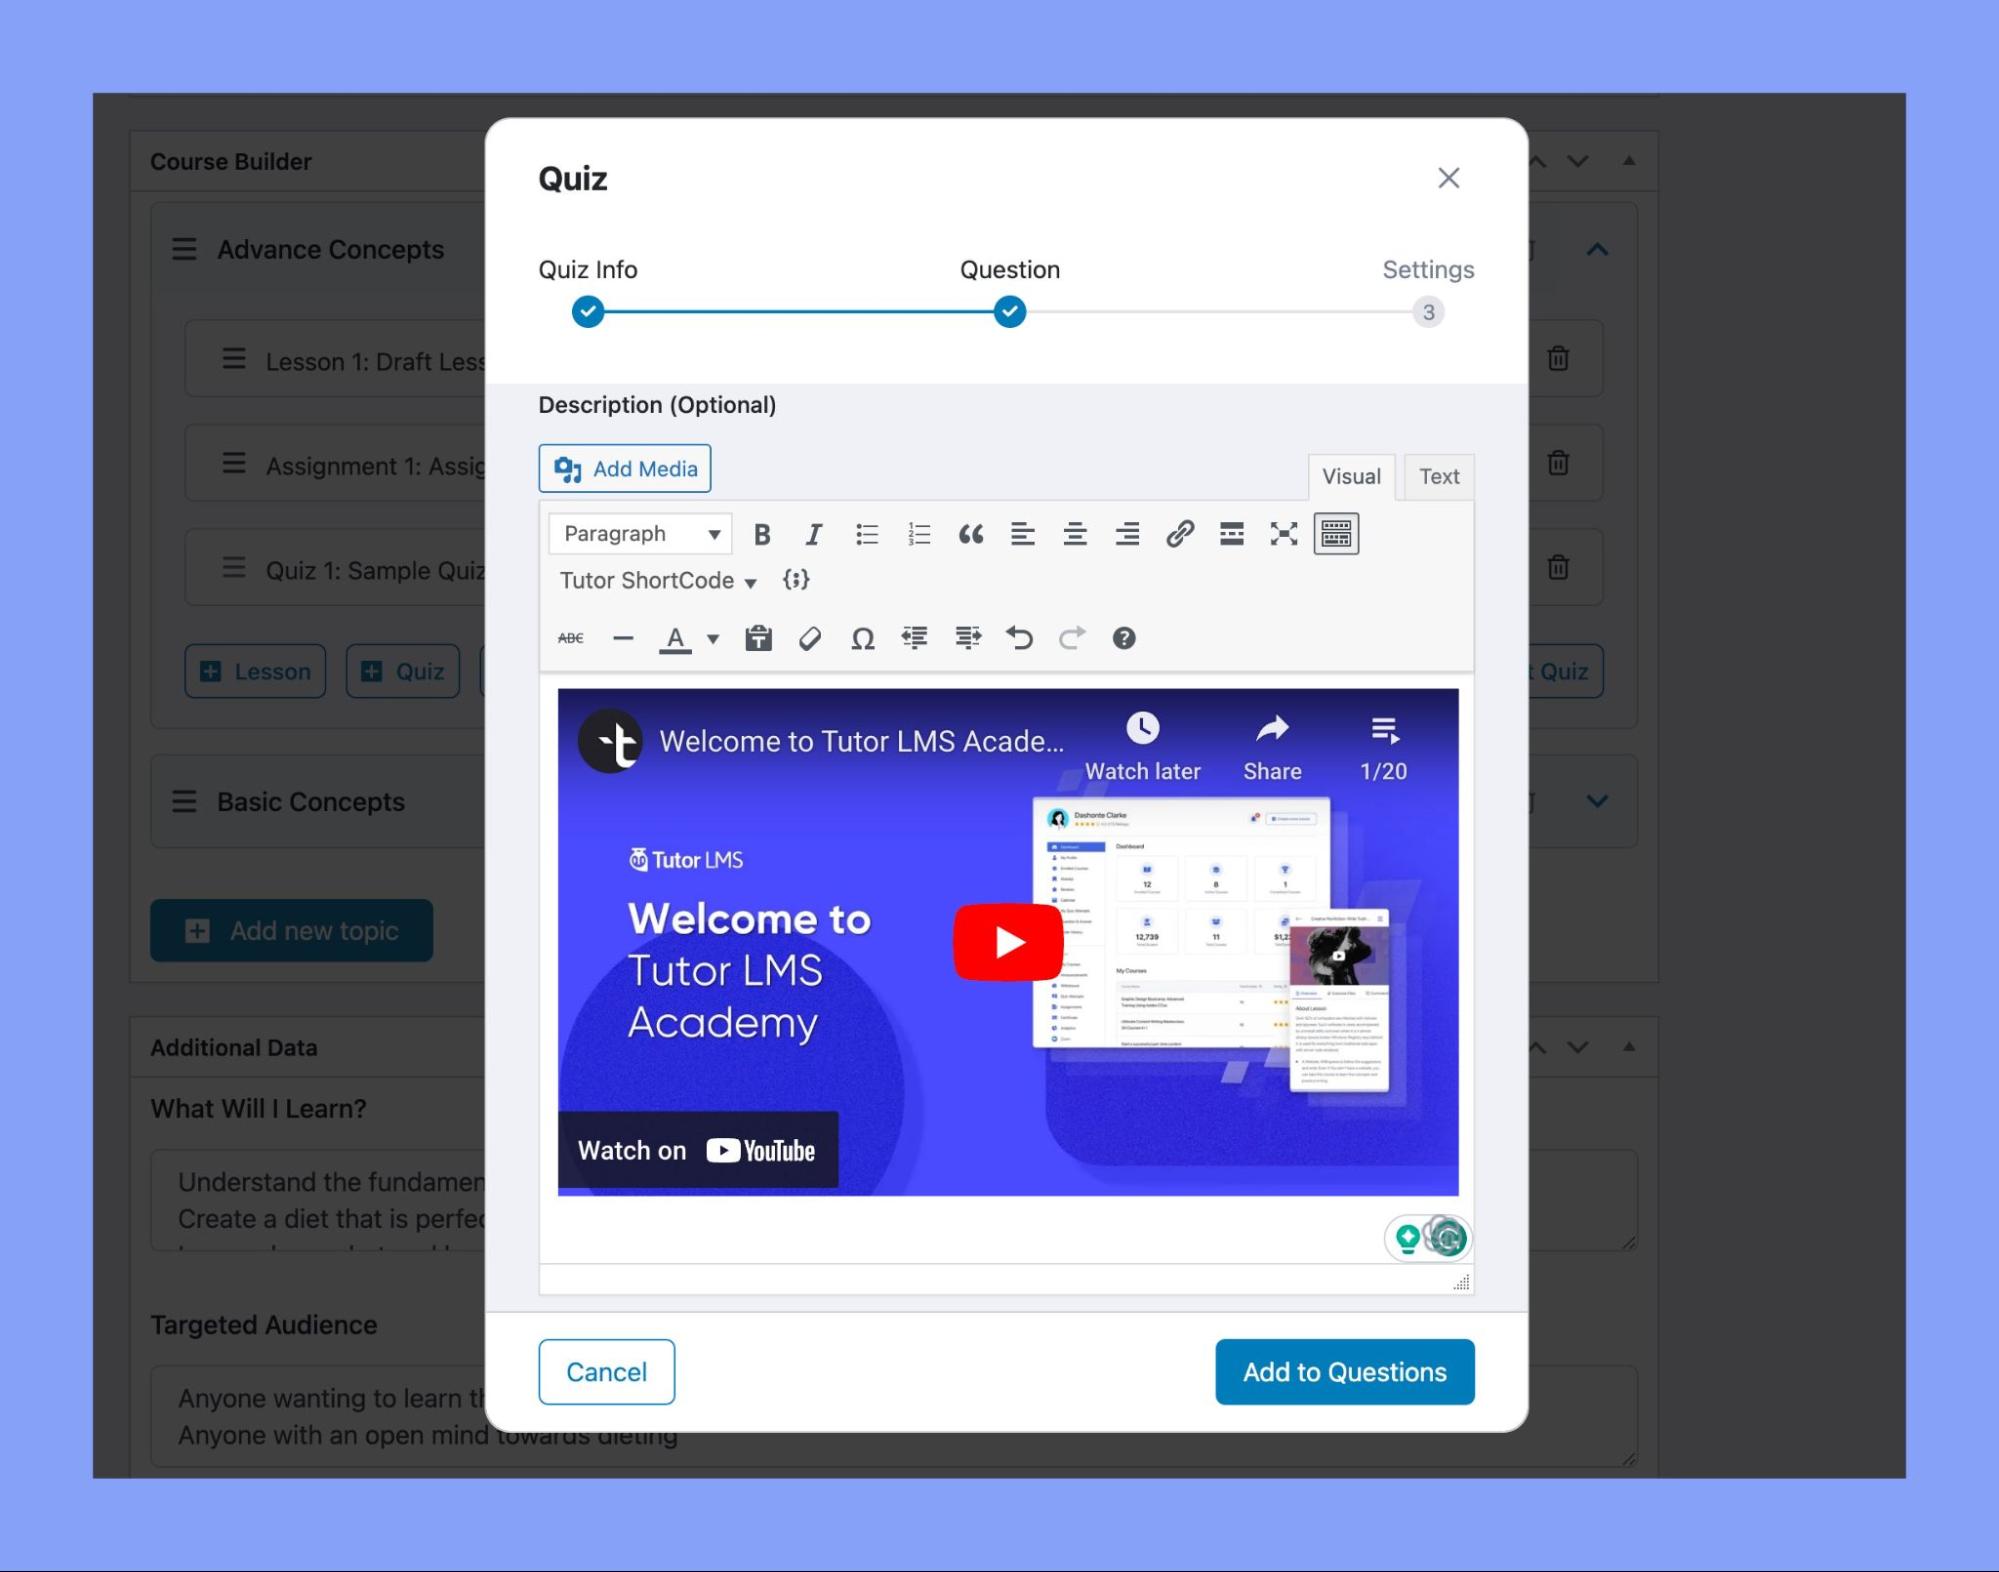
Create Quizzes with Tutor LMS
Quizzes are important to keep your students engaged, focused, and evaluate their performance. You can create quizzes the same way for both the front-end and back-end course builders. Below each topic, you will see an option for Quiz. Click on it and this will take you to the Quiz creation page.
Give your quiz a name, a description, and start adding questions and their answers.
Tutor LMS offers lots of unique question types so that you can create a versatile set of quizzes including Single Choice, Multiple Choice, True/False, Open-Ended questions, etc.
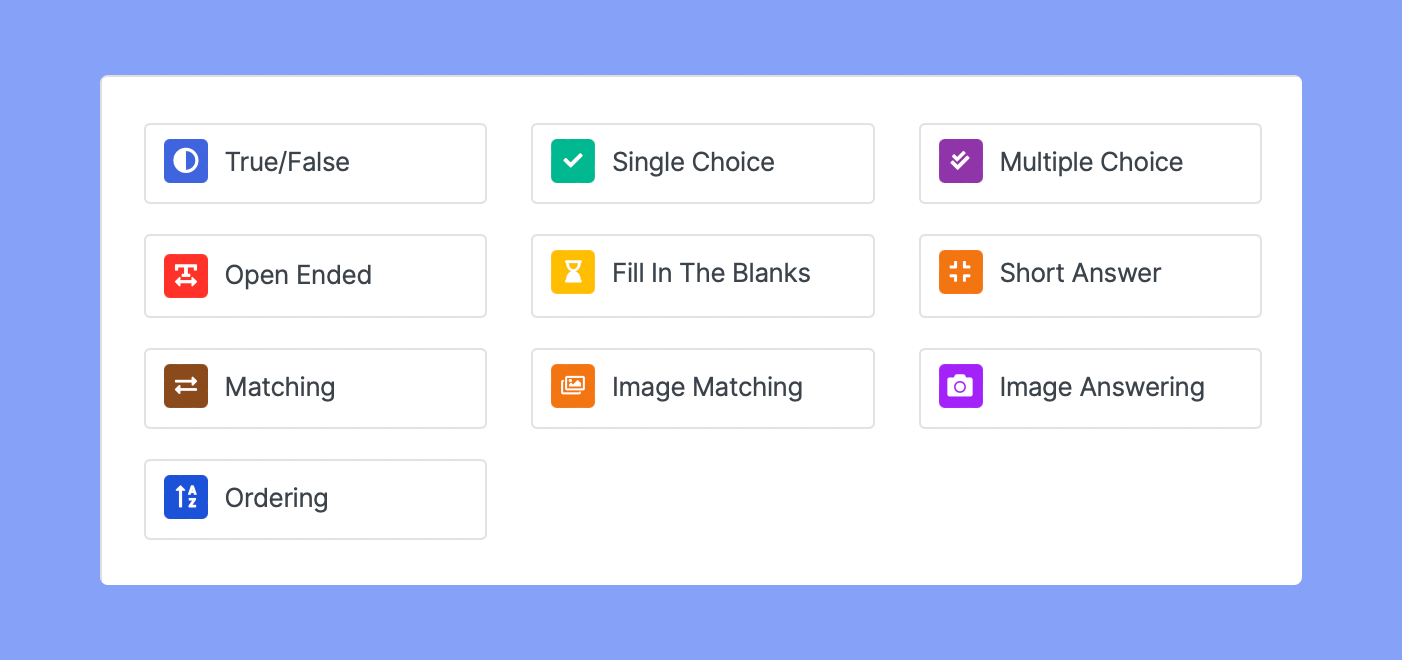
You can even set quiz timers, quiz attempts, a passing grade, and the results will auto-update to show the result status. For open-ended questions, the results will change as you grade them.
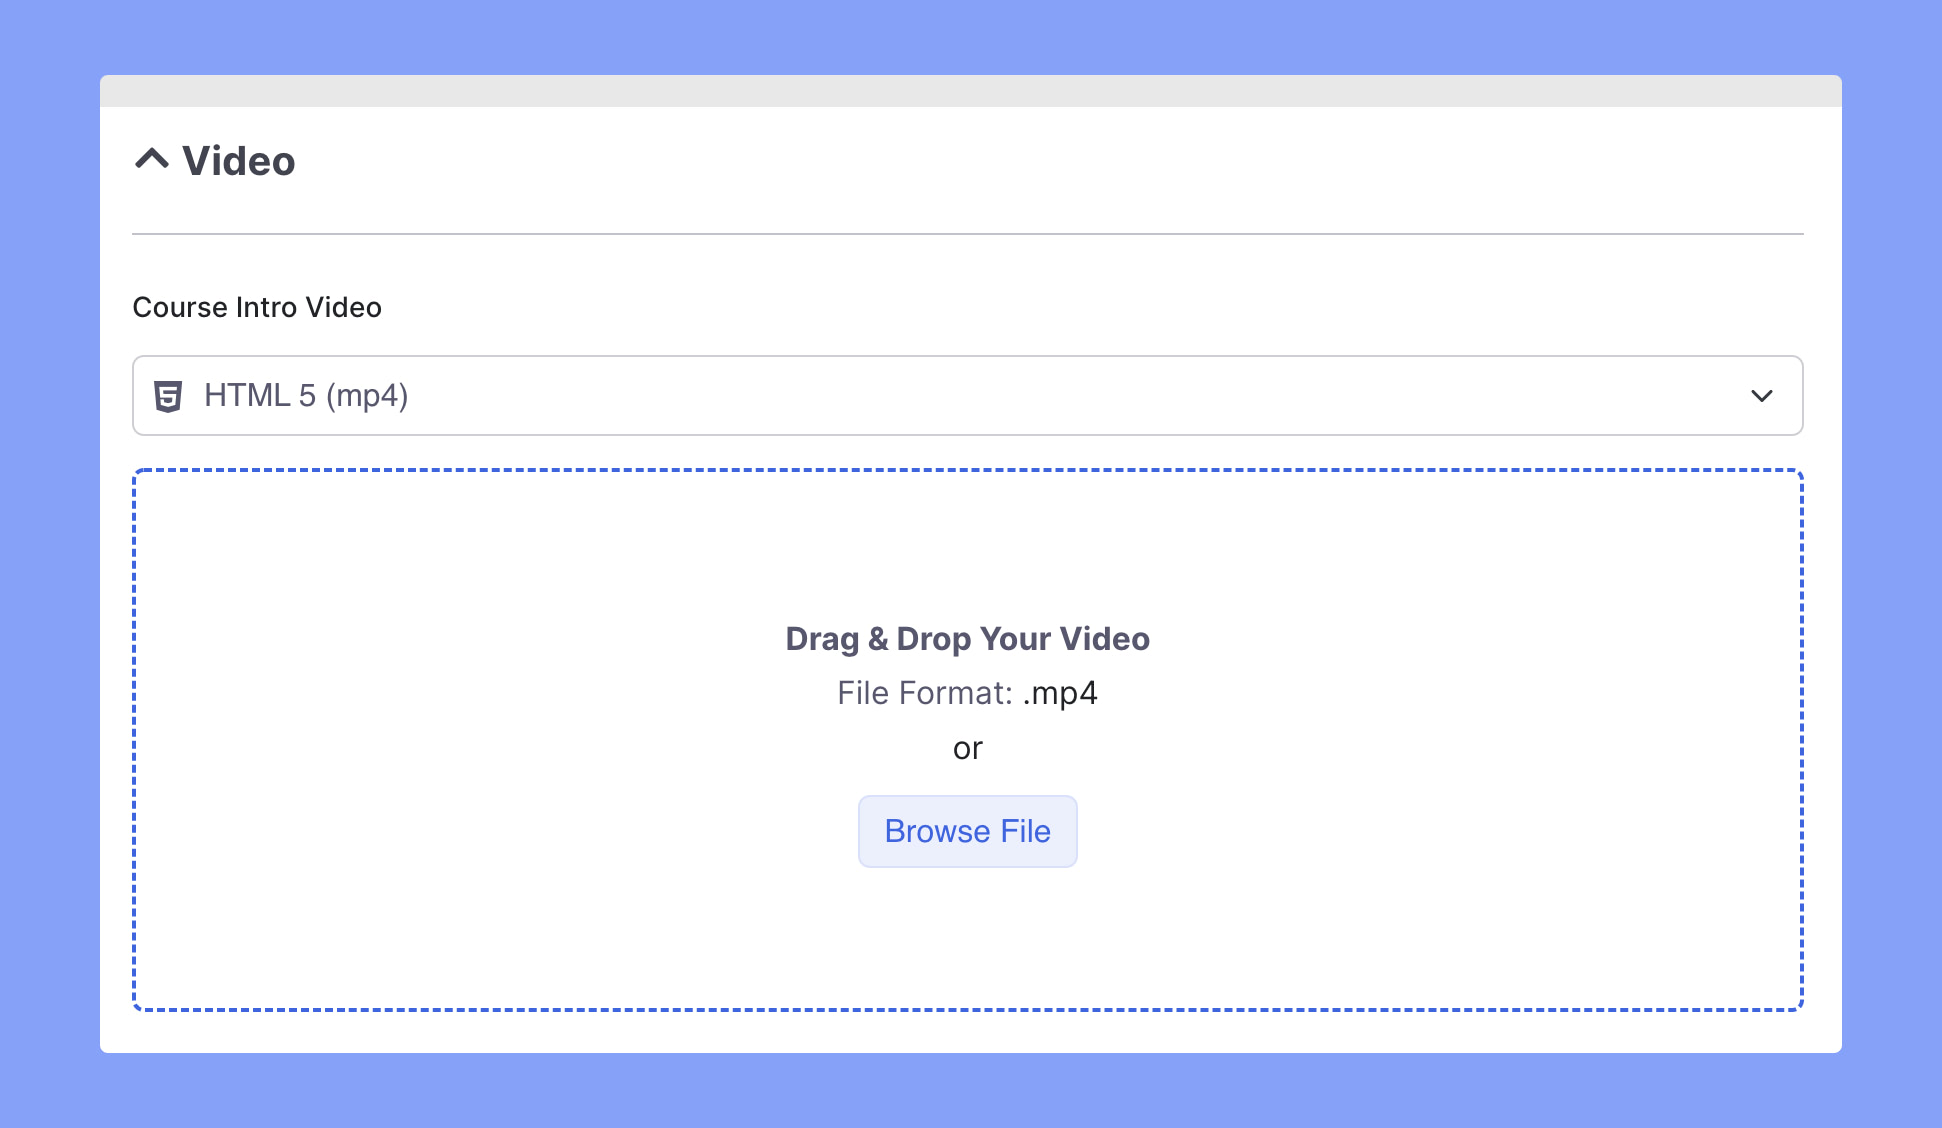
Step 6: Host Your Videos
Video content is an essential feature of online courses. With Tutor LMS you can add a source for your Course Intro Video and Video lessons. The best practice is to upload your videos on video hosting platforms and show them on your website powered by Tutor LMS. To know more about where you should host your course videos, refer to our article HERE.
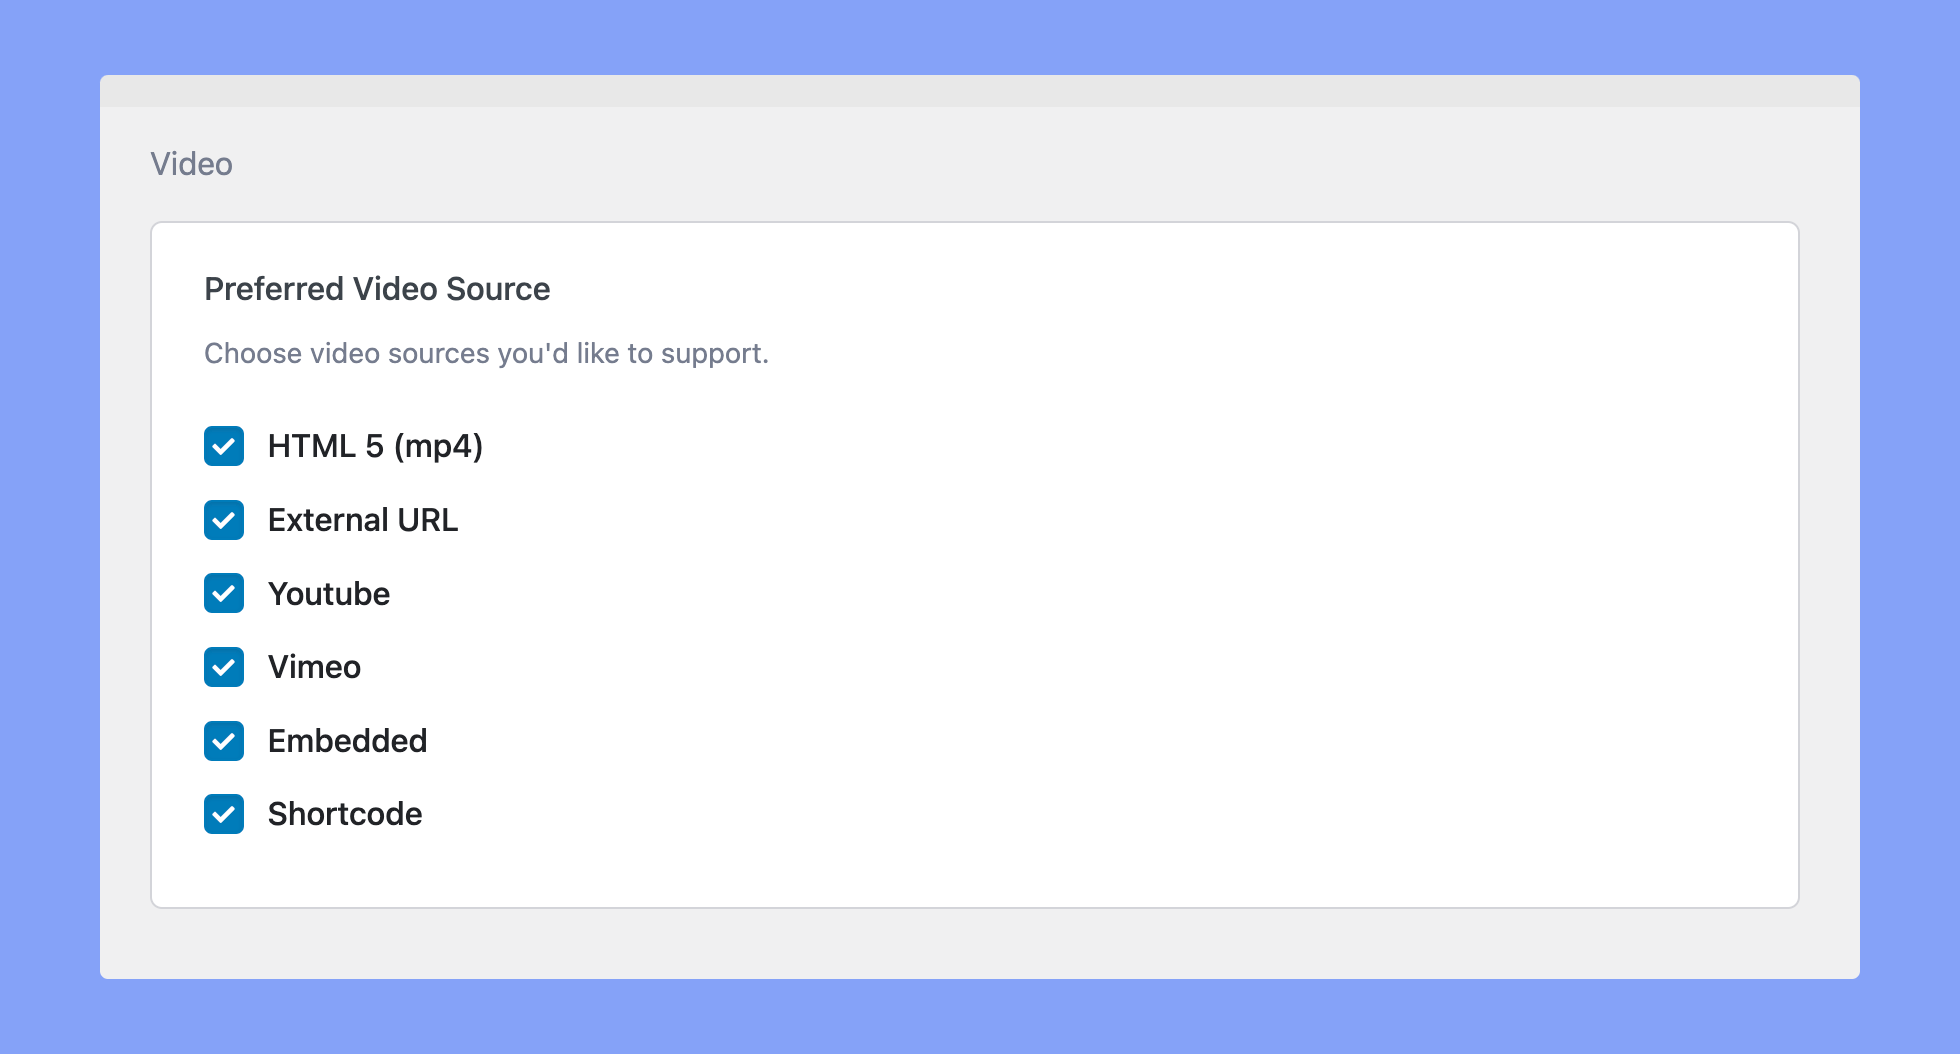
Tutor LMS gives you the option to add videos through:
- HTML5
- External URL
- YouTube
- Vimeo
- Embedded
Using HTML5 will upload the videos to your WordPress media library and is not recommended as it will use your bandwidth. If your video contents are not premium, YouTube is a great option for you.
Other useful options are External URL and Embedded, if your videos are hosted on other video hosting platforms. You can use direct MP4 links on the External URL option or get an embed code for your video and use the Embedded option. Make sure your video is on the mp4 format and the Share Setting is Public.
Before proceeding, make sure to select your preferred video source(s) from the Tutor LMS Settings > Course section. If this step is not completed, the video sources will not be available in the dropdown list.
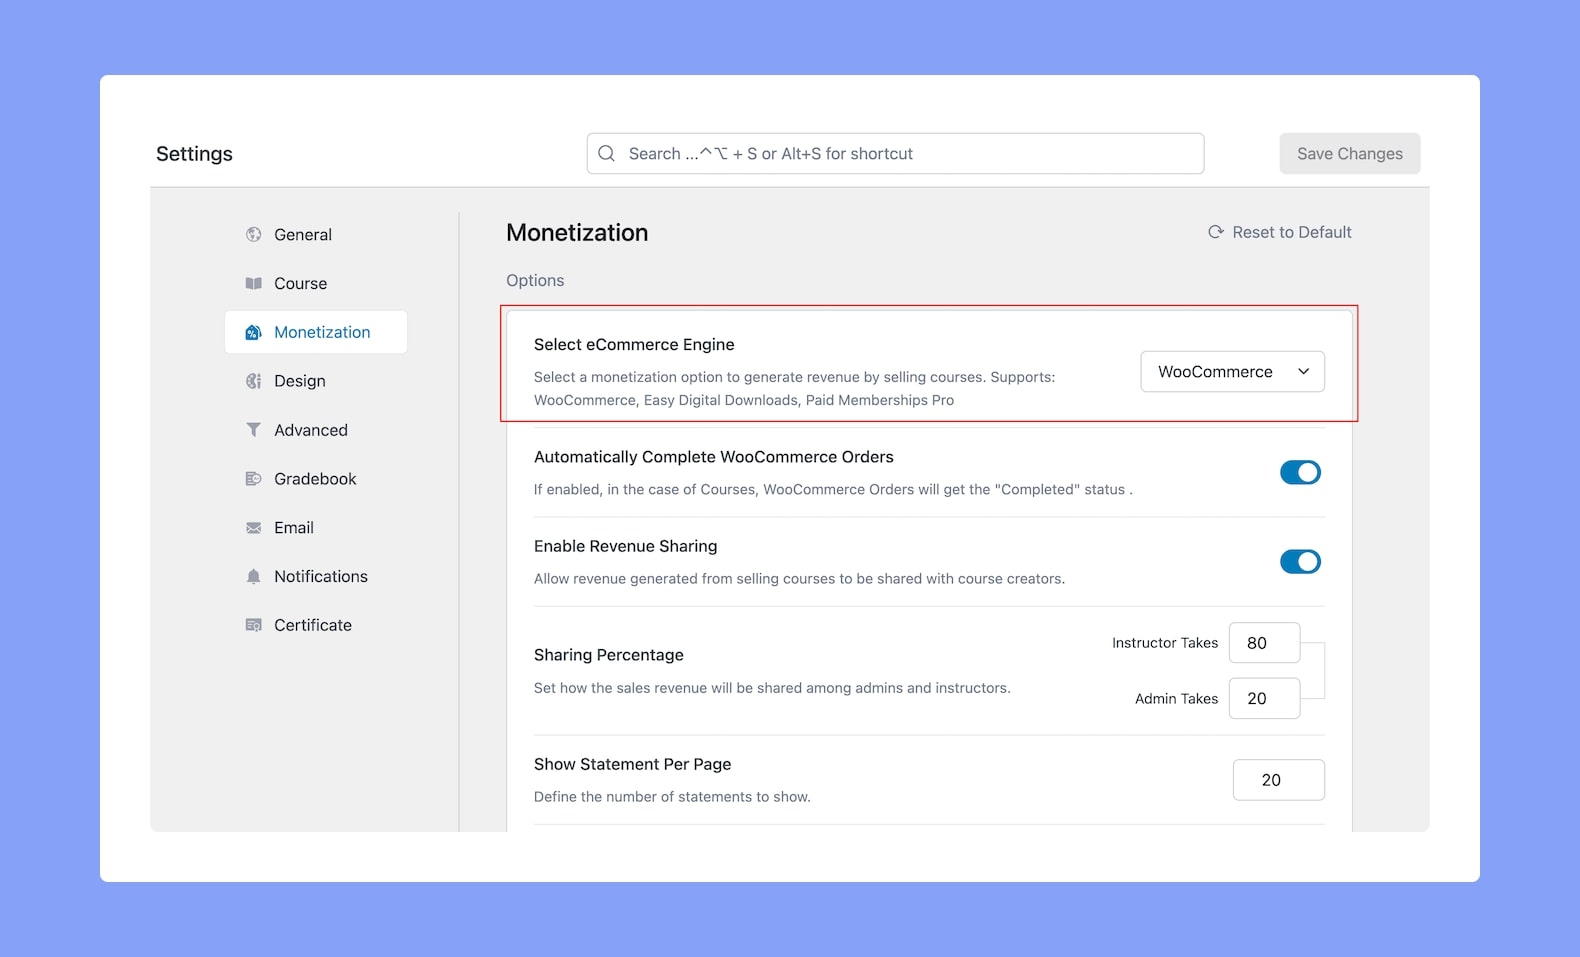
Step 7: Monetization and WooCommerce Integration
To make your courses premium, you will need a monetization system. WordPress has a ton of monetization options available to its users and some of the most popular ones are WooCommerce and Easy Digital Downloads.
For this tutorial, we will use WooCommerce not only for its ease of use but also for the fact it’s free and works with the free Tutor LMS version as well.
Step 1: Go to the WordPress admin panel and then navigate to Plugins > Add New. Then search for WooCommerce, install and activate it.
Step 2: From the dashboard go to Tutor LMS Pro > Tutor Settings > Monetization and set the monetization option to WooCommerce.
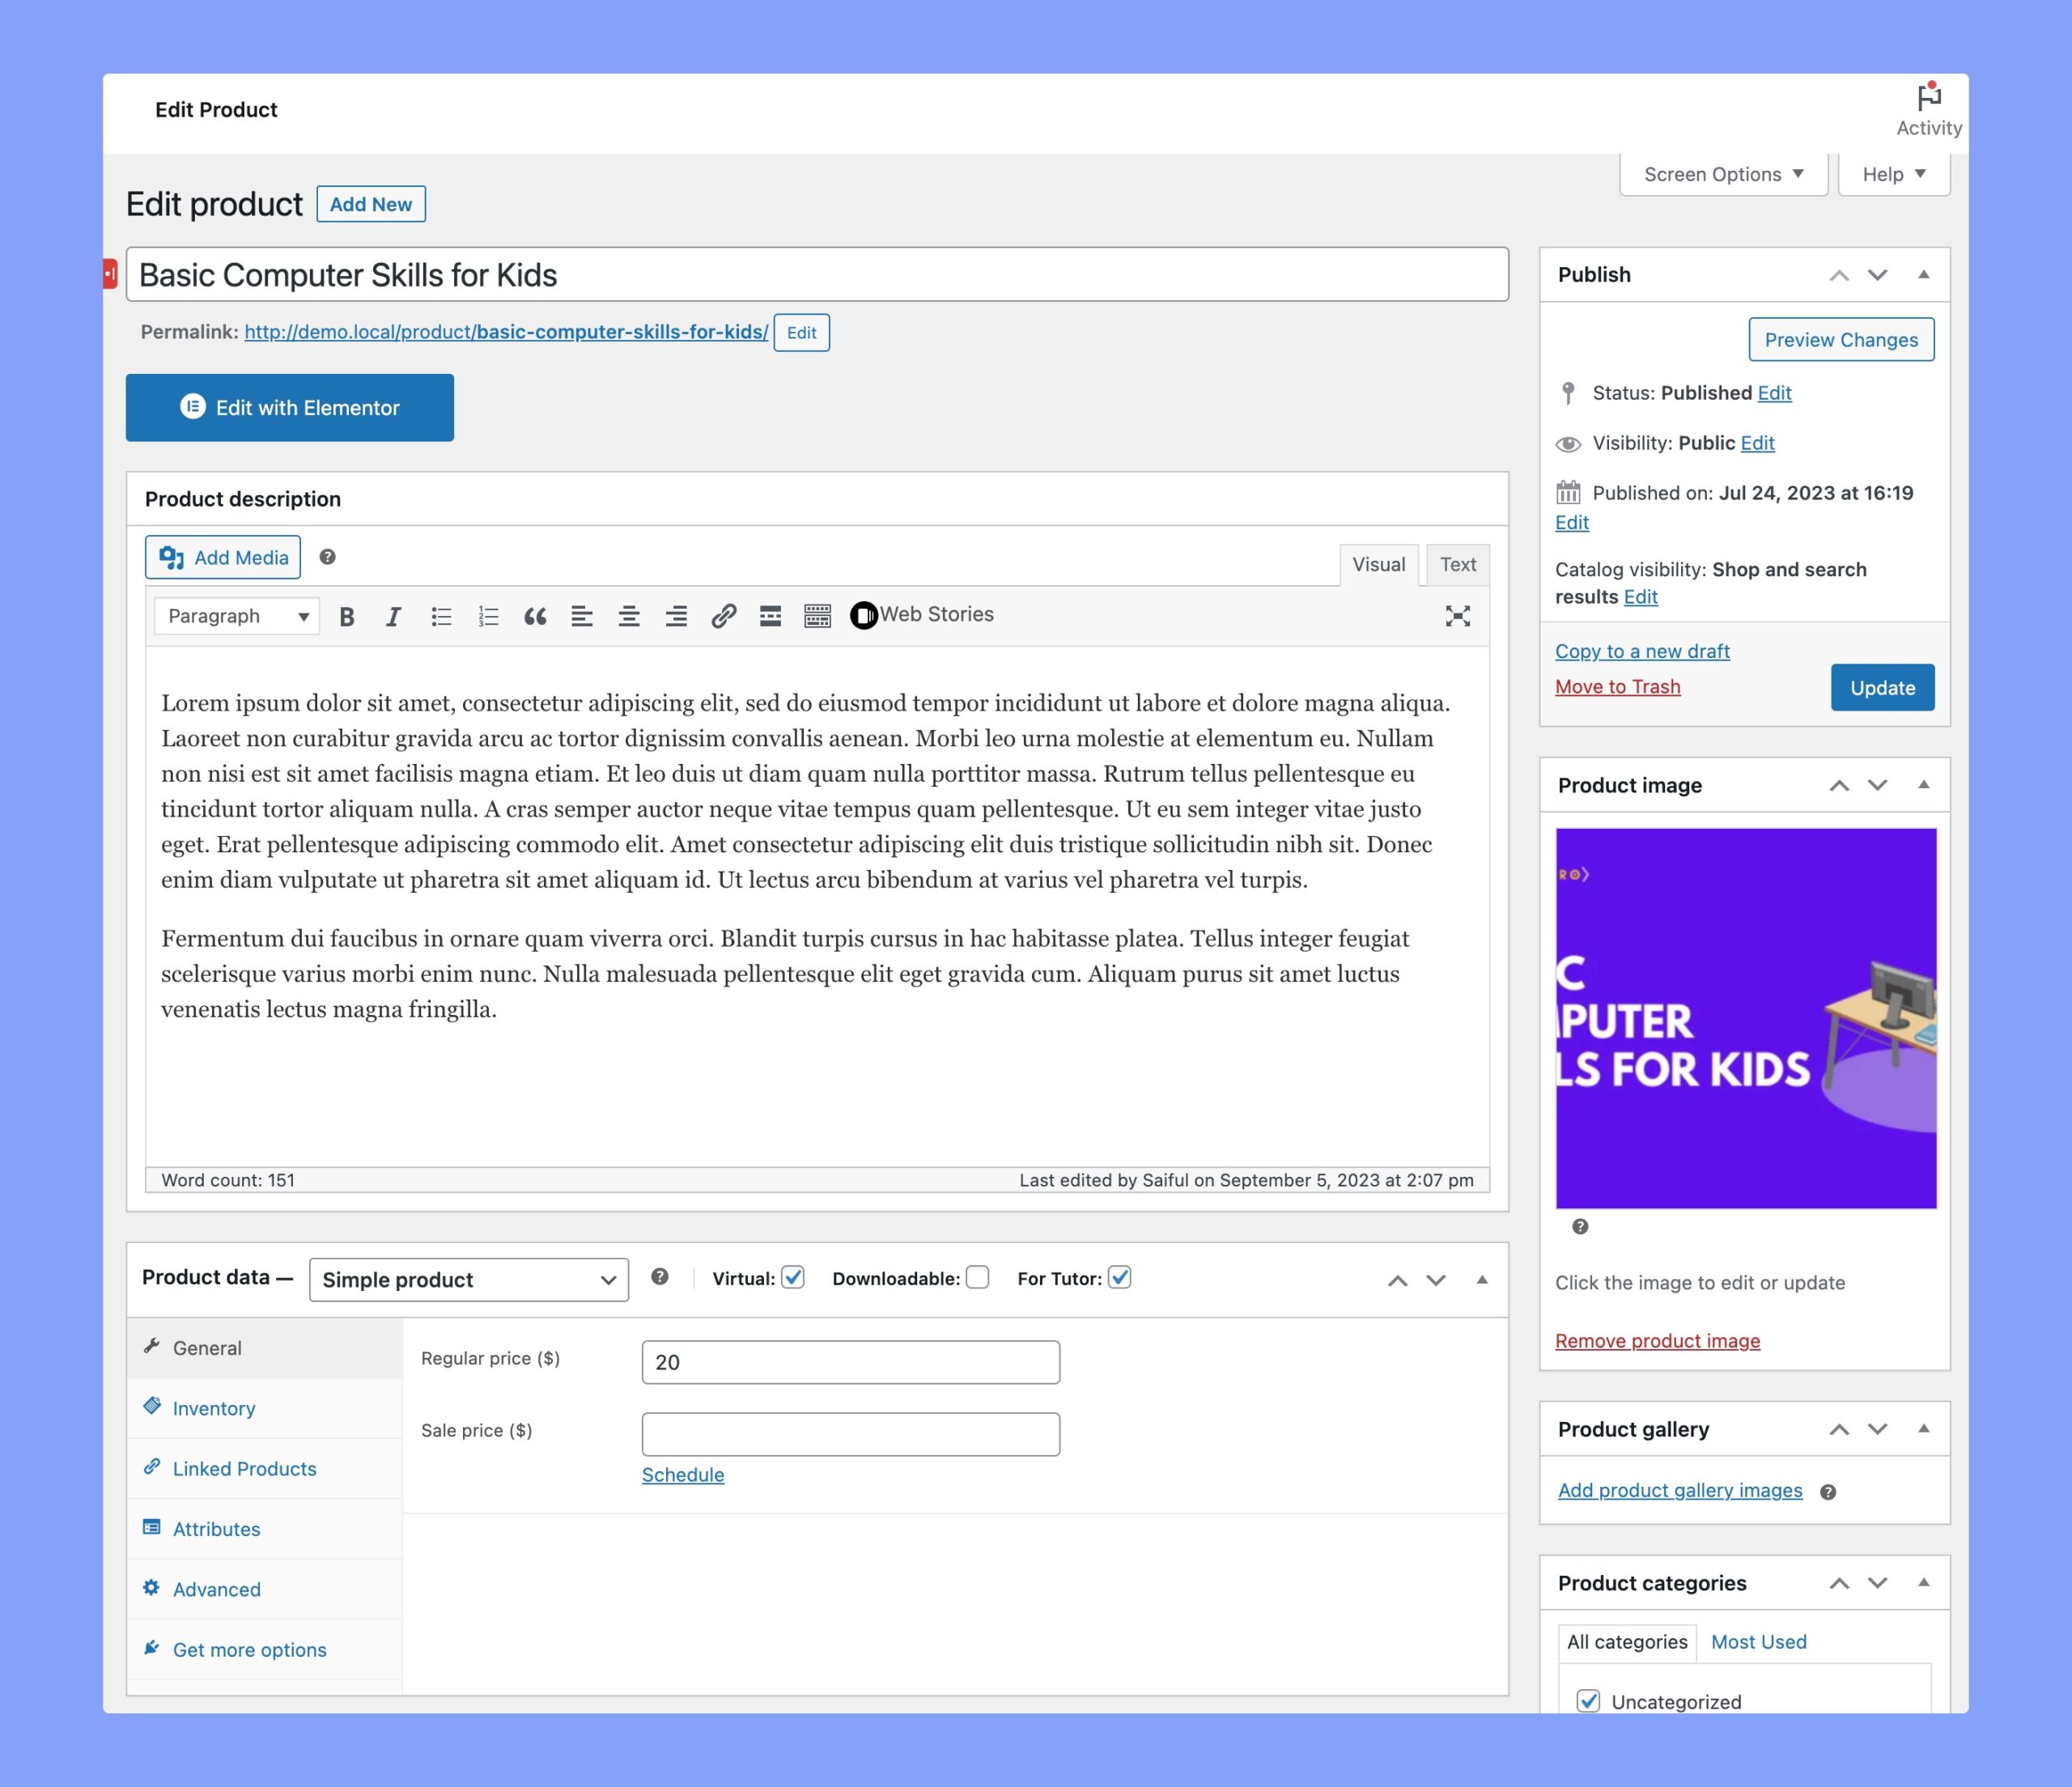
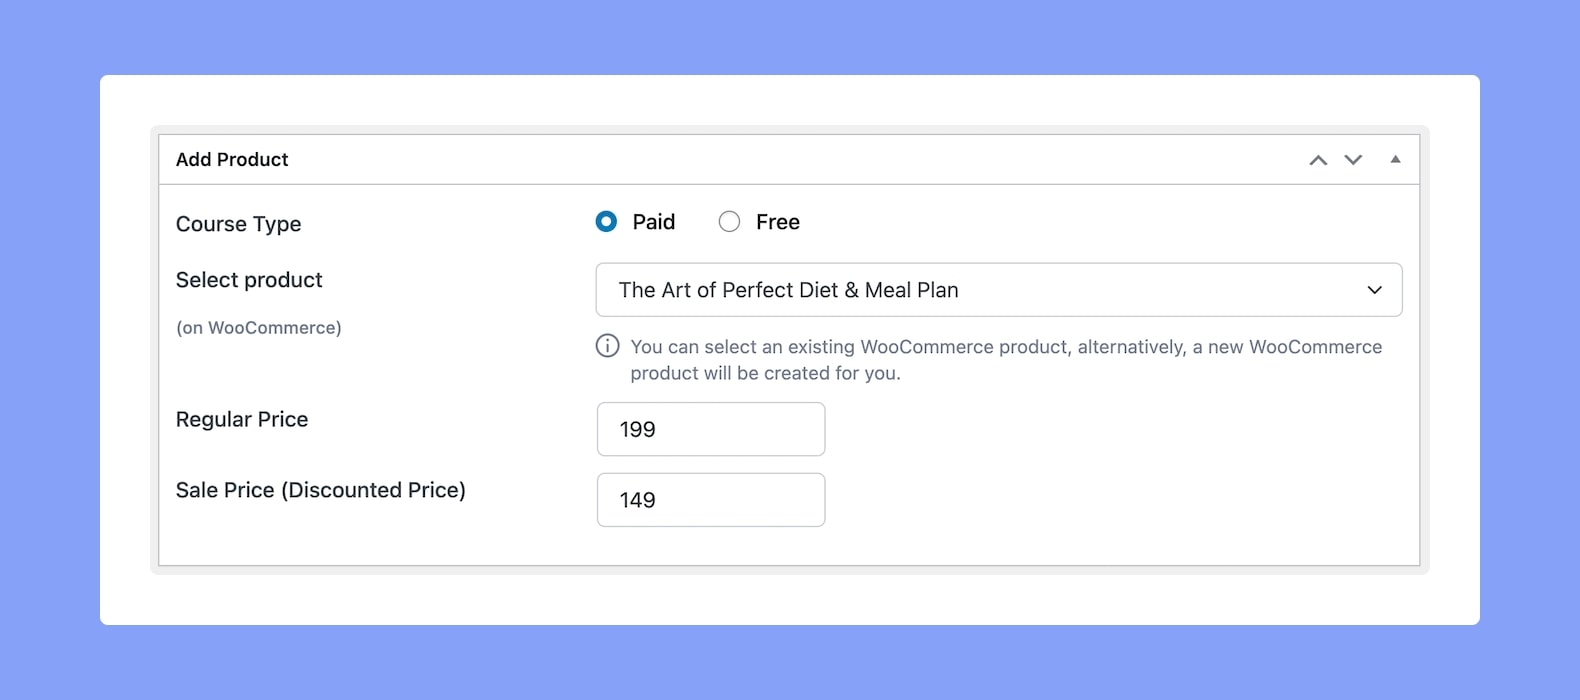
Step 3: Before you can make your course premium, you first need to add a WooCommerce product. Navigate to Products > Add New. You can now create a new product by giving it a name, description, and price. Make sure to tick the For Tutor checkbox so that you can sell a specific course via this product.
Step 4: Now from the backend, select the course you want to make premium and click on the Edit Course button. When you Scroll down, you’ll now see an option called Add Product. From the Select Product dropdown, select the product you just created and set the Course Type to paid.
And you’re done with the monetization process. This is how you can start selling courses with Tutor LMS and WooCommerce integration.
Step 8: Use the Tutor LMS Add-ons to Stand Out
Tutor LMS Pro has a handful of add-ons to add advanced features to your eLearning website. From certification, course performance report, grade book, content drip, and many more, it gives you the freedom to craft a full-fledged eLearning platform.
To access the add-ons, go to your WordPress Dashboard > Tutor LMS Pro > Add-ons. Enable your required add-ons and enjoy the premium functionalities!
Step 9: Promote Your eLearning Courses
Congratulations! You’ve already won half the battle. Now, the other half of the battle is to make sure your courses end up reaching those who can truly benefit from them.
Here are some of the marketing tips to keep in mind to promote your online courses:
- Identify your target audience
- Create value for your online courses
- Advertise your courses as time and cost-effective
- Offer sneak peeks and course previews
- Use social media and newsletters to stay in the loop
- Involve influencers, bloggers, and affiliates from a similar niche to promote your courses
Learn how to utilize content marketing to promote eLearning courses HERE.
Wrapping Up
That’s it! That’s how easy it is to create an LMS website on WordPress with Tutor LMS. If you have been delaying getting your eLearning course site up because of the technical hassles, this is a perfect time and opportunity to get started. What’s even more amazing is with the latest update, Tutor LMS has announced Zoom and Google Classroom integration and REST API support.
Now you can easily manage, schedule, and hold online live classes too. Hopefully, this article has covered all the bits and pieces of creating an eLearning platform. For any queries, feel free to leave us a comment. We’d be glad to lend you a helping hand. Good luck!